Developer Manual
This section of the online help is intended for developers.
The platform uses the Voxel Farm Cloud solution for storage, processing and rendering of spatial data. For this reason, many of the APIs to interact with the platform are provided by Voxel Farm and will be under the "VoxelFarm" namespace.
The platform offers a set of APIs for developers to extend the platform's functionality. There are two main types of APIs: server-side and client-side.
Server-side APIs allow to run custom code that performs spatial tasks in a massively parallel fashion. The code is supplied by the developer as a Program entity, which runs within the context of the platform. In other cases, the programs define how different datasets will be combined together in a visualization. For more about Server-side programs, check out the Server-side Programs section of this guide.
Also server-side, the platform features a REST API which exposes the entity model of the platform. This allows to create new objects, start processing jobs like reports among other tasks. For more about the REST API, check out the REST Interface section of this guide.
Client-side APIs allow external applications or agents to interact with the platform. This may be streaming spatial data for rendering, consuiming volumetric data for local reports, export jobs, among other tasks. Fore more about client-side APIs, please check the following sections:
- REST Interface - Entity Model
- Introduction
- Shared Properties
- Entity-specific Properties
- Spatial Properties
- Extended Block Model Metadata
- Extended Drill Hole Metadata
- Extended Voxelized Mesh Metadata
- Extended Geo-chemical Metadata
- REST Interface - Working with Projects and Entities
- Getting all Project Entities
- Getting an Entity
- Requesting a new ID
- Creating a Project
- Creating an Entity
- Updating an Entity
- Deleting Entities
- Getting Entity Files
- Uploading Entity Files
- Uploading large files
- Retrieving Processing Log Files
- Adding versions to Workflow Products
- Rest Interface - Advanced REST calls
- Triggering Jobs
- Triggering Reports
- Triggering Export Jobs
- Getting Program Inputs
- Validating a Program
- Creating Views
- Adding Users to Projects
- Python - API Setup
- Python - Data Ingestion
- Upload Point Cloud
- Create Indexed Point Cloud
- Create Voxel Terrain from Point Cloud
- Upload Mesh Set
- Process Mesh Set
- Create Voxel Terrain from Mesh
- Upload Block Model
- Process Block Model
- Python - Report Lambdas
- Report Lambda Cheatset
- Define Report Program
- Run Report Program
- Read Report Results
- Initialize Report Lambda
- Read inputs of Report Lambda
- Volumetric Booleans in Report
- Load and Write Pandas
- Python - Process Lambdas
- Run Process Lambda
- Read Process Results
- Initialize Process Lambda
- Read inputs of Process Lambda
- Downloading files in Process Lambda
- Getting temp folder in Process Lambda
- Attach file to Process Lambda
- Log from Process Lambda
- Set exit code for Process Lambda
- Python - Workflow Interface
- Create Version from Blob Upload
- Workflow Definition
- Read a Product property
- Read parameters as DataFrame
- Search Time Series
- Get Time Series Data
- Create Report
- Create View
- Serverless Programs - Python
- Serverless .Net Lambdas
- Submitting .Net Lambdas
- Writing Report Lambdas
- IVoxelFarmReportLambda
- IVoxelFarmReportLambdaHost
- IVoxelFarmReportDoneLambdaHost
- Report Lambda Examples
- Embed Viewer
- C# Client Library
- Introduction
- Threading Model
- Coordinate Systems
- Spatial Indexing
- Creating a View
- View Configuration
- Using Views for Rendering
- Using Views for Data Retrieval
- Example - Mesh Export
- Unity3D Client
- Material Tracking API
REST Interface - Entity Model
Introduction
A Voxel Farm project is a collection of entities. Each entity is a collection of key-value pairs. Both key and value are strings. These pairs will be called “properties” in this document.
Each entity will have a special property “ID” which uniquely identifies the entity. This ID is often used in REST calls to identify the entity.
Entities also have a “name” property. This is a readable name that will be used in the UI for users to identify the entity.
Another special property, “type” describes the type of entity. The entity type can be one of these:
|
“PROJECT” |
Specifies the entity is a Voxel Farm project. A project entity can contain other entities. |
|
“FILE” |
An entity that contains data, either data that was imported into the system or that was produced by the system |
|
“REGION” |
A special type of entity that describes a 3D scope |
File entities can be placed inside Folder entities. The “file_folder” in the File entity property specifies the ID of the Folder that contains it.
Most entities in a project will be of “FILE” type, as these are the ones holding the source data and processed results. To differentiate them, the “file_type” property is used. These are the different file types that can appear in Voxel Farm projects:
|
“FOLDER” |
A special type of file entity inside a project that can contain other file entities. |
|
“RAWPC” |
A raw point could, that is, a point cloud that has been uploaded by users and remains in an unprocessed format. |
|
“IDXPC” |
A point cloud that has been processed by the system and inserted into a spatial index. |
|
“VOXSURF” |
A Voxel Terrain entity, usually derived from a heightmap or raw point cloud. |
|
“RAWHM” |
A raw raster set defining heights, also known as a heightmap. |
|
“RAWBM” |
A raw Block Model, typically stores a CVS file and column metadata for the block model |
|
“RAWMESH” |
A raw mesh object. |
|
“IDXMESH” |
A mesh that has been processed and indexed into the project. |
|
"VOXMESH" |
A voxelized mesh set with attributes |
|
“VOXBM” |
A voxelized Block Model. This is the output of processing a “RAWBM” entity. |
|
“RAWDH” |
A raw drill hole dataset. |
|
"IDXDH" |
An indexed drill hole dataset. |
|
“ORTHO” |
A raw imagery raster set, typically used to apply ortho imagery to terrains. Includes images and world registration files. |
|
"IDXORTHO" |
An indexed imagery set. A single imagery set can supply different formats for the image, depending on what the clients can read. |
|
“PROGRAM” |
An entity that stores a Python program for a custom report, view or spatial object. |
|
“VOXGEN” |
An entity that generates volumetric content on-the-fly using a Python program that runs on the servers. |
|
“VOXOP” |
A real-time terrain operation layer. |
|
“VIEW” |
Describes a view in the project. A view is a mashup of different entities and viewing options used for rendering |
|
“REPORT” |
An entity that describes a report |
|
“EXPORT” |
An entity that holds data that can be downloaded out of the system. |
|
“UNITY” |
An entity that contains a Unity project already preconfigured for this Voxel Farm project |
|
“VOXMT” |
A Material Tracking Layer. See the Material Tracking API for additional REST calls available for this entity type. |
|
"VOXPC" |
A voxelized point cloud. This entity produces a volumetric model out of a set of spherical point cloud capture sets. |
|
"RAWGEOCHEM" |
A raw Geo-chemical samples dataset |
|
"GEOCHEM" |
A processed Geo-chemical samples dataset. |
Shared Properties
The following properties are found in most entities:
|
ID |
Contains the unique identifier for the entity. This property is used to index all entities. |
|
name |
Contains the readable name of the entity. |
|
description |
Contains a textual description of the entity. |
|
type |
Contains a type identifier for the entity. These are the types currently supported:
|
|
project |
Contains the unique identifier for the project that contains the entity. For project entities, this property must have the same value as the “ID” property. |
|
state |
Defines the current state of the entity. It can be one of these values: “COMPLETE”, “PARTIAL” and “ERROR”. |
|
partial_progress |
If the “state” property is set to “PARTIAL”, this property may contain a percentage indicator for the current stage of processing. |
|
partial_status |
If the “state” property is set to “PARTIAL”, this property may contain a readable sentence that describes the current stage of processing. |
|
error_info |
If the “state” property is set to “ERROR”, this property may contain additional information about the error. This property contains a Base64 string. |
|
file_type |
If the “type” property is set to “FILE”, this property contains a more specific type for the entity. The following subsections are dedicated to these types. |
|
file_size |
If the “type” property is set to “FILE”, this property contains the size of the entity’s data in bytes. |
|
file_folder |
If the “type” property is set to “FILE”, this property contains the ID of the folder that contains the entity. The special value “0” means the entity is in the root folder of the project. |
|
virtual |
Can be set to "1" or "0". If set to "1", this signals the application that this entity should be hidden in the User Interface. This property is used in entities that are building blocks for a larger entity. |
Entity-specific Properties
File VIEW
Defines a View entity. Views store a pre-configured way of viewing multiple datasets. This type of entity will have these additional properties:
|
view_type |
Specifies the type of view. A view that contains children, should have its "view_type" property set to "container", and should include a property named "entity_container" which lists the view children. If the view is not a container, its "view_type" must be set to the ID of a View Program entity. Please review the View Programs section for more information on these programs. |
|
entity_container |
Used only if the "view_type" property is set to "container". This property contains the list of children views for the view entity. This property is made by concatenating the IDs of the children views separated by spaces. |
|
input_value_#id# |
Used only for views that use a View Program. Contains the value for the input. Replace the #id# placeholder by the actual id used by the input. Depending on the value specified for "input_type_#id#" (see types below in this table) the value will have a different interpretation: 0 – A numeric value, can have decimals 1 – A date-time, a 64bit integer value representing a timestamp. Typically a Linux epoch time. 2 – An alphanumeric value 3 – An identifier for an entity 4 – A list of attributes, separated by spaces 5 – Ignored, attribute query properties are listed below in this table. 6 – A Boolean value, "0" for False and "1" for True. 7 – Ignored, color legend properties are listed below in this table. 8 – Ignored, drill hole properties are listed below in this table. |
|
input_label_#id# |
Used only for views that use a View Program. Contains the label for the input. Replace the #id# placeholder by the actual id used by the input. |
|
input_type_#id# |
Used only for views that use a View Program. Specifies type of the input. Replace the #id# placeholder by the actual id used by the input. The possible input types are: 0 – Numeric 1 – Date 2 – String 3 – Entity 4 – Attribute Set 5 – Query Expression 6 – Boolean (Checkbox) 7 – Color Legend 8 – Drill-hole Settings |
|
input_filter_#id# |
Used only for views that use a View Program. Specifies the type of the input. Replace the #id# placeholder by the actual id used by the input. Must be non-zero for type 3 (Entity), contains a numeric value containing a binary mask identifying which types of entities can be potentially selected. Use binary OR to merge different types into a single mask. The values identifying each identity type are (in hexadecimal): 0x01 – Voxel Terrain 0x02 – Voxel Block Model 0x04 – Voxel Generator 0x08 – Realtime Voxel Terrain 0x10 – Indexed Point Cloud |
|
color_legend_mode |
Used only when an input of type "Color Legend" is included in the object. Defines which color model should be applied to the object view. Can have one of these two values:
|
|
color_legend_static_r |
Used only when an input of type "Color Legend" is included in the object and "color_legend_mode" is set to "1". This property contains the Red component in the static color. This property ranges from 0 to 255. |
|
color_legend_static_g |
Used only when an input of type "Color Legend" is included in the object and "color_legend_mode" is set to "1". This property contains the Green component in the static color. This property ranges from 0 to 255. |
|
color_legend_static_b |
Used only when an input of type "Color Legend" is included in the object and "color_legend_mode" is set to "1". This property contains the Blue component in the static color. This property ranges from 0 to 255. |
|
color_legend_attribute |
Used only when an input of type "Color Legend" is included in the object and "color_legend_mode" is set to "2". This property contains the identifier of the attribute that will be used to derive the color for the object. |
|
color_legend_attribute_index |
Used only when an input of type "Color Legend" is included in the object and "color_legend_mode" is set to "2". This property contains the index of the attribute that will be used to derive the color for the object. This index is respective to the full list of available attributes in the object. |
|
color_legend_range_min |
Used only when an input of type "Color Legend" is included in the object and "color_legend_mode" is set to "2". This property contains the minimum attribute value to be mapped to the lower end of the color gradient. |
|
color_legend_range_max |
Used only when an input of type "Color Legend" is included in the object and "color_legend_mode" is set to "2". This property contains the maximum attribute value to be mapped to the higher end of the color gradient. |
|
color_legend_range_step |
Used only when an input of type "Color Legend" is included in the object and "color_legend_mode" is set to "2". This property defines the magnitude of each step in the attribute's space that will mapped as a single color in the the color gradient. |
|
attribute_query_mode |
Used only when an input of type "Query Expression" is included in the object. This property defines which attribute filter mode will be used. There are two possible modes:
|
|
attribute_query_string |
Used only when an input of type "Query Expression" is included in the object and the "attribute_query_mode" is set to "1". This property contains a query string. |
|
attribute_query_builder |
Used only when an input of type "Query Expression" is included in the object and the "attribute_query_mode" is set to "1". This property contains a list of space-separated terms. Each term contains four items separated by commas. Each of these items corresponds to:
|
|
drillholes_show_collars |
Used only when an input of type "Drill-hole Settings" is included in the object. Set to "1" to make the drill hole collar geometry appear in the view. Set to "0" to hide drill hole collars for the object. |
|
drillholes_show_collar_labels |
Used only when an input of type "Drill-hole Settings" is included in the object. Set to "1" to make the drill hole collar labels appear in the view. Set to "0" to hide drill hole labels for the object. |
|
drillholes_show_cylinders |
Used only when an input of type "Drill-hole Settings" is included in the object. Set to "1" to make the drill hole cylinder geometry appear in the view. Set to "0" to hide drill hole cylinders for the object. |
|
drillholes_show_attributes |
Used only when an input of type "Drill-hole Settings" is included in the object. Set to "1" to make the drill hole attribute labels appear in the view. Set to "0" to hide drill hole attribute labels for the object. |
|
drillholes_attributes |
Used only when an input of type "Drill-hole Settings" is included in the object. Set to "1" to make the drill hole collar geometry appear in the view. Set to "0" to hide drill hole collars for the object. |
|
tube_legend_attribute |
Specifies the attribute ID for the attribute that will be used to compute cylinder diameter. |
|
tube_legend_radius |
Used when "tube_legend_scale_mode" equals "1", this defines the radius of all cylinders. |
|
tube_legend_radius_max |
Used when "tube_legend_scale_mode" equals "2", this defines the maximum radius of cylinders. |
|
tube_legend_radius_min |
Used when "tube_legend_scale_mode" equals "2", this defines the minimum radius of cylinders. |
|
tube_legend_range_max |
Used when "tube_legend_scale_mode" equals "2", this defines the maximum value for the attribute that will be mapped to the maximum cylinder radius. |
|
tube_legend_range_min |
Used when "tube_legend_scale_mode" equals "2", this defines the minimum value for the attribute that will be mapped to the minimum cylinder radius. |
|
tube_legend_range_step |
Used when "tube_legend_scale_mode" equals "2", this defines the discrete step increases in attribute value. |
|
tube_legend_scale_mode |
Set to "1" for constant cylinder radius. Set to "2" for attribute-dependent cylinder radius. |
File VOXSURF
Defines a Voxel Terrain Surface. This type of entity will have these additional properties:
|
source |
Contains the ID of the entity that was used to produce the Voxel Terrain Surface |
|
source_type |
Contains the type of the entity that was used to produce the Voxel Terrain Surface. Can be either “RAWPC” (raw point cloud) or “HM” (heightmaps). |
|
source_ortho |
Contains the ID of the raw orthoimagery set used for the Voxel Terrain Surface. |
|
normals |
Contains “1” when the Voxel Terrain Surface contains normal maps, “0” otherwise. |
File IDXORTHO
Defines an indexed ortho-imagery dataset. This type of entity will have these additional properties:
|
source |
Contains the ID of the ORTHO entity that was used to produce the imagery dataset |
|
image_format |
Specifies which image formats should be included in the processed imagery dataset. It is possible to specify multiple targets. Target can be identify by the following values, using space as a separator between targets:
|
File RAWBM
Defines a raw Block Model CSV file. This type of entity will have these additional properties:
|
column_meta |
This property is optional. Please look into the following section to see how to provide information about the columns in the raw Block Model: Defines how to interpret and process each column (attribute) found in the Block Model’s CSV file. This value must be the Base64 encoding of a single string composed of multiple comma-separated headers. There should be one of these headers for each column in the CVS file. Each header contains four terms separated by spaces. The first term is a unique identifier for the column in the model. It must not contain any spaces nor commas. The second term identifies the type of column, it can be one of the following:
The third term specifies the Level of Detail operation that will be performed for the column. These are the possible values:
The fourth term is a default value that will be used when the system is not able to parse or convert to a number a particular entry in the column. |
|
block_model_type |
Optional property to specify the type of block model. The possible values are: "octree" - Denotes an octree-based block model. This is the default value. "varz" - Denotes a variable-z octree (DataMine) |
File VOXBM
Defines a Voxel Block Model. This type of entity will have these additional properties:
|
source |
Contains the ID of the raw Block Model data that was used to process the Voxel Block Model |
|
translate_x |
Number of units to translate the block model along the X direction. |
|
translate_y |
Number of units to translate the block model along the Y direction. |
|
translate_z |
Number of units to translate the block model along the Z direction. |
|
scale_x |
A proportion (0..1) to scale the block model along the X direction. |
|
scale_y |
A proportion (0..1) to scale the block model along the Y direction. |
|
scale_z |
A proportion (0..1) to scale the block model along the Z direction. |
|
rotate_x |
Euler angle rotation for X axis. |
|
rotate_y |
Euler angle rotation for Y axis. |
|
rotate_z |
Euler angle rotation for Z axis. |
|
rotation_order |
Rotation order. Must be one of: ZXZ, XYX, YZY, ZYZ, XZX or YXY |
File VOXMT
Defines a Material Tracking Layer. This type of entity will have these additional properties:
|
attributes |
Contains a list of comma separated attributes that will be tracked by the layer. |
|
tags |
Contains a list of comma separated tags that will be tracked by the layer. Unlike attributes, tags are not originally included in the resource model attribute schema. |
|
resource_model |
Contains a Base64 string that defines a list of resource models, allowing to define a timestamp and a series of tags for each model . The models are listed as comma-separated terms, where each term corresponds to one resource model. Each term is a list of space-separated entries, following this sequence: <ENTITY_ID> <timestamp> [tag0=value] [tag1=value] ... The first two terms are required:
The following terms contain custom tag values, in the form: tagId=value The tags specified here should belong to the same set of tags that is specified for the "tags" attribute. Not all tags are required. |
|
terrain_model |
Contains the identifier for a Terrain Model entity. This terrain model will be used as a starting point for depletion of the resource models |
|
resource_models_initialized |
Set to zero to signal the resource models require re-processing. The system will set this to one after processing is complete. |
|
|
|
File IDXPC
Defines an Indexed Point Cloud. This type of entity will have these additional properties:
|
source |
Contains the ID of the raw Point Cloud data that was used to process the Indexed Point Cloud. |
File VOXPC
Defines an voxelized point cloud. This type of entity will have these additional properties:
|
translate_x |
Number of units to translate the point cloud along the X direction. |
|
translate_y |
Number of units to translate the point cloud along the Y direction. |
|
translate_z |
Number of units to translate the point cloud along the Z direction. |
|
scale_x |
A proportion (0..1) to scale the point cloud along the X direction. |
|
scale_y |
A proportion (0..1) to scale the point cloud along the Y direction. |
|
scale_z |
A proportion (0..1) to scale the point cloud along the Z direction. |
|
rotate_x |
Euler angle rotation for X axis. |
|
rotate_y |
Euler angle rotation for Y axis. |
|
rotate_z |
Euler angle rotation for Z axis. |
|
rotation_order |
Rotation order. Must be one of: ZXZ, XYX, YZY, ZYZ, XZX or YXY |
File IDXMESH
Defines an indexed mesh. This type of entity will have these additional properties:
|
source |
Contains the ID of the raw Block Model data that was used to process the Voxel Block Model. |
|
translate_x |
Number of units to translate the mesh along the X direction. |
|
translate_y |
Number of units to translate the mesh along the Y direction. |
|
translate_z |
Number of units to translate the mesh along the Z direction. |
|
scale_x |
A proportion (0..1) to scale the mesh along the X direction. |
|
scale_y |
A proportion (0..1) to scale the mesh along the Y direction. |
|
scale_z |
A proportion (0..1) to scale the mesh along the Z direction. |
|
rotate_x |
Euler angle rotation for X axis. |
|
rotate_y |
Euler angle rotation for Y axis. |
|
rotate_z |
Euler angle rotation for Z axis. |
|
rotation_order |
Rotation order. Must be one of: ZXZ, XYX, YZY, ZYZ, XZX or YXY |
File VOXMESH
Defines a voxelized set of meshes. This type of entity will have these additional properties:
|
source |
Contains the ID of the raw mesh entity used to process the Voxelized Mesh. |
|
metadata |
Contains a sequence of comma-separated terms. Each term describes an attribute for the voxelized set, and it is made from three space-separated items. These items are, in listing order:
The set must have one attribute defined as UID, which will allow to link individual meshes in the set to their attributes in the property file. See the Extended Voxelized Mesh Metadata topic for more information on how metadata for Voxelized Mesh Sets is defined. |
|
translate_x |
Number of units to translate the mesh along the X direction. |
|
translate_y |
Number of units to translate the mesh along the Y direction. |
|
translate_z |
Number of units to translate the mesh along the Z direction. |
|
scale_x |
A proportion (0..1) to scale the mesh along the X direction. |
|
scale_y |
A proportion (0..1) to scale the mesh along the Y direction. |
|
scale_z |
A proportion (0..1) to scale the mesh along the Z direction. |
|
rotate_x |
Euler angle rotation for X axis. |
|
rotate_y |
Euler angle rotation for Y axis. |
|
rotate_z |
Euler angle rotation for Z axis. |
|
rotation_order |
Rotation order. Must be one of: ZXZ, XYX, YZY, ZYZ, XZX or YXY |
File RAWHM
Defines a set of orthoimagery that describes elevation. This type of entity will have these additional properties:
|
elevation_min |
Contains the minimum elevation value for the set. This value maps to a black pixel. |
|
elevation_max |
Contains the maximum elevation value for the set. This value maps to a white pixel. |
File RAWDH
Defines source data for a Drill Hole entity. While this entity does not have any special properties, the entity must include a process.meta file. This is covered in the Extended Drill Hole Metadata section.
File PROGRAM
Defines a voxel generator program. This type of entity will have these additional properties:
|
code_origin |
Contains the type of code used by the program. Currently, two types are supported:
|
|
code |
If code_origin is "PYTHON", this property contains the Python code for the program, in Base64 format. If code_origin is "NETASM", this property identifies the entry-point class for the Lambda program in the form: <FullyNamespacedClassName>:<DLLName> |
|
program_type |
Contains the type of the program. The program type can be one of the following:
|
File VOXGEN
Defines a spatial entity that is the output of a voxel generator program. This type of entity will have these additional properties:
|
program |
Contains the ID of the voxel generator program that will be evaluated. |
|
input_value_#id# |
Contains the value for the input. Replace the #id# placeholder by the actual id used by the input. |
|
input_label_#id# |
Contains the label for the input. Replace the #id# placeholder by the actual id used by the input. |
|
input_type_#id# |
Specifies type of the input. Replace the #id# placeholder by the actual id used by the input. The possible input types are: 0 – Numeric 1 – Date 2 – String 3 – Entity 4 – Attribute Set 5 – Query Expression |
|
input_filter_#id# |
For Specifies type of the input. Replace the #id# placeholder by the actual id used by the input. Must be non-zero for type 3 (Entity), contains a numeric value containing a binary mask identifying which types of entities can be potentially selected. Use binary OR to merge different types into a single mask. The values identifying each identity type are (in hexadecimal): 0x01 – Voxel Terrain 0x02 – Voxel Block Model 0x04 – Voxel Generator 0x08 – Realtime Voxel Terrain 0x10 – Indexed Point Cloud |
File REPORT
Defines a report entity. A report entity takes a Program and runs it over a specified Region. The program gets to inspect the spatial data int the region and it can compute useful information by combining the different spatial attributes using custom logic.
Creating a report entity is not enough to produce the desired report files. After the entity has been created, it is also necessary to trigger its processing by a second REST call. Please visit the “Triggering reports” section to see how report jobs can be triggered.
This type of entity will have these additional properties:
|
program |
Contains the ID of the report program that will be evaluated. |
|
lod |
Specifies at which Level of Detail the report will run. |
|
input_value_#id# |
Contains the value for the input. Replace the #id# placeholder by the actual id used by the input. |
|
input_label_#id# |
Contains the label for the input. Replace the #id# placeholder by the actual id used by the input. |
|
input_type_#id# |
Specifies type of the input. Replace the #id# placeholder by the actual id used by the input. The possible input types are: 0 – Numeric 1 – Date 2 – String 3 – Entity 4 – Attribute Set 5 – Query Expression |
|
input_filter_#id# |
For Specifies type of the input. Replace the #id# placeholder by the actual id used by the input. Must be non-zero for type 3 (Entity), contains a numeric value containing a binary mask identifying which types of entities can be potentially selected. Use binary OR to merge different types into a single mask. The values identifying each identity type are (in hexadecimal): 0x01 – Voxel Terrain 0x02 – Voxel Block Model 0x04 – Voxel Generator 0x08 – Realtime Voxel Terrain 0x10 – Indexed Point Cloud |
File EXPORT
Defines an export entity. Export entities contain files in standard formats that were produced out of the spatial data in the project. For instance, a user may desire to export a mashup of terrain surfaces as a single terrain mesh. In this case, there would be one export entity that stores the mesh as an internal file.
Creating an export entity is not enough to produce the desired files. After the entity has been created, it is also necessary to trigger its processing by a second REST call. Please visit the “Triggering jobs” section to see how export jobs can be triggered.
This type of entity will have these additional properties:
|
entity |
Contains the ID of the entity that will be used as a source for the export operation |
|
lod |
Specifies at which Level of Detail the report will run. |
|
region |
A region can be expressed in the REST interface as a single string, containing the following format:
1,<min_height>,<max_height>,<polygon_point0_x>, <polygon_point0_y>, <polygon_point1_x>, <polygon_point1_y>, …
The format is a list of numbers separated by commas. The first number must be 1, this identifies this is an extruded polygon region. The second two numbers are world coordinates for the vertical bounds of the region. The following numbers are the X, Y coordinates of each region point. The polygon points are defined in counter-clockwise order. For example, the following region string defines a 10-unit cube centered in the project’s origin: 1,-5,5,-5, 5,5,5,5,-5,-5,-5 |
|
export_type |
Specifies the type of data that will be exported. Can be one of these:
|
Export entities have one special file attachment. This file is named “export.zip” and contains a ZIP archive of the exported data.
Region entity
Entities of type “REGION” describe a 3D scope where export jobs, reports and other tasks will be performed.
This type of entity will have these additional properties:
|
region |
A region can be expressed in the REST interface as a single string, containing the following format:
1,<min_height>,<max_height>,<polygon_point0_x>, <polygon_point0_y>, <polygon_point1_x>, <polygon_point1_y>, …
The format is a list of numbers separated by commas. The first number must be 1, this identifies this is an extruded polygon region. The second two numbers are world coordinates for the vertical bounds of the region. The following numbers are the X, Y coordinates of each region point. The polygon points are defined in counter-clockwise order. For example, the following region string defines a 10-unit cube centered in the project’s origin: 1,-5,5,-5, 5,5,5,5,-5,-5,-5 |
Spatial Properties
Some entities are of spatial nature, in these cases, the entity will have a set of properties related to the coordinate system used by the entity. The following table lists these properties:
|
coord_hdatum |
Contains the horizontal datum for the Coordinate Reference Systems (CRS). These are the types currently supported:
|
||||||||||||||||||||||||||||||||||||||
|
coord_origin_x |
Contains the coordinate of axis X for the origin of the project. |
||||||||||||||||||||||||||||||||||||||
|
coord_origin_y |
Contains the coordinate of axis Y for the origin of the project. |
||||||||||||||||||||||||||||||||||||||
|
coord_origin_z |
Contains the coordinate of axis Z for the origin of the project. |
||||||||||||||||||||||||||||||||||||||
|
coord_projection |
Contains the data projection for the Coordinate Reference Systems (CRS). These are the types currently supported:
|
||||||||||||||||||||||||||||||||||||||
|
coord_projection_aeac_falseEasting |
Contains the false Easting. It is only required if the projection is aeac. |
||||||||||||||||||||||||||||||||||||||
|
coord_projection_aeac_falseNorthing |
Contains the false Northing. It is only required if the projection is aeac. |
||||||||||||||||||||||||||||||||||||||
|
coord_projection_aeac_firstStdParallelDeg |
Contains the first Std Parallel Degree. It is only required if the projection is aeac. |
||||||||||||||||||||||||||||||||||||||
|
coord_projection_aeac_latOfOriginDeg |
Contains the latitud of Origin Degree. It is only required if the projection is aeac. |
||||||||||||||||||||||||||||||||||||||
|
coord_projection_aeac_longOfOriginDeg |
Contains the longitud of Origin Degree. It is only required if the projection is aeac. |
||||||||||||||||||||||||||||||||||||||
|
coord_projection_aeac_secondStdParallelDeg |
Contains the second Std Parallel Degree. It is only required if the projection is aeac. |
||||||||||||||||||||||||||||||||||||||
|
coord_projection_amg_zone |
Contains the zone value. It is a number between 48 and 58. It is only required if the projection is amg. |
||||||||||||||||||||||||||||||||||||||
|
coord_projection_mga_zone |
Contains the zone value. It is a number between 48 and 58. It is only required if the projection is mga. |
||||||||||||||||||||||||||||||||||||||
|
coord_projection_lo_zone |
Contains the zone value. It is one of these numbers: [15, 17, 19, 21, 23, 25, 27, 31, 33]. It is only required if the projection is lo. |
||||||||||||||||||||||||||||||||||||||
|
coord_projection_lcc_falseEasting |
Contains the false Easting. It is only required if the projection is lcc. |
||||||||||||||||||||||||||||||||||||||
|
coord_projection_lcc_falseNorthing |
Contains the false Northing. It is only required if the projection is lcc. |
||||||||||||||||||||||||||||||||||||||
|
coord_projection_lcc_firstStdParallelDeg |
Contains the first Std Parallel Degree. It is only required if the projection is lcc. |
||||||||||||||||||||||||||||||||||||||
|
coord_projection_lcc_latOfOriginDeg |
Contains the latitud of Origin Degree. It is only required if the projection is lcc. |
||||||||||||||||||||||||||||||||||||||
|
coord_projection_lcc_longOfOriginDeg |
Contains the longitud of Origin Degree. It is only required if the projection is lcc. |
||||||||||||||||||||||||||||||||||||||
|
coord_projection_lcc_secondStdParallelDeg |
Contains the second Std Parallel Degree. It is only required if the projection is lcc. |
||||||||||||||||||||||||||||||||||||||
|
coord_projection_tm_falseEasting |
Contains the false Easting. It is only required if the projection is tm. |
||||||||||||||||||||||||||||||||||||||
|
coord_projection_tm_falseNorthing |
Contains the false Northing. It is only required if the projection is tm. |
||||||||||||||||||||||||||||||||||||||
|
coord_projection_tm_latOriginDeg |
Contains the latitude of Origin Degree. It is only required if the projection is tm. |
||||||||||||||||||||||||||||||||||||||
|
coord_projection_tm_longMeridianDeg |
Contains the longitude of Origin Degree. It is only required if the projection is tm. |
||||||||||||||||||||||||||||||||||||||
|
coord_projection_tm_scaleFactor |
Contains the scale factor. It is only required if the projection is tm. |
||||||||||||||||||||||||||||||||||||||
|
coord_unit |
Contains the unit of measure of the horizontal data. These are the types currently supported:
|
||||||||||||||||||||||||||||||||||||||
|
coord_vunit |
Contains the unit of measure of the horizontal data. These are the types currently supported:
|
||||||||||||||||||||||||||||||||||||||
|
coord_vdatum |
Contains the vertical datum for the Coordinate Reference Systems (CRS). These are the types currently supported:
|
Extended Block Model Metadata
When submitting files for a new Block Model raw dataset (file_type RAWBM), the system expects an additional file named:
- process.meta
This is a text file in INI format that contains additional information on how the block model dataset must be constructed out of the accompanying files.
The file must contain a single section, named [Configuration]
|
Column_Count |
Specifies how may attribute columns will be read from the block model. |
|
Column<N>_ID |
Specifies the name for the attribute as listed in the block model headers. The <N> placeholder is replaced by the attribute index, which is zero-based. |
|
Column<N>_Class |
Specifies the class for the attribute. The <N> placeholder is replaced by the attribute index, which is zero-based. The possible values are: XL – X coordinate of the block’s origin XC – X coordinate of the block’s centroid XR – X coordinate of the block’s end XS – Block’s dimension along the X axis YL – Y coordinate of the block’s origin YC – Y coordinate of the block’s centroid YR – Y coordinate of the block’s end YS – Block’s dimension along the Y axis ZL – Z coordinate of the block’s origin ZC – Z coordinate of the block’s centroid ZR – Z coordinate of the block’s end ZS – Block’s dimension along the Z axis Value – The values in this column will be interpreted as numbers. This setting should be used for grades and any other numeric quantity. Enum – The values in this column belong to a set with a limited number of elements that appear many times over in the block model. |
|
Column<N>_Aggregator |
Specifies the aggregator for the attribute. The <N> placeholder is replaced by the attribute index, which is zero-based. The possible values are: AVG – Average the values. |
|
Column<N>_DefaultValue |
Specifies the default value for the attribute. The <N> placeholder is replaced by the attribute index, which is zero-based. |
|
Column<N>_Unit |
Specifies the unit of measure for the attribute. The <N> placeholder is replaced by the attribute index, which is zero-based. |
|
Column<N>_Label |
Specifies a readable label for the attribute name. The <N> placeholder is replaced by the attribute index, which is zero-based. |
Example process.meta file:
[Configuration]
Column_Count=35
Column0_ID=xlength
Column0_Class=XS
Column0_Aggregator=Avg
Column0_DefaultValue=0
Column1_ID=xworld
Column1_Class=XC
Column1_Aggregator=Avg
Column1_DefaultValue=0
Column2_ID=ylength
Column2_Class=YS
Column2_Aggregator=Avg
Column2_DefaultValue=0
Column3_ID=yworld
Column3_Class=YC
Column3_Aggregator=Avg
Column3_DefaultValue=0
Column4_ID=zlength
Column4_Class=ZS
Column4_Aggregator=Avg
Column4_DefaultValue=0
Column5_ID=zworld
Column5_Class=ZC
Column5_Aggregator=Avg
Column5_DefaultValue=0
Column6_ID=volume
Column6_Class=Value
Column6_Aggregator=Avg
Column6_DefaultValue=0
Column7_ID=flag_block_count
Column7_Class=Value
Column7_Aggregator=Avg
Column7_DefaultValue=0
Column8_ID=metreg_cyclone_feed_al2o3
Column8_Class=Value
Column8_Aggregator=Avg
Column8_DefaultValue=0
Column9_ID=metreg_cyclone_feed_fe
Column9_Class=Value
Column9_Aggregator=Avg
Column9_DefaultValue=0
Column10_ID=metreg_cyclone_feed_sio2
Column10_Class=Value
Column10_Aggregator=Avg
Column10_DefaultValue=0
Column11_ID=metreg_cyclone_feed_tonnes
Column11_Class=Value
Column11_Aggregator=Avg
Column11_DefaultValue=0
Column12_ID=mine_fines_al2o3
Column12_Class=Value
Column12_Aggregator=Avg
Column12_DefaultValue=0
Column13_ID=mine_fines_fe
Column13_Class=Value
Column13_Aggregator=Avg
Column13_DefaultValue=0
Column14_ID=mine_fines_sio2
Column14_Class=Value
Column14_Aggregator=Avg
Column14_DefaultValue=0
Column15_ID=mine_fines_tonnes
Column15_Class=Value
Column15_Aggregator=Avg
Column15_DefaultValue=0
Column16_ID=mine_lump_al2o3
Column16_Class=Value
Column16_Aggregator=Avg
Column16_DefaultValue=0
Column17_ID=mine_lump_fe
Column17_Class=Value
Column17_Aggregator=Avg
Column17_DefaultValue=0
Column18_ID=mine_lump_sio2
Column18_Class=Value
Column18_Aggregator=Avg
Column18_DefaultValue=0
Column19_ID=mine_lump_tonnes
Column19_Class=Value
Column19_Aggregator=Avg
Column19_DefaultValue=0
Column20_ID=mine_tails_al2o3
Column20_Class=Value
Column20_Aggregator=Avg
Column20_DefaultValue=0
Column21_ID=mine_tails_fe
Column21_Class=Value
Column21_Aggregator=Avg
Column21_DefaultValue=0
Column22_ID=mine_tails_sio2
Column22_Class=Value
Column22_Aggregator=Avg
Column22_DefaultValue=0
Column23_ID=mine_tails_tonnes
Column23_Class=Value
Column23_Aggregator=Avg
Column23_DefaultValue=0
Column24_ID=pit_al2o3
Column24_Class=Value
Column24_Aggregator=Avg
Column24_DefaultValue=0
Column25_ID=pit_density_dry_gp
Column25_Class=Value
Column25_Aggregator=Avg
Column25_DefaultValue=0
Column26_ID=pit_fe
Column26_Class=Value
Column26_Aggregator=Avg
Column26_DefaultValue=0
Column27_ID=pit_sio2
Column27_Class=Value
Column27_Aggregator=Avg
Column27_DefaultValue=0
Column28_ID=pit_tonnes_gp
Column28_Class=Value
Column28_Aggregator=Avg
Column28_DefaultValue=0
Column29_ID=pit_volume
Column29_Class=Value
Column29_Aggregator=Avg
Column29_DefaultValue=0
Column30_ID=flag_water_table_status
Column30_Class=Enum
Column30_Aggregator=Set
Column30_DefaultValue="-"
Column31_ID=geo_domain
Column31_Class=Enum
Column31_Aggregator=Set
Column31_DefaultValue="-"
Column32_ID=id_product
Column32_Class=Enum
Column32_Aggregator=Set
Column32_DefaultValue="-"
Column33_ID=id_product_3
Column33_Class=Enum
Column33_Aggregator=Set
Column33_DefaultValue="-"
Column34_ID=id_product_4
Column34_Class=Enum
Column34_Aggregator=Set
Column34_DefaultValue="-"
Extended Drill Hole Metadata
When submitting files for a new Drill Hole raw dataset (file_type RAWDH), the system expects an additional file named:
- process.meta
This is a text file in INI format that contains additional information on how the drill hole dataset must be constructed out of the accompanying files.
The file must contain a single section, named [Configuration]
This section must contain a property named "Desurveyed", which indicates if the Drill Hole dataset must be submitted to a desurveying process before ingestion.
Set Desureveyed = 0 to request the system to desurvey the holes and create segment interpolation.
Set Desureveyed = 1 to ingest the drill hole segments as they appear in the source files.
The rest of the properties found in the [Configuration] section depend on whether desurveying was chosen. The two following sections cover these alternatives.
Metadata for Desurveyed (Composite) Drill Hole datasets
In this variant, the process.meta file must contain the following properties:
|
Desurveyed |
Must be equal to 1. |
|
AssayFileCount |
Specifies how many assay files will be included. |
|
AssayFile<N> |
Specifies an assay file name. There will be one of these properties for each assay file. For instance, if AssayFileCount = 3, the file must include values for AssayFile0, AssayFile1 and AssayFile2. The <N> placeholder is replaced by the file index. |
|
Column_Assay<N>_ID |
Specifies the index of the column in the assay file that contains the drill hole ID. This is an unique identifier per hole, which is shared across several files in the dataset. There will be one of these properties for each assay file. For instance, if AssayFileCount = 3, the file must include values for Column_Assay0_ID, Column_Assay1_ID and Column_Assay2_ID. The <N> placeholder is replaced by the file index. |
|
Column_Assay<N>_From |
Specifies the index of the column in the assay file that contains drill hole segment start depths. There will be one of these properties for each assay file. For instance, if AssayFileCount = 3, the file must include values for Column_Assay0_From, Column_Assay1_From and Column_Assay2_From. The <N> placeholder is replaced by the file index. |
|
Column_Assay<N>_To |
Specifies the index of the column in the assay file that contains drill hole segment end depths. There will be one of these properties for each assay file. For instance, if AssayFileCount = 3, the file must include values for Column_Assay0_To, Column_Assay1_To and Column_Assay2_To. The <N> placeholder is replaced by the file index. |
|
Column_Assay<N>_X |
Specifies the index of the column in the assay file that contains drill hole segment start X coordinate. There will be one of these properties for each assay file. For instance, if AssayFileCount = 3, the file must include values for Column_Assay0_X, Column_Assay1_X and Column_Assay2_X. The <N> placeholder is replaced by the file index. |
|
Column_Assay<N>_Y |
Specifies the index of the column in the assay file that contains drill hole segment start Y coordinate. There will be one of these properties for each assay file. For instance, if AssayFileCount = 3, the file must include values for Column_Assay0_Y, Column_Assay1_Y and Column_Assay2_Y. The <N> placeholder is replaced by the file index. |
|
Column_Assay<N>_Z |
Specifies the index of the column in the assay file that contains drill hole segment start Z coordinate. There will be one of these properties for each assay file. For instance, if AssayFileCount = 3, the file must include values for Column_Assay0_Z, Column_Assay1_Z and Column_Assay2_Z. The <N> placeholder is replaced by the file index. |
|
Column_Assay<N>_Attribute_Columns |
Specifies how may attribute columns will be read from an assay file. There will be one of these properties for each assay file. The <N> placeholder is replaced by the file index. |
|
Column_Assay<N>_Attribute_Column<M>_Index |
Specifies the index of the column that contains the attribute values for a given attribute in a given assay file. The <N> placeholder is replaced by the assay file index, and the <M> placeholder is replaced by the attribute index. For instance, if the third assay file has three attributes to define, the properties.meta file will include values for Column_Assay2_Attribute_Column0_Index, Column_Assay2_Attribute_Column1_Index and Column_Assay2_Attribute_Column2_Index. |
|
Column_Assay<N>_Attribute_Column<M>_Name |
Specifies the name of an attribute in a given assay file. The <N> placeholder is replaced by the assay file index, and the <M> placeholder is replaced by the attribute index. For instance, if the third assay file has three attributes to define, the properties.meta file will include values for Column_Assay2_Attribute_Column0_Name, Column_Assay2_Attribute_Column1_Name and Column_Assay2_Attribute_Column2_Name. |
|
Column_Assay<N>_Attribute_Column<M>_Type |
Specifies the type of an attribute in a given assay file. 0 - Attribute is of Float type 1 - Attribute of of Alphanumerical type Other types than float are not currently supported. The <N> placeholder is replaced by the assay file index, and the <M> placeholder is replaced by the attribute index. For instance, if the third assay file has three attributes to define, the properties.meta file will include values for Column_Assay2_Attribute_Column0_Type, Column_Assay2_Attribute_Column1_Type and Column_Assay2_Attribute_Column2_Type. |
|
Column_Assay<N>_Attribute_Column<M>_Unit |
Specifies the Units of Measure for the attribute |
|
Column_Assay<N>_Attribute_Column<M>_Label |
Specifies a readable label for the attribute name. The <N> placeholder is replaced by the attribute index, which is zero-based |
Example of properties.meta for a desurveyed (composite) drill hole dataset:
[Configuration]
Desurveyed=1
AssayFileCount=2
AssayFile0=Granofels_composites.csv
AssayFile1=Pyroxenite_composites.csv
Column_Assay0_ID=0
Column_Assay0_From=4
Column_Assay0_To=5
Column_Assay0_X=1
Column_Assay0_Y=2
Column_Assay0_Z=3
Column_Assay0_Attribute_Columns = 11
Column_Assay0_Attribute_Column0_Index=7
Column_Assay0_Attribute_Column0_Name=A0
Column_Assay0_Attribute_Column0_Type=0
Column_Assay0_Attribute_Column1_Index=8
Column_Assay0_Attribute_Column1_Name=B0
Column_Assay0_Attribute_Column1_Type=0
Column_Assay0_Attribute_Column2_Index=9
Column_Assay0_Attribute_Column2_Name=C0
Column_Assay0_Attribute_Column2_Type=0
Column_Assay0_Attribute_Column3_Index=10
Column_Assay0_Attribute_Column3_Name=PGE
Column_Assay0_Attribute_Column3_Type=0
Column_Assay0_Attribute_Column4_Index=11
Column_Assay0_Attribute_Column4_Name=PT
Column_Assay0_Attribute_Column4_Type=0
Column_Assay0_Attribute_Column5_Index=12
Column_Assay0_Attribute_Column5_Name=PD
Column_Assay0_Attribute_Column5_Type=0
Column_Assay0_Attribute_Column6_Index=13
Column_Assay0_Attribute_Column6_Name=RH
Column_Assay0_Attribute_Column6_Type=0
Column_Assay0_Attribute_Column7_Index=14
Column_Assay0_Attribute_Column7_Name=AU
Column_Assay0_Attribute_Column7_Type=0
Column_Assay0_Attribute_Column8_Index=15
Column_Assay0_Attribute_Column8_Name=CU
Column_Assay0_Attribute_Column8_Type=0
Column_Assay0_Attribute_Column9_Index=16
Column_Assay0_Attribute_Column9_Name=NI
Column_Assay0_Attribute_Column9_Type=0
Column_Assay0_Attribute_Column10_Index=17
Column_Assay0_Attribute_Column10_Name=SG
Column_Assay0_Attribute_Column10_Type=0
Column_Assay1_ID=0
Column_Assay1_From=4
Column_Assay1_To=5
Column_Assay1_X=1
Column_Assay1_Y=2
Column_Assay1_Z=3
Column_Assay1_Attribute_Columns = 10
Column_Assay1_Attribute_Column0_Index=7
Column_Assay1_Attribute_Column0_Name=A0
Column_Assay1_Attribute_Column0_Type=0
Column_Assay1_Attribute_Column1_Index=8
Column_Assay1_Attribute_Column1_Name=B0
Column_Assay1_Attribute_Column1_Type=0
Column_Assay1_Attribute_Column2_Index=9
Column_Assay1_Attribute_Column2_Name=PGE
Column_Assay1_Attribute_Column2_Type=0
Column_Assay1_Attribute_Column3_Index=10
Column_Assay1_Attribute_Column3_Name=PT
Column_Assay1_Attribute_Column3_Type=0
Column_Assay1_Attribute_Column4_Index=11
Column_Assay1_Attribute_Column4_Name=PD
Column_Assay1_Attribute_Column4_Type=0
Column_Assay1_Attribute_Column5_Index=12
Column_Assay1_Attribute_Column5_Name=RH
Column_Assay1_Attribute_Column5_Type=0
Column_Assay1_Attribute_Column6_Index=13
Column_Assay1_Attribute_Column6_Name=AU
Column_Assay1_Attribute_Column6_Type=0
Column_Assay1_Attribute_Column7_Index=14
Column_Assay1_Attribute_Column7_Name=CU
Column_Assay1_Attribute_Column7_Type=0
Column_Assay1_Attribute_Column8_Index=15
Column_Assay1_Attribute_Column8_Name=NI
Column_Assay1_Attribute_Column8_Type=0
Column_Assay1_Attribute_Column9_Index=16
Column_Assay1_Attribute_Column9_Name=SG
Column_Assay1_Attribute_Column9_Type=0
Metadata for Drill Hole datasets that require desurveying
In this variant, the process.meta file must contain the following properties:
|
Desurveyed |
Must be equal to 0. |
|
CollarFile |
Specifies the filename for the file that contains the drill hole collars. |
|
Column_Collars_ID |
Specifies the index of the column in the collars file that contains drill hole IDs. |
|
Column_Collars_X |
Specifies the index of the column in the collars file that contains the X coordinate for the drill hole collar. |
|
Column_Collars_Y |
Specifies the index of the column in the collars file that contains the Y coordinate for the drill hole collar. |
|
Column_Collars_Z |
Specifies the index of the column in the collars file that contains the Z coordinate for the drill hole collar. |
|
Column_Collars_Depth |
Specifies the index of the column in the collars file that contains the depth (length) for the drill hole. |
|
SurveyFile |
Specifies the filename for the file that contains the drill hole surveys. |
|
Column_Survey_ID |
Specifies the index of the column in the survey file that contains drill hole IDs. |
|
Column_Survey_Depth |
Specifies the index of the column in the surveys file that contains the depth for each survey. |
|
Column_Survey_Azimuth |
Specifies the index of the column in the surveys file that contains the azimuth for each survey. |
|
Column_Survey_Dip |
Specifies the index of the column in the surveys file that contains the dip for each survey. |
|
Column_Survey_Type |
Specifies the type of interpolation that will be used to reconstruct drill hole paths in space. Specify one of the following values: 0 - Tangential First (use for acQuire sets) 1 - Tangential Second 2 - Minimum Curvature 3 - Balanced Tangential 4 - Average Angle 5 - Radius of Curvature |
|
AssayFileCount |
Specifies how many assay files will be included. |
|
AssayFile<N> |
Specifies an assay file name. There will be one of these properties for each assay file. For instance, if AssayFileCount = 3, the file must include values for AssayFile0, AssayFile1 and AssayFile2. The <N> placeholder is replaced by the file index. |
|
Column_Assay<N>_ID |
Specifies the index of the column in the assay file that contains the drill hole ID. This is an unique identifier per hole, which is shared across several files in the dataset. There will be one of these properties for each assay file. For instance, if AssayFileCount = 3, the file must include values for Column_Assay0_ID, Column_Assay1_ID and Column_Assay2_ID. The <N> placeholder is replaced by the file index. |
|
Column_Assay<N>_From |
Specifies the index of the column in the assay file that contains drill hole segment start depths. There will be one of these properties for each assay file. For instance, if AssayFileCount = 3, the file must include values for Column_Assay0_From, Column_Assay1_From and Column_Assay2_From. The <N> placeholder is replaced by the file index. |
|
Column_Assay<N>_To |
Specifies the index of the column in the assay file that contains drill hole segment end depths. There will be one of these properties for each assay file. For instance, if AssayFileCount = 3, the file must include values for Column_Assay0_To, Column_Assay1_To and Column_Assay2_To. The <N> placeholder is replaced by the file index. |
|
Column_Assay<N>_X |
Specifies the index of the column in the assay file that contains drill hole segment start X coordinate. There will be one of these properties for each assay file. For instance, if AssayFileCount = 3, the file must include values for Column_Assay0_X, Column_Assay1_X and Column_Assay2_X. The <N> placeholder is replaced by the file index. |
|
Column_Assay<N>_Y |
Specifies the index of the column in the assay file that contains drill hole segment start Y coordinate. There will be one of these properties for each assay file. For instance, if AssayFileCount = 3, the file must include values for Column_Assay0_Y, Column_Assay1_Y and Column_Assay2_Y. The <N> placeholder is replaced by the file index. |
|
Column_Assay<N>_Z |
Specifies the index of the column in the assay file that contains drill hole segment start Z coordinate. There will be one of these properties for each assay file. For instance, if AssayFileCount = 3, the file must include values for Column_Assay0_Z, Column_Assay1_Z and Column_Assay2_Z. The <N> placeholder is replaced by the file index. |
|
Column_Assay<N>_Attribute_Columns |
Specifies how may attribute columns will be read from an assay file. There will be one of these properties for each assay file. The <N> placeholder is replaced by the file index. |
|
Column_Assay<N>_Attribute_Column<M>_Index |
Specifies the index of the column that contains the attribute values for a given attribute in a given assay file. The <N> placeholder is replaced by the assay file index, and the <M> placeholder is replaced by the attribute index. For instance, if the third assay file has three attributes to define, the properties.meta file will include values for Column_Assay2_Attribute_Column0_Index, Column_Assay2_Attribute_Column1_Index and Column_Assay2_Attribute_Column2_Index. |
|
Column_Assay<N>_Attribute_Column<M>_Name |
Specifies the name of an attribute in a given assay file. The <N> placeholder is replaced by the assay file index, and the <M> placeholder is replaced by the attribute index. For instance, if the third assay file has three attributes to define, the properties.meta file will include values for Column_Assay2_Attribute_Column0_Name, Column_Assay2_Attribute_Column1_Name and Column_Assay2_Attribute_Column2_Name. |
|
Column_Assay<N>_Attribute_Column<M>_Type |
Specifies the type of an attribute in a given assay file. 0 - Attribute is of Float type 1 - Attribute of of Alphanumerical type Other types than float are not currently supported. The <N> placeholder is replaced by the assay file index, and the <M> placeholder is replaced by the attribute index. For instance, if the third assay file has three attributes to define, the properties.meta file will include values for Column_Assay2_Attribute_Column0_Type, Column_Assay2_Attribute_Column1_Type and Column_Assay2_Attribute_Column2_Type. |
|
Column_Assay<N>_Attribute_Column<M>_Units |
Specifies the Units of Measure for the attribute |
|
Column_Assay<N>_Attribute_Column<M>_Label |
Specifies a readable label for the attribute name. The <N> placeholder is replaced by the attribute index, which is zero-based |
Example of properties.meta for a drill hole dataset that requires desurveying:
[Configuration]
CollarFile="CollarAll.csv"
SurveyFile="SurveyAll.csv"
AssayFileCount=2
AssayFile0="GeologyAll.csv"
AssayFile1="AssayAll.csv"
Column_Collars_ID=0
Column_Collars_X=2
Column_Collars_Y=3
Column_Collars_Z=4
Column_Collars_Depth=5
Column_Survey_ID = 0
Column_Survey_Depth = 2
Column_Survey_Azimuth = 3
Column_Survey_Dip = 4
Column_Survey_Type = 5
Column_Assay0_ID = 0
Column_Assay0_From = 2
Column_Assay0_To = 3
Column_Assay0_Attribute_Columns = 1
Column_Assay0_Attribute_Column0_Index=4
Column_Assay0_Attribute_Column0_Name=Abbrv
Column_Assay0_Attribute_Column0_Type=1
Column_Assay1_ID = 0
Column_Assay1_From = 3
Column_Assay1_To = 4
Column_Assay1_Attribute_Columns = 10
Column_Assay1_Attribute_Column0_Index=5
Column_Assay1_Attribute_Column0_Name=Ag_ppm_BEST
Column_Assay1_Attribute_Column0_Type=0
Column_Assay1_Attribute_Column1_Index=6
Column_Assay1_Attribute_Column1_Name=As_pct_BEST
Column_Assay1_Attribute_Column1_Type=0
Column_Assay1_Attribute_Column2_Index=7
Column_Assay1_Attribute_Column2_Name=Cd_ppm_BEST
Column_Assay1_Attribute_Column2_Type=0
Column_Assay1_Attribute_Column3_Index=8
Column_Assay1_Attribute_Column3_Name=Co_ppm_BEST
Column_Assay1_Attribute_Column3_Type=0
Column_Assay1_Attribute_Column4_Index=9
Column_Assay1_Attribute_Column4_Name=Cu_ppm_BEST
Column_Assay1_Attribute_Column4_Type=0
Column_Assay1_Attribute_Column5_Index=10
Column_Assay1_Attribute_Column5_Name=Fe_pct_BEST
Column_Assay1_Attribute_Column5_Type=0
Column_Assay1_Attribute_Column6_Index=11
Column_Assay1_Attribute_Column6_Name=Mg_pct_BEST
Column_Assay1_Attribute_Column6_Type=0
Column_Assay1_Attribute_Column7_Index=12
Column_Assay1_Attribute_Column7_Name=Ni_ppm_BEST
Column_Assay1_Attribute_Column7_Type=0
Column_Assay1_Attribute_Column8_Index=13
Column_Assay1_Attribute_Column8_Name=Pb_pct_BEST
Column_Assay1_Attribute_Column8_Type=0
Column_Assay1_Attribute_Column9_Index=14
Column_Assay1_Attribute_Column9_Name=Zn_pct_BEST
Column_Assay1_Attribute_Column9_Type=0
Extended Voxelized Mesh Metadata
In order to produce voxelized mesh sets, the mesh source RAWMESH entity requires additional files included along with the source OBJ meshes:
-
meta_attributes.csv
The file is used to enumerate the meshes that will be included in the mesh dataset, and it also allows assigning different attribute values to the volume occupied by the mesh.
The first row in the file contains the attribute identifiers used for each column. There must be one column that lists the mesh file names names.
For instance, assume the user wants to import a set of five meshes. For each mesh, the user will supply one OBJ file, named:
- MESH_01.OBJ
- MESH_02.OBJ
- MESH_03.OBJ
- MESH_04.OBJ
- MESH_05.OBJ
Let's also assume each mesh assigns a different value for the following attributes: ROCKID, DOMAIN, ZONE, INDEX
In this case, the meta_attributes.csv would look like:
|
Filename |
INDEX |
ROCKID |
DOMAIN |
DENSITY |
|
MESH_01 |
1 |
23 |
10 |
15 |
|
MESH_02 |
2 |
34 |
1 |
17 |
|
MESH_03 |
3 |
85 |
3 |
21 |
|
MESH_04 |
4 |
23 |
12 |
37 |
|
MESH_05 |
5 |
1 |
7 |
1 |
Note the file names do not include the .OBJ extension here.
The schema for this file must be defined in the "metadata" property for the RAWMESH entity.
This property contains a sequence of comma-separated terms.
Each term describes an attribute for the voxelized set, in the same order as they appear in the meta_attributes.csv file,
and it is made from four space-separated items. These items are, in listing order:
- Attribute ID - This identifies the attribute in the dataset
- Attribute Type - Defines which type of attribute to use. Can be set to UID, VALUE or SET.
- Attribute Default Value - Default value for the attribute. Leave empty for UID type.
- Attribute Unit of Measure - It is an optional text describing the Unit of Measure for the attribute. Leave empty for UID type.
The set must have one attribute defined as UID, which will allow to link individual meshes in the set to their attributes in the property file.
For the earlier example, the metadata property would look like this:
Filename UID,INDEX VALUE 0,ROCKID VALUE 0,DOMAIN VALUE 0,DENSITY VALUE 0 kg/m3
-
meshes.meta
This file is optional, and it describes additional properties per mesh. Like the previous file in this section, this is also a CSV file. The file must contain two columns, with two headers named UID and volumetric (lowercase).
The "UID" column lists the mesh names. These identifiers must match the ones included in meta_attributes.csv.
The "volumetric" column specifies whether the mesh should be processed as volumetric.
If this file is omitted, or a particular mesh is not found in the list, the ingestion system assumes the mesh is not volumetric.
If a mesh is set as volumetric, but it fails a mesh consistency check, it will not be included in the processed set. The processing log for the entity will contain a warning for the mesh.
|
UID |
volumetric |
|
GM_Macro-Stratigraphy_BVstrat - CMZ - GM_Macro-Stratigraphy_BVstrat_- |
1 |
|
GM_Macro-Stratigraphy_BVstrat - GCZ - GM_Macro-Stratigraphy_BVstrat_- |
1 |
|
GM_Macro-Stratigraphy_BVstrat - LowerZone - GM_Macro-Stratigraphy_BVstrat_- |
1 |
|
GM_Macro-Stratigraphy_BVstrat - Upper - GM_Macro-Stratigraphy_BVstrat_- |
1 |
|
GM_Macro-Stratigraphy_BVstrat - Xenolith - GM_Macro-Stratigraphy_BVstrat_- |
1 |
|
GM_Macro-Stratigraphy_BVstrat - Archean Crystalline - GM_Macro-Stratigraphy_BVstrat_- |
0 |
|
GM_Macro-Stratigraphy_BVstrat - Critical Zone - GM_Macro-Stratigraphy_BVstrat_- |
0 |
|
GM_Macro-Stratigraphy_BVstrat - Footwall - GM_Macro-Stratigraphy_BVstrat_- |
0 |
|
GM_Macro-Stratigraphy_BVstrat - FT Granite - GM_Macro-Stratigraphy_BVstrat_- |
0 |
|
GM_Macro-Stratigraphy_BVstrat - Granite - GM_Macro-Stratigraphy_BVstrat_- |
0 |
|
GM_Macro-Stratigraphy_BVstrat - Main Zone - GM_Macro-Stratigraphy_BVstrat_- |
0 |
Extended Geo-chemical Metadata
When submitting files for a new Geo-chemical raw dataset (file_type RAWGEOCHEM), the system expects an additional file named:
- process.meta
This is a text file in INI format that contains additional information on how the drill hole dataset must be constructed out of the accompanying files.
The file must contain a single section, named [Configuration] with the following properties:
|
SampleFile |
Specifies the filename for the file that contains the samples. |
|
SampleFile_ID |
Specifies the index of the column in the collars file that contains sample IDs. |
|
SampleFile_X |
Specifies the index of the column in the samples file that contains the X coordinate for the drill hole collar. |
|
SampleFile_Y |
Specifies the index of the column in the samples file that contains the Y coordinate for the drill hole collar. |
|
SampleFile_Z |
Specifies the index of the column in the samples file that contains the Z coordinate for the drill hole collar. |
|
SampleFile_Attribute_Columns |
Specifies how may attribute columns will be read from the sample file. |
|
SampleFile_Attribute_Column<N>_Index |
Specifies the index of the column that contains the attribute values for a given attribute in the sample file. The <N> placeholder is replaced by the attribute index. For instance, if the sample file has three attributes to define, the process.meta file will include values for SampleFile_Attribute_Column0_Index, SampleFile_Attribute_Column1_Index and SampleFile_Attribute_Column2_Index. |
|
SampleFile_Attribute_Column<N>_Name |
Specifies the name of an attribute in the sample file. The <N> placeholder is replaced by the attribute index. For instance, if the sample file has three attributes to define, the process.meta file will include values for SampleFile_Attribute_Column0_Name, SampleFile_Attribute_Column1_Name and SampleFile_Attribute_Column2_Name. |
|
SampleFile_Attribute_Column<N>_Type |
Specifies the type of an attribute in the sample file. Must be set to one the following values: 0 - Attribute is of Float type 1 - Attribute of Alphanumerical type The <N> placeholder is replaced by the attribute index. For instance, if the sample file has three attributes to define, the process.meta file will include values for SampleFile_Attribute_Column0_Type, SampleFile_Attribute_Column1_Type and SampleFile_Attribute_Column2_Type. |
|
SampleFile_Attribute_Column<N>_Unit |
A string identifying the Units of Measurement for the attribute |
|
AssayFileCount |
Specifies how many assay files will be included. |
|
AssayFile<N> |
Specifies an assay file name. There will be one of these properties for each assay file. For instance, if AssayFileCount = 3, the file must include values for AssayFile0, AssayFile1 and AssayFile2. The <N> placeholder is replaced by the file index. |
|
Column_Assay<N>_ID |
Specifies the index of the column in the assay file that contains the drill hole ID. This is a unique identifier per hole, which is shared across several files in the dataset. There will be one of these properties for each assay file. For instance, if AssayFileCount = 3, the file must include values for Column_Assay0_ID, Column_Assay1_ID and Column_Assay2_ID. The <N> placeholder is replaced by the file index. |
|
Column_Assay<N>_Attribute_Columns |
Specifies how may attribute columns will be read from an assay file. There will be one of these properties for each assay file. The <N> placeholder is replaced by the file index. |
|
Column_Assay<N>_Attribute_Column<M>_Index |
Specifies the index of the column that contains the attribute values for a given attribute in a given assay file. The <N> placeholder is replaced by the assay file index, and the <M> placeholder is replaced by the attribute index. For instance, if the third assay file has three attributes to define, the properties.meta file will include values for Column_Assay2_Attribute_Column0_Index, Column_Assay2_Attribute_Column1_Index and Column_Assay2_Attribute_Column2_Index. |
|
Column_Assay<N>_Attribute_Column<M>_Name |
Specifies the name of an attribute in a given assay file. The <N> placeholder is replaced by the assay file index, and the <M> placeholder is replaced by the attribute index. For instance, if the third assay file has three attributes to define, the process.meta file will include values for Column_Assay2_Attribute_Column0_Name, Column_Assay2_Attribute_Column1_Name and Column_Assay2_Attribute_Column2_Name. |
|
Column_Assay<N>_Attribute_Column<M>_Type |
Specifies the type of an attribute in a given assay file. Must be set to one the following values: 0 - Attribute is of Float type 1 - Attribute of Alphanumerical type The <N> placeholder is replaced by the assay file index, and the <M> placeholder is replaced by the attribute index. For instance, if the third assay file has three attributes to define, the process.meta file will include values for Column_Assay2_Attribute_Column0_Type, Column_Assay2_Attribute_Column1_Type and Column_Assay2_Attribute_Column2_Type. |
|
Column_Assay<N>_Attribute_Column<M>_Unit |
A string identifying the Units of Measurement for the attribute |
|
Column_Assay<N>_Attribute_Column<M>_Label |
Specifies a readable label for the attribute name. The <N> placeholder is replaced by the attribute index, which is zero-based |
REST Interface - Working with Projects and Entities
Getting all Project Entities
This call retrieves all entities in the project.
Method
GET
URL
<server>/entity.ashx
Parameters
|
project |
Unique identifier for the project |
Returns
This call returns a JSON file. The file defines a dictionary where each key is an entity “ID”, and the data associated to the key is another dictionary containing the entity’s properties.
Example
| http://localhost:58697/entity.ashx?project=myproject |
Getting an Entity
This call retrieves one entity.
Method
GET
URL
<server>/entity.ashx
Parameters
|
id |
Unique identifier for the entity |
Returns
This call returns a JSON file. The file defines a dictionary where the entity’s properties appear as key-value pairs.
Example
| http://localhost:58697/entity.ashx?id=770A11061EFA41C0B7729DE5ABA266C4 |
Requesting a new ID
The REST API provides a mean to obtain a new unique identifier. This is useful when creating object hierarchies where objects are required to point to each other. By generating their IDs first, the application can submit objects only once.
Method
GET
URL
<server>/file.ashx
Parameters
|
generateids |
Contains the number of identifiers to be created |
Returns
If completed (200 code), this call returns a JSON array of strings where each string corresponds to a newly created ID:
["21CB001A697043ACBF84F54BCB1244F3"]
Example (PowerShell)
This GET call creates one new unique identifier:
|
Invoke-WebRequest -Uri "http://localhost:58697/file.ashx?generateids=1" -Headers @{ "User-Agent"="Mozilla/5.0 (Windows NT 10.0; Win64; x64) AppleWebKit/537.36 (KHTML, like Gecko) Chrome/85.0.4183.102 Safari/537.36" "Accept"="*/*" "Sec-Fetch-Site"="same-origin" "Sec-Fetch-Mode"="cors" "Sec-Fetch-Dest"="empty" "Referer"="http://localhost:58697/cloud/project.html?id=D9927BF62BFA4CCD930CBC716601D09C" "Accept-Encoding"="gzip, deflate, br" "Accept-Language"="en-US,en;q=0.9,es;q=0.8" } |
Creating a Project
This call creates a new project.
Method
POST
URL
<server>/entity.ashx
Post Payload
Multi-part form data containing two fields:
|
operation |
Must be set to "create" |
|
data |
A JSON dictionary where each project property appears as a key-value entry. |
Returns
If completed (200 code), this call returns a JSON object that describes the result of the operation and provides the ID of the newly created object:
{"result" : "success", "id" : "D8C328DD186E4059A81555E07E60A210"}
Example (PowerShell)
This POST call creates a folder entity named “New Folder” at the root of the “myproject” project:
| Invoke-WebRequest -Uri "http://localhost/entity.ashx" -Method "POST" -Headers @{"User-Agent"="Mozilla/5.0 (Windows NT 10.0; Win64; x64) AppleWebKit/537.36 (KHTML, like Gecko) Chrome/79.0.3945.130 Safari/537.36"; "Accept"="*/*"; "Origin"="http://localhost"; "S |
Creating an Entity
This call creates a new entity.
Method
POST
URL
<server>/entity.ashx
Parameters
|
project |
Unique identifier for the project |
Post Payload
Text payload containing a JSON dictionary where each entity property appears as a key-value entry.
Returns
If completed (200 code), this call returns a JSON object that describes the result of the operation and provides the ID of the newly created object:
{"result" : "success", "id" : "D8C328DD186E4059A81555E07E60A210"}
Example (PowerShell)
This POST call creates a folder entity named “New Folder” at the root of the “myproject” project:
| Invoke-WebRequest -Uri "http://localhost:58697/entity.ashx?project=myproject" -Method "POST" -Headers @{"Origin"="http://localhost:58697"; "Accept-Encoding"="gzip, deflate, br"; "Accept-Language"="en-US,en;q=0.9,es;q=0.8"; "User-Agent"="custom"; "Accept"="*/*"; "Referer"="http://localhost:58697/cloud/project.html?id=myproject"} -ContentType "application/json; charset=UTF-8" -Body "{`"name`":`"New Folder`",`"type`":`"FILE`",`"file_type`":`"FOLDER`",`"file_date`":`"1557000140020`",`"file_folder`":`"0`"}" |
Updating an Entity
This call updates the properties of an existing entity.
Method
POST
URL
<server>/entity.ashx
Parameters
|
id |
Unique identifier for the entity |
|
project |
Unique identifier for the project |
Post Payload
Text payload containing a JSON dictionary where each entity property appears as a key-value entry.
Returns
If completed (200 code), this call returns a JSON object that describes the result of the operation and the ID of the modified object:
{"result" : "success", "id" : " 953F185BDE91400C94B56E0F69F78B16"}
Example (PowerShell)
This POST call renames a folder entity:
Invoke-WebRequest -Uri "http://localhost:58697/entity.ashx?id=953F185BDE91400C94B56E0F69F78B16&project=myproject" -Method "POST" -Headers @{"Origin"="http://localhost:58697"; "Accept-Encoding"="gzip, deflate, br"; "Accept-Language"="en-US,en;q=0.9,es;q=0.8"; "User-Agent"="Mozilla/5.0 (Windows NT 10.0; Win64; x64) AppleWebKit/537.36 (KHTML, like Gecko) Chrome/73.0.3683.103 Safari/537.36"; "Accept"="*/*"; "Referer"="http://localhost:58697/cloud/project.html?id=myproject"} -ContentType "application/json; charset=UTF-8" -Body "{`"name`":`"My Folder`"}"
Deleting Entities
This call deletes a list of entities from the project. If the entity has any data associated to it, it will be deleted as well.
Method
POST
URL
<server>/entity.ashx
Parameters
|
id |
Unique identifier for the entity |
|
project |
Unique identifier for the project |
|
org |
Organization ID |
Post Payload
Multi-part form data containing two fields:
|
operation |
Must be set to “delete” |
|
items |
A string containing the IDs for the entities to be deleted, separated by spaces |
Returns
If completed (200 code), this call returns a JSON object that describes the result of the deletion operation:
{"result" : "success"}
Example (PowerShell)
This POST request deletes two entities:
| Invoke-WebRequest -Uri "http://localhost:58697/entity.ashx?project=myproject&org=2343243456678890" -Method "POST" -Headers @{"Origin"="http://localhost:58697"; "Accept-Encoding"="gzip, deflate, br"; "Accept-Language"="en-US,en;q=0.9,es;q=0.8"; "User-Agent"="custom"; "Accept"="*/*"; "Referer"="http://localhost:58697/cloud/project.html?id=myproject"} -ContentType "multipart/form-data; boundary=----WebKitFormBoundaryn7EOnCC1kkG5mYkA" -Body ([System.Text.Encoding]::UTF8.GetBytes("------WebKitFormBoundaryn7EOnCC1kkG5mYkA$([char]13)$([char]10)Content-Disposition: form-data; name=`"operation`"$([char]13)$([char]10)$([char]13)$([char]10)delete$([char]13)$([char]10)------WebKitFormBoundaryn7EOnCC1kkG5mYkA$([char]13)$([char]10)Content-Disposition: form-data; name=`"items`"$([char]13)$([char]10)$([char]13)$([char]10)953F185BDE91400C94B56E0F69F78B16 D8C328DD186E4059A81555E07E60A210 $([char]13)$([char]10)------WebKitFormBoundaryn7EOnCC1kkG5mYkA--$([char]13)$([char]10)")) |
Getting Entity Files
Some entities may have raw files associated to them. This is the case of raw point clouds and unprocessed block models. Some other entities may have files that are the result of processing spatial data, like a CSV report file, or datasets that have been exported as images, meshes or point clouds.
A single entity may have multiple files associated with it. Each file will have a unique filename under the entity.
Method
GET
URL
<server>/file.ashx
Parameters
|
id |
Unique identifier for the entity |
|
project |
Identifier of the project that contains the entity |
|
org |
Organization ID |
|
filename |
The name of the file inside the entity |
|
namehint |
A base64 string that contains a filename that will be suggested by the browser |
Returns
This call returns the contents of the file.
Example
http://localhost:58697/file.ashx?org=2343243456678890&project=myproject&id=08A1E6851DFD46F3B0EC958D1118A823&filename=report.csv&namehint=Vm9sdW1lb2ZTcGhlcmUuY3N2
Uploading Entity Files
Some entities may have raw files associated to them. This is the case of raw point clouds and unprocessed block models. Some other entities may have files that are the result of processing spatial data, like a CSV report file, or datasets that have been exported as images, meshes or point clouds.
A single entity may have multiple files associated with it. Each file will have a unique filename under the entity.
Method
POST
URL
<server>/file.ashx
Parameters
|
id |
Unique identifier for the entity |
|
project |
Identifier of the project that contains the entity |
|
org |
Organization ID |
|
filename |
The name of the file inside the entity |
Post Payload
Multi-form binary data containing the files to upload.
Returns
If completed (200 code), this call returns a JSON object that describes the result of the upload operation:
{"result" : "success", "size" : "0"}
Example
| Invoke-WebRequest -Uri "http://localhost:58697/file.ashx?project=myproject&id=BC094DC8D5CB4D15963D57D13B848A73&org=2343243456678890&partialsize=0" -Method "POST" -Headers @{"Origin"="http://localhost:58697"; "Accept-Encoding"="gzip, deflate, br"; "Accept-Language"="en-US,en;q=0.9,es;q=0.8"; "User-Agent"="Mozilla/5.0 (Windows NT 10.0; Win64; x64) AppleWebKit/537.36 (KHTML, like Gecko) Chrome/73.0.3683.103 Safari/537.36"; "Accept"="*/*"; "Referer"="http://localhost:58697/cloud/project.html?id=myproject"} -ContentType "multipart/form-data; boundary=----WebKitFormBoundaryqUAZzU65mbgwqJSz" -Body ([System.Text.Encoding]::UTF8.GetBytes("------WebKitFormBoundaryqUAZzU65mbgwqJSz$([char]13)$([char]10)Content-Disposition: form-data; name=`"file`"; filename=`"Points.zip`"$([char]13)$([char]10)Content-Type: application/x-zip-compressed$([char]13)$([char]10)$([char]13)$([char]10)$([char]13)$([char]10)------WebKitFormBoundaryqUAZzU65mbgwqJSz--$([char]13)$([char]10)")) |
Uploading large files
In occasions, file sizes can be prohibitively large for uploading using the REST interface, as some services have file limits of 2GB or 4GB for a single file size.
In these cases, there are alternatives to consider:
- If the files have not been compressed, consider placing them into a ZIP archive before uploading. The processor system will unpack the files.
- If the entity type allows, consider splitting the spatial data into several files that under the required limit.
- Bypass the REST upload altogether, and upload directly to the storage system, for instance AWS S3 or Azure Blob Storage.
The following sections cover how to upload data directly, depending on the storage system in use.
Uploading data directly to Azure Blob Storage
In order to upload data directly into Azure Blob storage, it is necessary to know how storage keys are composed in the system.
The keys in Azure are composed using the following syntax:
<OrganizationID>@<ProjectID>@<EntityID>@<FileName>
Where:
OrganizationID - Set to 2343243456678890
ProjectId - The ID of the project that contains the data entity
EntityId - The ID of the entity that will contain the file
FileName - Name for the file
Here is one particular examples of such a key:
2343243456678890@03684CA0F35947EC8243E52972CA3E70@3AC3A444AF414041A0668032536697AD@myblockmodel.zip
This key/blob pair should be created in the Blob Container that is used by the deployment.
Uploading data directly to AWS S3
In order to upload data directly into AWS S3, it is necessary to know how storage keys are composed in the system.
The keys in Azure are composed using the following syntax:
<OrganizationID>@<ProjectID>@<EntityID>@<FileName>
Where:
OrganizationID - Set to 2343243456678890
ProjectId - The ID of the project that contains the data entity
EntityId - The ID of the entity that will contain the file
FileName - Name for the file
Here is one particular examples of such a key:
2343243456678890@03684CA0F35947EC8243E52972CA3E70@3AC3A444AF414041A0668032536697AD@myblockmodel.zip
This key/blob pair should be created in the S3 Bucket that is used by the deployment.
Retrieving Processing Log Files
This call retrieves the processing log for an entity.
Method
GET
URL
<server>/file.ashx
Parameters
|
id |
Unique identifier for the entity |
|
project |
Project identifier |
|
org |
Organization identifier, use 2343243456678890 |
|
filename |
Set to processor.log |
Returns
This call returns a text file that contains the processing log.
Example
http://localhost:58697/file.ashx?org=2343243456678890&project=18ACF0074ED64B49851033071EA6F401&id=7D5F61152A14495F9BD2216DE59FE778&filename=processor.log
Adding versions to Workflow Products
The process of triggering a new version for a Workflow Product involves the following general steps:
- Upload all required files in the designated drop-zone blob container
- Once all required files have successfully uploaded, upload one additional file named "manifest.json" to the designated drop-zone blob container
The "manifest.json" file contains the following properties:
|
project |
Unique identifier for the project |
|
product |
The identifier for the Workflow Product |
|
files |
A JSON array of strings, where each string contains a path relative the drop-zone blob container for a file that should be attached to the new version |
|
properties |
A JSON object containing a dictionary of properties that will be associated with the new version. Values must be strings. |
Example of a "manifest.json" file:
{

    "project" : "D1847E42C5964B2DAED3B8DBE1C8B6CF",
    "product" : "COM_SURF",
    "files" : ["EOM_220130.zip"],
    "properties": {
        "custom_0" : "value 1",
        "custom_1" : "value 2"
    }
}
This example creates a new version in the COM_SURF product for the specified project. The version will be produced using the "EOM_220130.zip" which must have been previously uploaded to the same blob container as the "manifest.json" file. The example adds two custom properties to the version: "custom_0" and "custom_1".
This is the JSON schema for the "manifest.json" file:
{
  "$schema": "http://json-schema.org/draft-04/schema#",
  "type": "object",
  "properties": {
    "project": {
      "type": "string"
    },
    "product": {
      "type": "string"
    },
    "files": {
      "type": "array",
      "items": [
        {
          "type": "string"
        }
      ]
    },
    "properties": {
      "type": "object"
    }
  },
  "required": [
    "project",
    "product",
    "files"
  ]
}
Rest Interface - Advanced REST calls
Triggering Jobs
A typical project will require to process raw files into spatially indexed datasets. This process takes one or more raw data entities and produces a new type of entity. In other cases, the system will use information already stored in the spatial storage to create additional entities. Some examples of this are:
- Raw point clouds used to create voxel terrains
- Heightmap raster sets used to create voxel terrains
- Block model in CSV format used to create a voxelized block model
- A report created out of multiple indexed datasets
- A high-resolution mesh exported from a mashup of datasets
Entities that require further processing will be created with its “state” property set to “PARTIAL”.
It is possible to use the REST API to trigger the processing of the entity so its state transitions from “PARTIAL” to “COMPLETE”.
These processes are time-consuming so the REST request returns immediately. The interface allows to register a callback URL. Upon completion, the system will try to deliver the notification for a configurable number of attempts. Instead of using a callback, the application using the REST interface also has the option to poll the entity state for completeness. This is doing by verifying the “state” property of the entity has switched from “PARTIAL” to either “COMPLETE” or “ERROR”.
Method
POST
URL
<server>/events.ashx
Parameters
|
id |
Unique identifier for the entity |
|
project |
Unique identifier for the project |
|
org |
Organization ID |
Post Payload
Multi-part form data containing two fields:
|
process |
A string identifying this request to a later callback |
|
callback |
A URL that will be called when the job has completed. This is an optional parameter. The URL is opaque to the system, but must contain two placeholders:
For example: http://myserver.mysite.com?mytoken=VF_PROCESS&id=VF_ID&myoutcome=VF_RESULT_CODE |
Result Error Codes
|
0 |
Operation was successful |
|
1 |
Entity not found |
|
2 |
Unknown error |
|
3 |
Error processing report |
|
4 |
Image creation failed |
|
5 |
Mesh creation failed |
|
6 |
Point cloud creation failed |
|
7 |
Could not index point cloud |
|
8 |
Could not index mesh |
|
9 |
Could not process block model |
|
10 |
Could not process voxel terrain model |
|
11 |
Could not ingest raw point cloud |
|
12 |
Could not ingest DEM (Heightmap) |
|
13 |
Could not produce Unity project |
|
14 |
Could not export density data |
|
15 |
Could not process density data |
|
16 |
Could not index block model |
|
17 |
Could not process material layer request |
Returns
If completed (200 code), this call returns a JSON object that describes the result of the operation:
{"result" : "success"}
Example (PowerShell)
This POST call triggers the processing of an entity:
| Invoke-WebRequest -Uri "http://localhost:58697/events.ashx?project=myproject&id=4E40F10BD7C74A77AE1E4CC163F3EA98&org=2343243456678890" -Method "POST" -Headers @{"Origin"="http://localhost:58697"; "Accept-Encoding"="gzip, deflate, br"; "Accept-Language"="en-US,en;q=0.9,es;q=0.8"; "User-Agent"="Mozilla/5.0 (Windows NT 10.0; Win64; x64) AppleWebKit/537.36 (KHTML, like Gecko) Chrome/73.0.3683.103 Safari/537.36"; "Accept"="*/*"; "Referer"="http://localhost:58697/cloud/project.html?id=myproject"} -ContentType "multipart/form-data; boundary=----WebKitFormBoundaryRADf50WY1KjKrmUF" -Body ([System.Text.Encoding]::UTF8.GetBytes("------WebKitFormBoundaryRADf50WY1KjKrmUF$([char]13)$([char]10)Content-Disposition: form-data; name=`"process`"$([char]13)$([char]10)$([char]13)$([char]10)IMPORT_VOXSURF$([char]13)$([char]10)------WebKitFormBoundaryRADf50WY1KjKrmUF--$([char]13)$([char]10)")) |
Triggering Reports
Reports, like some other entities, require to be processed in order to have their data ready for use. The processing of a report is triggered in the same fashion as any other processed entity, which is the subject of the previous section.
Before processing a report, the report entity must be properly configured. This section will cover how to set up a report using the REST interface.
To successfully set up a report entity, it is necessary to:
- Define which report program will be used
- Provide values to the program’s inputs
- Define a 3D region where the report will run
- The Report Program Entity
A report entity will obtain its data by running a Python program or a .Net assembly over a custom mashup of spatial datasets. It is up to the report code to decide which inputs will be used and how the data will be interpreted.
In order to set up a report entity, it is necessary to have a report program entity. The program entity holds the Python program, and it can be used to create many different report entities, each one containing the results of a different run of the same program, but with different input choices.
If there is no program entity yet, one must be created with the following properties:
|
code_origin |
Contains the type of code used by the program. Currently, two types are supported:
|
|
code |
If code_origin is "PYTHON", this property contains the Python code for the program, in Base64 format. If code_origin is "NETASM", this property identifies the entry-point class for the Lambda program in the form: <FullyNamespacedClassName>:<DLLName> |
|
program_type |
Contains the type of the program. The program type can be one of the following:
|
For Python programs, the supplied Python code can be validated by making an additional REST call. See the Validating a Program section.
For .Net assemblies, the entity must be sent for processing so the platform can verify the supplied code. See the Triggering Jobs section for information on how to start the processing of the program entity.
The entity creation request will return the ID of the report program in the system. This ID will be later used to set up the report entity.
Providing input values
In most cases a report program will request input from the user. In the context of a REST call, it may not be possible to prompt the user for any information, so it is up to the REST caller to supply the values the report program expects. This requires knowledge of which inputs the report program expects.
The report program may call any of the Voxel Farm Python interface functions to ask for input. These functions are:
|
voxelfarm.input(id, …) |
Requests a numeric value |
|
voxelfarm.input_string(id, …) |
Requests a string |
|
voxelfarm.input_date(id, …) |
Requests a date/time |
|
voxelfarm.input_entity(id, …) |
Requests the unique ID of an existing entity in the project |
|
voxelfarm.input_attributes(id, …) |
Requests an attribute set for an existing entity |
|
voxelfarm.input_query(id, …) |
Requests a filter query for an existing entity |
When using the .Net assembly interface, the input functions follow the same pattern. The same rules apply.
The first parameter in every call is an alphanumeric identifier. This identifier is used to store the input value in the entity model. If caller of the REST interface is aware of the calls made by the program requesting input, for each call to an input function, a property must be added to the report entity containing the value for the input.
|
input_value_#id# |
Contains the value for the input. Replace the #id# placeholder by the actual id used by the input. |
|
input_label_#id# |
Contains the label for the input. Replace the #id# placeholder by the actual id used by the input. |
|
input_type_#id# |
Specifies type of the input. Replace the #id# placeholder by the actual id used by the input. The possible input types are: 0 – Numeric 1 – Date 2 – String 3 – Entity 4 – Attribute Set 5 – Query Expression 6 – Boolean (Checkbox) 7 – Color Legend 8 – Drill-hole Settings |
|
input_filter_#id# |
For Specifies type of the input. Replace the #id# placeholder by the actual id used by the input. Must be non-zero for type 3 (Entity), contains a numeric value containing a binary mask identifying which types of entities can be potentially selected. Use binary OR to merge different types into a single mask. The values identifying each identity type are (in hexadecimal): 0x01 – Voxel Terrain 0x02 – Voxel Block Model 0x04 – Voxel Generator 0x08 – Realtime Voxel Terrain 0x10 – Indexed Point Cloud |
The caller of the REST interface may not be aware of which inputs the report program expects. It is possible to discover the list of inputs by performing an additional REST call. This REST call is covered in the “Getting program inputs” section.
Providing a 3D region
The system currently supports one type of 3D region, which is defined as a horizontal 2D polygon that has been extruded along the vertical dimension.
A region can be expressed in the REST interface as a single string, containing the following format:
1,<min_height>,<max_height>,<polygon_point0_x>, <polygon_point0_y>, <polygon_point1_x>, <polygon_point1_y>, …
The format is a list of numbers separated by commas. The first number must be 1, this identifies this is an extruded polygon region. The second two numbers are world coordinates for the vertical bounds of the region. The following numbers are the X, Y coordinates of each region point. The polygon points are defined in counter-clockwise order.
For example, the following region string defines a 10-unit cube centered in the project’s origin:
1,-5,5,-5, 5,5,5,5,-5,-5,-5
Putting the Report entity together
Once the report program and its inputs are known, it is possible to define all properties required to create the report entity. The following table lists these properties:
|
name |
Set to the readable name of the report. |
|
description |
Set to a textual description of the report. |
|
type |
Must be set to “FILE”. |
|
state |
Set to “PARTIAL” |
|
file_type |
Set to “REPORT” |
|
file_folder |
Set to the ID of the folder that will contain the report. Set to “0” to use the project’s root folder. |
|
program |
Set to the ID of the program entity that contains the report code |
|
lod |
Set to zero. |
|
region |
Set to region string. This is the region where the scope will run. |
|
input_value_#id# |
For each input in the program, se to the value for the input. Replace the #id# placeholder by the actual id used by the input. |
|
input_label_#id# |
For each input in the program, set to the label for the input. Replace the #id# placeholder by the actual id used by the input. |
|
input_type_#id# |
For each input in the program, set to type of the input. Replace the #id# placeholder by the actual id used by the input. The possible input types are: 0 – Numeric 1 – Date 2 – String 3 – Entity 4 – Attribute Set 5 – Query Expression |
|
input_filter_#id# |
Must defined for each input in the program. Replace the #id# placeholder by the actual id used by the input. Must be non-zero for type 3 (Entity), contains a numeric value containing a binary mask identifying which types of entities can be potentially selected. Use binary OR to merge different types into a single mask. The values identifying each identity type are (in hexadecimal): 0x01 – Voxel Terrain 0x02 – Voxel Block Model 0x04 – Voxel Generator 0x08 – Realtime Voxel Terrain 0x10 – Indexed Point Cloud |
The next step is to create the entity using the values defined above. See the “Creating an entity” section for instruction on how to perform this operation.
Right after it is created, the report entity will be in unprocessed state. To trigger the report’s processing, follow the steps outlined in the “Triggering jobs” section.
Report example
This example will use the REST interface to create a report that computes the volume of a large sphere. Both the report and the sphere will be Python programs. This example does not rely on any external data or entities that may already exist in the project.
This is the Python code for the sphere object:
import voxelfarm as vf
import math
vf.init()
x = vf.input("x", "Sphere Center X")
y = vf.input("y", "Sphere Center Y")
z = vf.input("z", "Sphere Center Z")
r = vf.input("r", "Sphere Radius")
vf.set_entity_bounds_x(x - r, x + r)
vf.set_entity_bounds_y(y - r, y + r)
vf.set_entity_bounds_z(z - r, z + r)
for v in vf.field:
    p = vf.get_field_origin(v)
    dx = x - p[0]
    dy = y - p[1]
    dz = z - p[2]
    d = math.sqrt(dx * dx + dy * dy + dz * dz)
    vf.set_field(v, d - r)
This program must be converted to Base64 before it can be stored as a Program entity:
| aW1wb3J0IHZveGVsZmFybSBhcyB2ZgppbXBvcnQgbWF0aAoKdmYuaW5pdCgpCgp4ID0gdmYuaW5wdXQoIngiLCAiU3BoZXJlIENlbnRlciBYIikKeSA9IHZmLmlucHV0KCJ5IiwgIlNwaGVyZSBDZW50ZXIgWSIpCnogPSB2Zi5pbnB1dCgieiIsICJTcGhlcmUgQ2VudGVyIFoiKQpyID0gdmYuaW5wdXQoInIiLCAiU3BoZXJlIFJhZGl1cyIpCgp2Zi5zZXRfZW50aXR5X2JvdW5kc194KHggLSByLCB4ICsgcikKdmYuc2V0X2VudGl0eV9ib3VuZHNfeSh5IC0gciwgeSArIHIpCnZmLnNldF9lbnRpdHlfYm91bmRzX3ooeiAtIHIsIHogKyByKQoKZm9yIHYgaW4gdmYuZmllbGQ6CiAgICBwID0gdmYuZ2V0X2ZpZWxkX29yaWdpbih2KQogICAgZHggPSB4IC0gcFswXQogICAgZHkgPSB5IC0gcFsxXQogICAgZHogPSB6IC0gcFsyXQogICAgZCA9IG1hdGguc3FydChkeCAqIGR4ICsgZHkgKiBkeSArIGR6ICogZHopCiAgICB2Zi5zZXRfZmllbGQodiwgZCAtIHIpCg== |
The following REST call creates the Program entity for the sphere:
| Invoke-WebRequest -Uri "http://localhost:58697/entity.ashx?project=myproject" -Method "POST" -Headers @{"Origin"="http://localhost:58697"; "Accept-Encoding"="gzip, deflate, br"; "Accept-Language"="en-US,en;q=0.9,es;q=0.8"; "User-Agent"="Mozilla/5.0 (Windows NT 10.0; Win64; x64) AppleWebKit/537.36 (KHTML, like Gecko) Chrome/73.0.3683.103 Safari/537.36"; "Accept"="*/*"; "Referer"="http://localhost:58697/cloud/project.html?id=myproject"} -ContentType "application/json; charset=UTF-8" -Body "{`"name`":`"Sphere`",`"type`":`"FILE`",`"state`":`"COMPLETE`",`"code`":`"aW1wb3J0IHZveGVsZmFybSBhcyB2ZgppbXBvcnQgbWF0aAoKdmYuaW5pdCgpCgp4ID0gdmYuaW5wdXQoIngiLCAiU3BoZXJlIENlbnRlciBYIikKeSA9IHZmLmlucHV0KCJ5IiwgIlNwaGVyZSBDZW50ZXIgWSIpCnogPSB2Zi5pbnB1dCgieiIsICJTcGhlcmUgQ2VudGVyIFoiKQpyID0gdmYuaW5wdXQoInIiLCAiU3BoZXJlIFJhZGl1cyIpCgp2Zi5zZXRfZW50aXR5X2JvdW5kc194KHggLSByLCB4ICsgcikKdmYuc2V0X2VudGl0eV9ib3VuZHNfeSh5IC0gciwgeSArIHIpCnZmLnNldF9lbnRpdHlfYm91bmRzX3ooeiAtIHIsIHogKyByKQoKZm9yIHYgaW4gdmYuZmllbGQ6CiAgICBwID0gdmYuZ2V0X2ZpZWxkX29yaWdpbih2KQogICAgZHggPSB4IC0gcFswXQogICAgZHkgPSB5IC0gcFsxXQogICAgZHogPSB6IC0gcFsyXQogICAgZCA9IG1hdGguc3FydChkeCAqIGR4ICsgZHkgKiBkeSArIGR6ICogZHopCiAgICB2Zi5zZXRfZmllbGQodiwgZCAtIHIpCg==`",`"program_type`":`"VOXEL`",`"file_type`":`"PROGRAM`",`"file_size`":`"0`",`"file_date`":`"1557157137959`",`"file_folder`":`"0`"}" |
The server returns the ID of the newly created program:
{"result" : "success", "id" : "03318353117A40D6AA8B6C09A85A1060"}
In a similar fashion, it is necessary to create a program entity for the report. The following report program computes the volume of an object:
import voxelfarm as vf
entity = vf.input_entity("entity1", "Entity", vf.type.voxel_terrain | vf.type.voxel_generator)
voxels = vf.load_voxels(entity, vf.attribute.volume, None)
volume = 0.0
for v in vf.voxels:
    volume += vf.get_volume(voxels, v)
sum = vf.start_sum("Item", "Object Volume")
vf.sum(sum, volume)
This program must be converted to Base64 before it can be stored as a Program entity:
| aW1wb3J0IHZveGVsZmFybSBhcyB2ZgplbnRpdHkgPSB2Zi5pbnB1dF9lbnRpdHkoImVudGl0eTEiLCAiRW50aXR5IiwgdmYudHlwZS52b3hlbF90ZXJyYWluIHwgdmYudHlwZS52b3hlbF9wcm9ncmFtKQp2b3hlbHMgPSB2Zi5sb2FkX3ZveGVscyhlbnRpdHksIHZmLmF0dHJpYnV0ZS52b2x1bWUsIE5vbmUpCnZvbHVtZSA9IDAuMApmb3IgdiBpbiB2Zi52b3hlbHM6CiAgICB2b2x1bWUgKz0gdmYuZ2V0X3ZvbHVtZSh2b3hlbHMsIHYpCnN1bSA9IHZmLnN0YXJ0X3N1bSgiSXRlbSIsICJPYmplY3QgVm9sdW1lIikKdmYuc3VtKHN1bSwgdm9sdW1lKQo= |
The following REST call creates the program entity for the report:
| Invoke-WebRequest -Uri "http://localhost:58697/entity.ashx?project=myproject" -Method "POST" -Headers @{"Origin"="http://localhost:58697"; "Accept-Encoding"="gzip, deflate, br"; "Accept-Language"="en-US,en;q=0.9,es;q=0.8"; "User-Agent"="Mozilla/5.0 (Windows NT 10.0; Win64; x64) AppleWebKit/537.36 (KHTML, like Gecko) Chrome/73.0.3683.103 Safari/537.36"; "Accept"="*/*"; "Referer"="http://localhost:58697/cloud/project.html?id=myproject"} -ContentType "application/json; charset=UTF-8" -Body "{`"name`":`"Compute Volume`",`"type`":`"FILE`",`"state`":`"COMPLETE`",`"code`":`"aW1wb3J0IHZveGVsZmFybSBhcyB2ZgplbnRpdHkgPSB2Zi5pbnB1dF9lbnRpdHkoImVudGl0eTEiLCAiRW50aXR5IiwgdmYudHlwZS52b3hlbF90ZXJyYWluIHwgdmYudHlwZS52b3hlbF9wcm9ncmFtKQp2b3hlbHMgPSB2Zi5sb2FkX3ZveGVscyhlbnRpdHksIHZmLmF0dHJpYnV0ZS52b2x1bWUsIE5vbmUpCnZvbHVtZSA9IDAuMApmb3IgdiBpbiB2Zi52b3hlbHM6CiAgICB2b2x1bWUgKz0gdmYuZ2V0X3ZvbHVtZSh2b3hlbHMsIHYpCnN1bSA9IHZmLnN0YXJ0X3N1bSgiSXRlbSIsICJPYmplY3QgVm9sdW1lIikKdmYuc3VtKHN1bSwgdm9sdW1lKQo=`",`"program_type`":`"REPORT`",`"file_type`":`"PROGRAM`",`"file_size`":`"0`",`"file_date`":`"1557157689680`",`"file_folder`":`"0`"}" |
The server returns the ID of the new report program:
{"result" : "success", "id" : "33ED105A348F44DBADB146867B383E71"}
The next step is to create an actual sphere object. The earlier step only created a program that can produce any sphere given some input parameters. In this step, a new entity must be created which links to the sphere program and provides values for the inputs the sphere program expects.
By examining the Sphere program, it can be seen it requests four different inputs:
x = vf.input("x", "Sphere Center X")
y = vf.input("y", "Sphere Center Y")
z = vf.input("z", "Sphere Center Z")
r = vf.input("r", "Sphere Radius")
The inputs are identified by the “x”, “y”, “z” and “r” input identifiers. These identifiers will be used in the next REST call to supply the values expected by the Sphere program.
The following REST request creates a Sphere entity centered at the project’s origin and with a radius of 50 meters:
| Invoke-WebRequest -Uri "http://localhost:58697/entity.ashx?project=myproject" -Method "POST" -Headers @{"Origin"="http://localhost:58697"; "Accept-Encoding"="gzip, deflate, br"; "Accept-Language"="en-US,en;q=0.9,es;q=0.8"; "User-Agent"="Mozilla/5.0 (Windows NT 10.0; Win64; x64) AppleWebKit/537.36 (KHTML, like Gecko) Chrome/73.0.3683.103 Safari/537.36"; "Accept"="*/*"; "Referer"="http://localhost:58697/cloud/project.html?id=myproject"} -ContentType "application/json; charset=UTF-8" -Body "{`"name`":`"My Sphere`",`"type`":`"FILE`",`"state`":`"COMPLETE`",`"program`":`"03318353117A40D6AA8B6C09A85A1060`",`"file_type`":`"VOXGEN`",`"file_size`":`"0`",`"file_date`":`"1557158594400`",`"file_folder`":`"0`",`"input_count`":`"4`",`"input_label_x`":`"Sphere Center X`",`"input_filter_x`":`"0`",`"input_type_x`":`"0`",`"input_value_x`":`"0`",`"input_label_y`":`"Sphere Center Y`",`"input_filter_y`":`"0`",`"input_type_y`":`"0`",`"input_value_y`":`"0`",`"input_label_z`":`"Sphere Center Z`",`"input_filter_z`":`"0`",`"input_type_z`":`"0`",`"input_value_z`":`"0`",`"input_label_r`":`"Sphere Radius`",`"input_filter_r`":`"0`",`"input_type_r`":`"0`",`"input_value_r`":`"50`"}" |
The server returns the ID of the newly created entity:
{"result" : "success", "id" : "060FCABE28CA4E41B46C89B0F65CB57E"}
At this point, all auxiliary entities required to create the report entity are ready. The next steps will be about setting up the actual report entity.
Like the sphere object, creating the report entity will require providing values to the inputs expected by the report program. From inspecting the report code, it can be seen the reports expects one input of type entity:
entity = vf.input_entity("entity1", "Entity", vf.type.voxel_terrain | vf.type.voxel_generator)
This input is identified as “entity1” and it will receive the ID of the sphere entity previously created so the report inspects the data produced by the sphere and gets to compute its volume. The type for this input is set to 3 (Entity) and the filter is set to 5 (Voxel Terrain + Voxel Generator).
The report entity also requires a region string. The following region defines a bounding box that encloses the sphere:
1,-50,50,-50,50,50,50,50,-50,-50,-50
The following REST request creates the report entity:
| Invoke-WebRequest -Uri "http://localhost:58697/entity.ashx?project=myproject" -Method "POST" -Headers @{"Origin"="http://localhost:58697"; "Accept-Encoding"="gzip, deflate, br"; "Accept-Language"="en-US,en;q=0.9,es;q=0.8"; "User-Agent"="Mozilla/5.0 (Windows NT 10.0; Win64; x64) AppleWebKit/537.36 (KHTML, like Gecko) Chrome/73.0.3683.103 Safari/537.36"; "Accept"="*/*"; "Referer"="http://localhost:58697/cloud/project.html?id=myproject"} -ContentType "application/json; charset=UTF-8" -Body "{`"name`":`"Volume of Sphere`",`"type`":`"FILE`",`"state`":`"PARTIAL`",`"program`":`"33ED105A348F44DBADB146867B383E71`",`"file_type`":`"REPORT`",`"file_size`":`"0`",`"file_date`":`"1557161627287`",`"file_folder`":`"0`",`"input_count`":`"1`",`"region`":`"1,-50,50,-50,50,50,50,50,-50,-50,-50`",`"lod`":`"0`",`"input_label_entity1`":`"Entity`",`"input_filter_entity1`":`"5`",`"input_type_entity1`":`"3`",`"input_value_entity1`":`"060FCABE28CA4E41B46C89B0F65CB57E`"}" |
The server returns the ID for the report entity:
{"result" : "success", "id" : "08A1E6851DFD46F3B0EC958D1118A823"}
The last call created a new entity for the report, however the results for the report will not be ready until the report entity has been triggered for processing and the processing is complete.
The following REST request triggers the processing of the report:
| Invoke-WebRequest -Uri "http://localhost:58697/events.ashx?project=myproject&id=08A1E6851DFD46F3B0EC958D1118A823&org=2343243456678890" -Method "POST" -Headers @{"Origin"="http://localhost:58697"; "Accept-Encoding"="gzip, deflate, br"; "Accept-Language"="en-US,en;q=0.9,es;q=0.8"; "User-Agent"="Mozilla/5.0 (Windows NT 10.0; Win64; x64) AppleWebKit/537.36 (KHTML, like Gecko) Chrome/73.0.3683.103 Safari/537.36"; "Accept"="*/*"; "Referer"="http://localhost:58697/cloud/project.html?id=myproject"} -ContentType "multipart/form-data; boundary=----WebKitFormBoundaryZATmyEvaQ9XPOzuY" -Body ([System.Text.Encoding]::UTF8.GetBytes("------WebKitFormBoundaryZATmyEvaQ9XPOzuY$([char]13)$([char]10)Content-Disposition: form-data; name=`"process`"$([char]13)$([char]10)$([char]13)$([char]10)RUN_REPORT$([char]13)$([char]10)------WebKitFormBoundaryZATmyEvaQ9XPOzuY--$([char]13)$([char]10)")) |
This example does not use the callback URL, it will poll until the state of the report entity is set to “COMPLETE”. The following REST request will retrieve the report entity:
| Invoke-WebRequest -Uri "http://localhost:58697/entity.ashx?id=08A1E6851DFD46F3B0EC958D1118A823" -Headers @{"Upgrade-Insecure-Requests"="1"; "User-Agent"="Mozilla/5.0 (Windows NT 10.0; Win64; x64) AppleWebKit/537.36 (KHTML, like Gecko) Chrome/73.0.3683.103 Safari/537.36"; "Accept"="text/html,application/xhtml+xml,application/xml;q=0.9,image/webp,image/apng,*/*;q=0.8,application/signed-exchange;v=b3"; "Accept-Encoding"="gzip, deflate, br"; "Accept-Language"="en-US,en;q=0.9,es;q=0.8"} |
The server will respond with a JSON object that contains all properties for the report:
| {"lod":"0","file_folder":"0","input_type_entity1":"3","input_count":"1","input_filter_entity1":"5","file_type":"REPORT","project":"myproject","name":"Volume of Sphere","state":"PARTIAL","program":"33ED105A348F44DBADB146867B383E71","file_size":"0","partial_progress":"0","region":"1,-50,50,-50,50,50,50,50,-50,-50,-50","ID":"08A1E6851DFD46F3B0EC958D1118A823","file_date":"1557162371543","input_value_entity1":"060FCABE28CA4E41B46C89B0F65CB57E","partial_status":"8,000,000 cubic meter volume analyzed...","type":"FILE","input_label_entity1":"Entity"} |
By inspecting the value of the “state” property, it is possible to determine if the entity has completed processing, and whether any errors may have occurred. When the processing completes, the “state” property will switch to either “COMPLETE” or “ERROR”.
Once the report’s processing has completed, the data generated by the report can be downloaded as a CSV file using the REST API:
|
Invoke-WebRequest -Uri "http://localhost:58697/file.ashx?org=2343243456678890&project=myproject&id=08A1E6851DFD46F3B0EC958D1118A823&filename=report.csv&namehint=Vm9sdW1lb2ZTcGhlcmUuY3N2" -Headers @{"Accept"="*/*"; "Accept-Encoding"="gzip, deflate, br"; "Referer"="http://localhost:58697/cloud/project.html?id=myproject"; "Accept-Language"="en-US,en;q=0.9,es;q=0.8"; "User-Agent"="Mozilla/5.0 (Windows NT 10.0; Win64; x64) AppleWebKit/537.36 (KHTML, like Gecko) Chrome/73.0.3683.103 Safari/537.36"}
|
The contents of the file are:
Item,Object Volume
Item,523605.137331239
At voxel size 0.5m, the report program has computed the volume of the 50m sphere to be: 523,605.137331239 cubic meters. The analytical result for the volume of a 50m sphere is: 523,598.7755983 cubic meters. The error introduced by the discretization of the sphere is 0.0012%
Triggering Export Jobs
Export entities allow to extract information from Voxel Farm Servers into a standard format. Currently, data can be exported in the following formats:
- An .OBJ file containing a mesh
- One or more image tiles in TIF/TFW format
- A CVS file containing a point cloud
Before exporting any data, the export entity must be properly configured. This section will cover how to set up an export job using the REST interface.
To successfully set up an export entity, it is necessary to:
- Define which region of space will be exported
- Define which type of data will be exported
- Define which other entity will provide the data to be exported
Providing a 3D region
The Voxel Farm system currently supports one type of 3D region, which is defined as a horizontal 2D polygon that has been extruded along the vertical dimension.
A region can be expressed in the REST interface as a single string, containing the following format:
1,<min_height>,<max_height>,<polygon_point0_x>, <polygon_point0_y>, <polygon_point1_x>, <polygon_point1_y>, …
The format is a list of numbers separated by commas. The first number must be 1, this identifies this is an extruded polygon region. The second two numbers are world coordinates for the vertical bounds of the region. The following numbers are the X, Y coordinates of each region point. The polygon points are defined in counter-clockwise order.
For example, the following region string defines a 10-unit cube centered in the project’s origin:
1,-5,5,-5, 5,5,5,5,-5,-5,-5
Putting the export entity together
The following table lists the properties that must be set in order to create an export entity:
|
name |
Set to the readable name of the export job. |
|
description |
Set to a textual description of the export job. |
|
type |
Must be set to “FILE”. |
|
state |
Set to “PARTIAL” |
|
file_type |
Set to “EXPORT” |
|
file_folder |
Set to the ID of the folder that will contain the export entity. Set to “0” to use the project’s root folder. |
|
entity |
Set to the ID of the program entity that will provide the data to be exported |
|
lod |
Set to the desired resolution for the exported data. Zero is the highest possible resolution, each subsequent number will decrease the resolution by a factor of two. |
|
region |
Set to region string. |
|
export_type |
Set to the desired type of data. The possible values are:
|
This set of values can be used to create the entity, as described in the “Creating an entity” section. Once the entity is successfully created, the actual export job needs to be triggered. To see how to do so, see the “Triggering jobs” section.
Downloading the exported data
Once the export job completes, it is possible to download the data using the REST interface.
The exported data is always created inside a ZIP archive, and this archive is attached to the export interface using the filename “export.zip”.
The “Getting entity files” section describes how to retrieve a file once its name inside the entity is known.
Export example
This example will use the REST interface to create an export job that produces a mesh for a large sphere. The sphere will be defined as a custom volumetric object using a Python program. This example does not rely on any external data or entities that may already exist in the project.
This is the Python code for the sphere object:
import voxelfarm as vf
import math
vf.init()
x = vf.input("x", "Sphere Center X")
y = vf.input("y", "Sphere Center Y")
z = vf.input("z", "Sphere Center Z")
r = vf.input("r", "Sphere Radius")
vf.set_entity_bounds_x(x - r, x + r)
vf.set_entity_bounds_y(y - r, y + r)
vf.set_entity_bounds_z(z - r, z + r)
for v in vf.field:
    p = vf.get_field_origin(v)
    dx = x - p[0]
    dy = y - p[1]
    dz = z - p[2]
    d = math.sqrt(dx * dx + dy * dy + dz * dz)
    vf.set_field(v, d - r)
This program must be converted to Base64 before it can be stored as a Program entity:
| aW1wb3J0IHZveGVsZmFybSBhcyB2ZgppbXBvcnQgbWF0aAoKdmYuaW5pdCgpCgp4ID0gdmYuaW5wdXQoIngiLCAiU3BoZXJlIENlbnRlciBYIikKeSA9IHZmLmlucHV0KCJ5IiwgIlNwaGVyZSBDZW50ZXIgWSIpCnogPSB2Zi5pbnB1dCgieiIsICJTcGhlcmUgQ2VudGVyIFoiKQpyID0gdmYuaW5wdXQoInIiLCAiU3BoZXJlIFJhZGl1cyIpCgp2Zi5zZXRfZW50aXR5X2JvdW5kc194KHggLSByLCB4ICsgcikKdmYuc2V0X2VudGl0eV9ib3VuZHNfeSh5IC0gciwgeSArIHIpCnZmLnNldF9lbnRpdHlfYm91bmRzX3ooeiAtIHIsIHogKyByKQoKZm9yIHYgaW4gdmYuZmllbGQ6CiAgICBwID0gdmYuZ2V0X2ZpZWxkX29yaWdpbih2KQogICAgZHggPSB4IC0gcFswXQogICAgZHkgPSB5IC0gcFsxXQogICAgZHogPSB6IC0gcFsyXQogICAgZCA9IG1hdGguc3FydChkeCAqIGR4ICsgZHkgKiBkeSArIGR6ICogZHopCiAgICB2Zi5zZXRfZmllbGQodiwgZCAtIHIpCg== |
The following REST call creates the Program entity for the sphere:
| Invoke-WebRequest -Uri "http://localhost:58697/entity.ashx?project=myproject" -Method "POST" -Headers @{"Origin"="http://localhost:58697"; "Accept-Encoding"="gzip, deflate, br"; "Accept-Language"="en-US,en;q=0.9,es;q=0.8"; "User-Agent"="Mozilla/5.0 (Windows NT 10.0; Win64; x64) AppleWebKit/537.36 (KHTML, like Gecko) Chrome/73.0.3683.103 Safari/537.36"; "Accept"="*/*"; "Referer"="http://localhost:58697/cloud/project.html?id=myproject"} -ContentType "application/json; charset=UTF-8" -Body "{`"name`":`"Sphere`",`"type`":`"FILE`",`"state`":`"COMPLETE`",`"code`":`"aW1wb3J0IHZveGVsZmFybSBhcyB2ZgppbXBvcnQgbWF0aAoKdmYuaW5pdCgpCgp4ID0gdmYuaW5wdXQoIngiLCAiU3BoZXJlIENlbnRlciBYIikKeSA9IHZmLmlucHV0KCJ5IiwgIlNwaGVyZSBDZW50ZXIgWSIpCnogPSB2Zi5pbnB1dCgieiIsICJTcGhlcmUgQ2VudGVyIFoiKQpyID0gdmYuaW5wdXQoInIiLCAiU3BoZXJlIFJhZGl1cyIpCgp2Zi5zZXRfZW50aXR5X2JvdW5kc194KHggLSByLCB4ICsgcikKdmYuc2V0X2VudGl0eV9ib3VuZHNfeSh5IC0gciwgeSArIHIpCnZmLnNldF9lbnRpdHlfYm91bmRzX3ooeiAtIHIsIHogKyByKQoKZm9yIHYgaW4gdmYuZmllbGQ6CiAgICBwID0gdmYuZ2V0X2ZpZWxkX29yaWdpbih2KQogICAgZHggPSB4IC0gcFswXQogICAgZHkgPSB5IC0gcFsxXQogICAgZHogPSB6IC0gcFsyXQogICAgZCA9IG1hdGguc3FydChkeCAqIGR4ICsgZHkgKiBkeSArIGR6ICogZHopCiAgICB2Zi5zZXRfZmllbGQodiwgZCAtIHIpCg==`",`"program_type`":`"VOXEL`",`"file_type`":`"PROGRAM`",`"file_size`":`"0`",`"file_date`":`"1557157137959`",`"file_folder`":`"0`"}" |
The server returns the ID of the newly created program:
{"result" : "success", "id" : "03318353117A40D6AA8B6C09A85A1060"}The next step is to create the export entity. The entity will use “1,-50,50,-50,50,50,50,50,-50,-50,-50” for the region, and will have its export_type property set to “mesh”. The following REST request creates the entity:
| Invoke-WebRequest -Uri "http://localhost:58697/entity.ashx?project=myproject" -Method "POST" -Headers @{"Origin"="http://localhost:58697"; "Accept-Encoding"="gzip, deflate, br"; "Accept-Language"="en-US,en;q=0.9,es;q=0.8"; "User-Agent"="Mozilla/5.0 (Windows NT 10.0; Win64; x64) AppleWebKit/537.36 (KHTML, like Gecko) Chrome/73.0.3683.103 Safari/537.36"; "Accept"="*/*"; "Referer"="http://localhost:58697/cloud/project.html?id=myproject"} -ContentType "application/json; charset=UTF-8" -Body "{`"name`":`"Sphere Mesh`",`"type`":`"FILE`",`"file_type`":`"EXPORT`",`"export_type`":`"mesh`",`"lod`":`"0`",`"region`":`"1,-50,50,-50,50,50,50,50,-50,-50,-50`",`"entity`":`"398446B631524AABAEE0D3183C138A62`",`"state`":`"PARTIAL`",`"file_size`":`"0`",`"file_date`":`"1557231988008`",`"file_folder`":`"0`"}" |
The server returns the ID of the newly created export entity:
{"result" : "success", "id" : "93E4A859BAD74A30AABFFE02D2403695"}
The following REST call starts the processing of the export entity:
| Invoke-WebRequest -Uri "http://localhost:58697/events.ashx?project=myproject&id=93E4A859BAD74A30AABFFE02D2403695&org=2343243456678890" -Method "POST" -Headers @{"Origin"="http://localhost:58697"; "Accept-Encoding"="gzip, deflate, br"; "Accept-Language"="en-US,en;q=0.9,es;q=0.8"; "User-Agent"="Mozilla/5.0 (Windows NT 10.0; Win64; x64) AppleWebKit/537.36 (KHTML, like Gecko) Chrome/73.0.3683.103 Safari/537.36"; "Accept"="*/*"; "Referer"="http://localhost:58697/cloud/project.html?id=myproject"} -ContentType "multipart/form-data; boundary=----WebKitFormBoundaryElB7ohnHD6E1hAjI" -Body ([System.Text.Encoding]::UTF8.GetBytes("------WebKitFormBoundaryElB7ohnHD6E1hAjI$([char]13)$([char]10)Content-Disposition: form-data; name=`"process`"$([char]13)$([char]10)$([char]13)$([char]10)EXPORT$([char]13)$([char]10)------WebKitFormBoundaryElB7ohnHD6E1hAjI--$([char]13)$([char]10)")) |
This example does not use the callback URL, it will poll until the state of the export entity is set to “COMPLETE”. The following REST request will retrieve the export entity:
| Invoke-WebRequest -Uri "http://localhost:58697/entity.ashx?id=93E4A859BAD74A30AABFFE02D2403695" -Headers @{"Upgrade-Insecure-Requests"="1"; "User-Agent"="Mozilla/5.0 (Windows NT 10.0; Win64; x64) AppleWebKit/537.36 (KHTML, like Gecko) Chrome/73.0.3683.103 Safari/537.36"; "Accept"="text/html,application/xhtml+xml,application/xml;q=0.9,image/webp,image/apng,*/*;q=0.8,application/signed-exchange;v=b3"; "Accept-Encoding"="gzip, deflate, br"; "Accept-Language"="en-US,en;q=0.9,es;q=0.8"} |
The server will respond with a JSON object that contains all properties for the export entity. By inspecting the value of the “state” property, it is possible to determine if the entity has completed processing and whether any errors may have occurred. When the processing completes, the “state” property will switch to either “COMPLETE” or “ERROR”.
Once the export job has completed, the data generated can be downloaded using the REST API:
| Invoke-WebRequest -Uri "http://localhost:58697/file.ashx?org=2343243456678890&project=myproject&id=93E4A859BAD74A30AABFFE02D2403695&filename=export.zip&mime=application/zip&namehint=U3BoZXJlTWVzaC56aXA=" -Headers @{"Upgrade-Insecure-Requests"="1"; "User-Agent"="Mozilla/5.0 (Windows NT 10.0; Win64; x64) AppleWebKit/537.36 (KHTML, like Gecko) Chrome/73.0.3683.103 Safari/537.36"; "Accept"="text/html,application/xhtml+xml,application/xml;q=0.9,image/webp,image/apng,*/*;q=0.8,application/signed-exchange;v=b3"; "Referer"="http://localhost:58697/cloud/project.html?id=myproject"; "Accept-Encoding"="gzip, deflate, br"; "Accept-Language"="en-US,en;q=0.9,es;q=0.8"} |
This retrieves a ZIP archive that contains the .OBJ mesh for the sphere:
Getting Program Inputs
This REST call can be used to request the input metadata for a custom program in the system. The metadata contains a list of the inputs the program expects.
Method
GET
URL
<server>/entity.ashx
Parameters
|
id |
Unique identifier for the program entity |
|
program |
Must be set to “input” |
Returns
If completed (200 code), this call returns a JSON object that describes the result of the operation and lists the inputs as an array of objects. Each object in the array corresponds to one input, and it is expected to have the following properties:
|
id |
Identifier for the input within the program |
|
label |
Readable text that will be shown as a label for the input in the UI |
|
type |
A numeric value that specifies the type of input: 0 – Numeric 1 – Date 2 – String 3 – Entity 4 – Attribute Set 5 – Query Expression 6 – Boolean 7 – Color Legend 8 – Drill-hole Settings |
|
filter |
Must be non-zero for type 3 (Entity), contains a numeric value containing a binary mask identifying which types of entities can be potentially selected. Use binary OR to merge different types into a single mask. The values identifying each identity type are (in hexadecimal): 0x01 – Voxel Terrain 0x02 – Voxel Block Model 0x04 – Voxel Generator 0x08 – Realtime Voxel Terrain 0x10 – Indexed Point Cloud |
Validating a Program
This REST call can be used to validate a view, report or generator program. The program’s code must be in Python and use the Voxel Farm Python API.
Method
POST
URL
<server>/entity.ashx
Parameters
|
program |
Must be set to “validate” |
Post Payload
Text payload containing the program source code in Base64 format.
Returns
If completed (200 code), this call returns a JSON object that describes the result of the operation and lists the inputs as an array of objects. Each object in the array corresponds to one input, and it is expected to have the following properties:
|
id |
The identifier for the input within the program |
|
label |
Readable text that will be shown as a label for the input in the UI |
|
type |
A numeric value that specifies the type of input: 0 – Numeric 1 – Date 2 – String 3 – Entity 4 – Attribute Set 5 – Query Expression 6 – Boolean (Checkbox) 7 – Color Legend 8 – Drill-hole Settings |
|
filter |
Must be non-zero for type 3 (Entity), contains a numeric value containing a binary mask identifying which types of entities can be potentially selected. Use binary OR to merge different types into a single mask. The values identifying each identity type are (in hexadecimal): 0x01 – Voxel Terrain 0x02 – Voxel Block Model 0x04 – Voxel Generator 0x08 – Realtime Voxel Terrain 0x10 – Indexed Point Cloud |
Example (PowerShell)
Python program to be validated:
import voxelfarm
print(voxelfarm.version)
This POST call validates the program:
| Invoke-WebRequest -Uri "http://localhost:58697/entity.ashx?program=validate" -Method "POST" -Headers @{"Origin"="http://localhost:58697"; "Accept-Encoding"="gzip, deflate, br"; "Accept-Language"="en-US,en;q=0.9,es;q=0.8"; "User-Agent"="Mozilla/5.0 (Windows NT 10.0; Win64; x64) AppleWebKit/537.36 (KHTML, like Gecko) Chrome/73.0.3683.103 Safari/537.36"; "Accept"="*/*"; "Referer"="http://localhost:58697/cloud/project.html?id=myproject"} -ContentType "application/json; charset=UTF-8" -Body "aW1wb3J0IHZveGVsZmFybQpwcmludCh2b3hlbGZhcm0udmVyc2lvbik=" |
Creating Views
Views are special entities which can be visualized in the 3D viewer. A view will typically involve one or more spatial entities, which will be used in the visualization. The view also captures a number of parameters that will determine how the objects should be visualized like attribute filters and color legends.
View entities have the "type" property set to "FILE" and the "file_type" property set to "VIEW". To create Views, follow the same steps described in the Creating an Entity section. The Entity-specific Properties section outlines the properties expected for a View entity.
Using Views as containers
A single view may contain multiple children views. A children view could also contain other children views. The 3D viewer UI may display views with children as folders, and terminal views as objects.
A view that contains children, should have its "view_type" property set to "container", and should include a property named "entity_container" which lists the view children. Each children view is a different entity. This list contains the IDs of the children view entities separated by spaces.
If the view is not a container, its "view_type" must be set to the ID of a View Program entity. Please review the View Programs section for more information on these programs.
The following diagram illustrates the relationship between these different entity types and their properties:
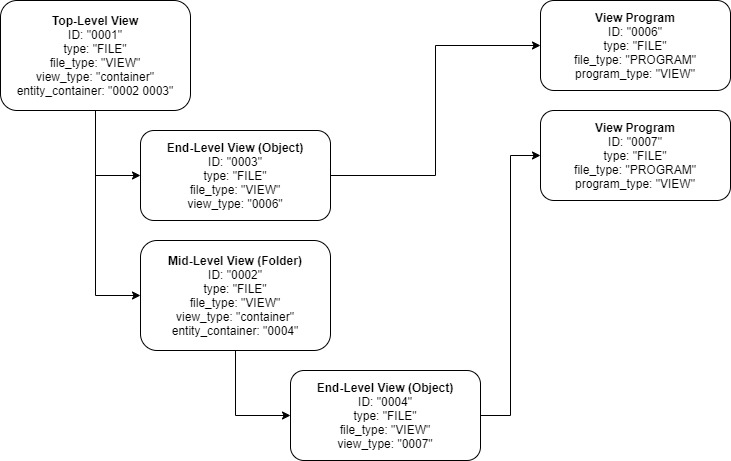
Setting view object inputs
The use of user-supplied programs allows the organization to add new types of visual objects dynamically, after the spatial platform is deployed. This also implies the inputs and behavior of these objects may not be known in advance to the application developers.
In order to construct a view entity of a specific type, the application must know which inputs the object type requires. This can be achieved in two ways:
- The application knows the inputs because it also knows the program (for instance, the application has first submitted the program and then it submits the view entity)
- The application discovers the inputs for the program using the REST API. See Getting Program Inputs for this case.
To set a particular input, first lookup its type and review how values should be encoded. Then, proceed to set the input value as a property in the view entity. This property will have a special name, which will be in the form:
input_value_#id#
Where #id# should be replaced by the identifier of the input.
Predefined view object types
The platform includes a predefined set of view object types:
|
Type |
Description |
|
com.voxelfarm.program.view.terrain |
A terrain surface. Has these inputs:
|
|
com.voxelfarm.program.view.mesh |
An indexed mesh. Has these inputs:
|
|
com.voxelfarm.program.view.blockmodel |
A voxelized block model. Has these inputs:
|
|
com.voxelfarm.program.view.pointcloud |
An indexed point cloud. Has these inputs:
|
|
com.voxelfarm.program.view.drillholes |
An indexed drill hole model. Has these inputs:
|
Example: Using predefined types
This example will create two objects: a top level view that contains another view object. Before anything, we will use the call described in the Requesting a new ID section to obtain two new IDs for the objects.
First, we create a root view container. This will appear in the UI as a top level view.
|
Invoke-WebRequest -Uri "http://localhost:58697/entity.ashx?id=1A5D65CBE25942B7A4594DD57C55F904&project=D9927BF62BFA4CCD930CBC716601D09C" ` -Method "POST" ` -Headers @{ "User-Agent"="Mozilla/5.0 (Windows NT 10.0; Win64; x64) AppleWebKit/537.36 (KHTML, like Gecko) Chrome/85.0.4183.102 Safari/537.36" "Accept"="*/*" "Origin"="http://localhost:58697" "Sec-Fetch-Site"="same-origin" "Sec-Fetch-Mode"="cors" "Sec-Fetch-Dest"="empty" "Referer"="http://localhost:58697/cloud/project.html?id=D9927BF62BFA4CCD930CBC716601D09C" "Accept-Encoding"="gzip, deflate, br" "Accept-Language"="en-US,en;q=0.9,es;q=0.8" } ` -ContentType "application/json; charset=UTF-8" ` -Body "{`"ID`":`"1A5D65CBE25942B7A4594DD57C55F904`", `"project`":`"D9927BF62BFA4CCD930CBC716601D09C`", `"name`":`"New View`", `"type`":`"FILE`", `"file_type`":`"VIEW`", `"view_type`":`"container`", `"state`":`"COMPLETE`", `"file_date`":`"1601166681260`", `"entity_container`":`"A20307F8C120444E9FBFAB9298B2F8D7`", `"file_folder`":`"0`"}" |
Then we create at least one visual object inside the view. In this example we will add a terrain surface, using the "com.voxelfarm.program.terrain" type:
|
Invoke-WebRequest -Uri "http://localhost:58697/entity.ashx?id=A20307F8C120444E9FBFAB9298B2F8D7&project=D9927BF62BFA4CCD930CBC716601D09C" ` -Method "POST" ` -Headers @{ "User-Agent"="Mozilla/5.0 (Windows NT 10.0; Win64; x64) AppleWebKit/537.36 (KHTML, like Gecko) Chrome/85.0.4183.102 Safari/537.36" "Accept"="*/*" "Origin"="http://localhost:58697" "Sec-Fetch-Site"="same-origin" "Sec-Fetch-Mode"="cors" "Sec-Fetch-Dest"="empty" "Referer"="http://localhost:58697/cloud/project.html?id=D9927BF62BFA4CCD930CBC716601D09C" "Accept-Encoding"="gzip, deflate, br" "Accept-Language"="en-US,en;q=0.9,es;q=0.8" } ` -ContentType "application/json; charset=UTF-8" ` -Body "{`"ID`":`"A20307F8C120444E9FBFAB9298B2F8D7`", `"name`":`"Sept 2009 `", `"view_type`":`"com.voxelfarm.program.view.terrain`", `"input_label_e`":`"Terrain`", `"input_filter_e`":`"8`", `"input_type_e`":`"3`", `"input_value_e`":`"67448DFF1C2F4C3AA7F9D858CE30A455`", `"input_label_colors`":`"Use Ortho-imagery`", `"input_filter_colors`":`"0`", `"input_type_colors`":`"6`", `"input_value_colors`":`"0`", `"input_label_normals`":`"Use high resolution detail`", `"input_filter_normals`":`"0`", `"input_type_normals`":`"6`", `"input_value_normals`":`"0`", `"input_type_colorlegend`":`"7`", `"project`":`"D9927BF62BFA4CCD930CBC716601D09C`", `"type`":`"FILE`", `"file_type`":`"VIEW`", `"state`":`"COMPLETE`", `"file_date`":`"1601166681446`", `"file_folder`":`"0`", `"virtual`":`"1`"}" |
The new view object points to a terrain dataset with ID "67448DFF1C2F4C3AA7F9D858CE30A455".
Also note that the child view has the "virtual" property set to "1". This signals the application this entity is a building block for another entity and should not be listed as a top element in the UI.
Adding Users to Projects
The REST interface enforces a simple security model. In this model, a single user may be associated with multiple projects, and each project will have multiple users associated with it. In every case, these associations will have one of two access levels:
- Read-only access: The user can see the list of objects in the project, but cannot create, modify or delete objects. The user will also be able to load the views in the project and see the visualizations. Once the user has loaded a view, the user will be allowed to modify the view locally (for instance, changing filters, color mappings, adding and removing objects) but the user will not be allowed to save any changes made to the view. The user will not be allowed to invite users to the project, nor will be allowed to modify access levels for existing users.
- Full-access: The user will be allowed to perform all operations in the project, including inviting other users and modifying access levels of existing users.
PROJECT_REF and USER_REF entities
A single user-project association requires two different entities in the system:
- An entity of type "PROJECT_REF", which links the project to the user
- An entity of type "USER_REF", which links the user to the project
Both entities have a property named "access_level", which can have one of three values:
- "none" -- Used to block access, it is the default value in case the property or object does not exit
- "read" -- Used for read-only access
- "full" -- Used for full access
It is up to the application to ensure the "access_level" property has the same value for any pair of PROJECT_REF and USER_REF entities. If the application fails to enforce this symmetry, this could lead to unpredictable behavior as API calls will be checking different values depending on the context of these calls.
The following diagram illustrates a scenario in which one user is assigned to two different projects:
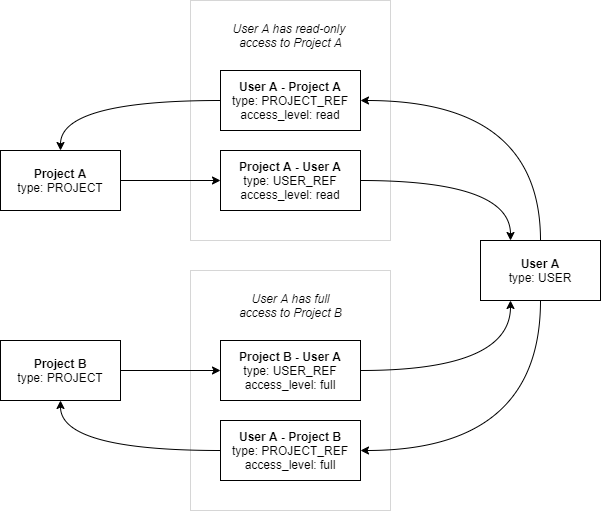
Understanding collections
The REST entity model supports the concept of a collection. A single entity may contain multiple collections. Like single-value properties in the entity, collections have a unique name in the entity. For instance, the "users" collection in a "PROJECT" entity will list all the "USER_REF" entities that belong to that particular project entity. There is also one default collection for every entity, which contains at least the entity. The default collection is identified by an empty string.
In fact, the call described in the Getting all Project Entities section, requests the default collection for a given project entity. In the case of projects, the default collection contains all spatial entities contained by the project. The call to retrieve the default collection for the project with "myproject" ID would be:
http://localhost:58697/entity.ashx?project=myproject
This will return all entities contained by the default collection, including the project entity itself.
If instead, we would like to access the user collection for the project, the REST call would look like this:
http://localhost:58697/entity.ashx?project=users:myproject
Here we have added the "users:" term to the ID of the project. Instead of requesting the default collection, we are requesting the entities in the "users" collection.
Note that the "project" parameter is still used in this call, but this parameter in fact denotes a collection name, not a project ID anymore. The "project" parameter would also be used if the entity holding the collection was not a project, in the context of this API, the property represents a collection. The name "project" was used for the sake of simplicity, since for most use cases, projects are the only collections the API user needs to use.
The same applies to the "project" property in entities. This property must contain the name of the collection that owns the entity. In most cases, this will be an actual project entity.
Users are collections too in this model. The default collection for a user contains all PROJECT_REF entities.
Adding USER_REF entities
Entities of USER_REF type bind users to projects. These entities are contained in the "users" collection for the project. The following table lists the expected properties for this entity, and the rules for their values:
|
ID |
USER_REF entities will have their id composed from three parts: users:<ProjectID>:<UserID> Here "ProjectID" should be replaced by the ID of the project. "UserID" should be replaced by the ID of the user, which is the User Id used to login to the application converted to a Base64 string. |
|
type |
Set to "USER_REF" |
|
access_level |
Set to "read" to provide read-only access, set to "full" to provide full access. |
|
project |
Contains the identifier for the collection that owns this entity. The collection identifier is composed in the following way: users:<ProjectID> Here "ProjectID" should be replaced by the ID of the project. |
|
user_ref |
Contains the user ID as a Base64 value. |
Adding PROJECT_REF entities
Entities of PROJECT_REF type bind projects to users. These entities are contained in the default collection for the user entity. The following table lists the expected properties for PROJECT_REF entities, and the rules for their values:
|
ID |
PROJECT_REF entities will have their id composed from three parts: users:<ProjectID>:<UserID> Here "ProjectID" should be replaced by the ID of the project. "UserID" should be replaced by the ID of the user, which is the User Id used to login to the application converted to a Base64 string. |
|
type |
Set to "PROJECT_REF" |
|
access_level |
Set to "read" to provide read-only access, set to "full" to provide full access. |
|
project |
Contains the identifier for the collection that owns this entity, which in this case is the user's default collection (not a project entity). The collection identifier in this case is equal to the user ID converted to Base64. |
|
project_ref |
Contains the identifier of the project entity that will be bound to the user. |
Python - API Setup
Initialize API
This examples shows how to create a new instance of the Voxel Farm client Python API.
# Import the Voxel Farm Client Library

from voxelfarm import voxelfarmclient

# The URL for the Voxel Space API
vf_api_url = 'https://vf-api.voxelspace.com'

# Create instance of the Voxel Farm REST API

vf = voxelfarmclient.rest(vf_api_url)Provide Credentials
This example shows how to provide credentials for API authentication.
# Set credentials

vf_token = os.getenv('VF_USER_TOKEN')
if (vf_token!=None):
    vf.token=vf_token
You can copy the token from your profile in the Developer tab, as shown below:
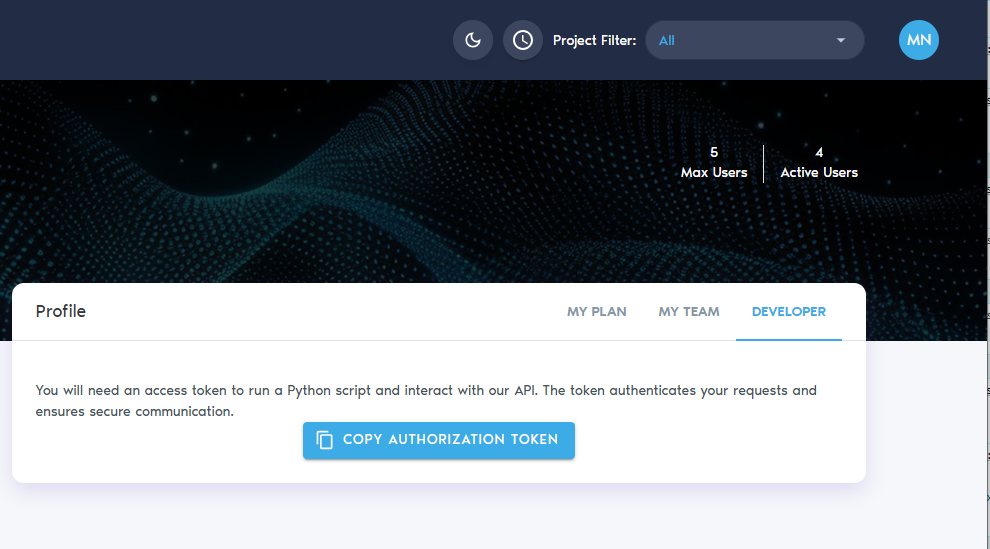
Specify an HTTP proxy
This example shows how to specify an HTTP proxy to be used in all HTTP calls made by the API.
# Use a proxy to debug HTTP requests using Fiddler or similar

proxies = {

  "http": os.getenv('YOUR_PROXY_URL'),

}

# Set the proxy to debug HTTP calls

vf.set_proxy(proxies)Get CRS from project
This example shows how to retrieve the project's CRS (Coordinate Reference System).
# Get the coordinate system given project ID

result = vf.get_project_crs(project)

if not result.success:

    print(result.error_info)

    exit()

crs = result.crs
Python - Data Ingestion
Upload Point Cloud
This example uploads a point cloud dataset.
# Import the Voxel Farm Client Library
from voxelfarm import voxelfarmclient

# The URL for the Voxel Farm API
vf_api_url = 'https://vf-api.voxelspace.com'

# Create instance of the Voxel Farm REST API
vf = voxelfarmclient.rest(vf_api_url)

# Get the coordinate system of the project
result = vf.get_project_crs(project)
if not result.success:
    print(result.error_info)
    exit()
crs = result.crs

# Create raw point cloud entity
result = vf.create_entity_raw(
    project=project,
    type=vf.entity_type.RawPointCloud,
    name="My Point Cloud",
    fields={},
    crs=crs)
if not result.success:
    print(result.error_info)
    exit()
pc_id = result.id
print('Raw Point Cloud Entity created ' + pc_id)

# Upload files
files = {'file': open('./mockdata/pointcloud.laz', 'rb')}
result = vf.attach_files(
    project=project,
    id=pc_id,
    files=files)
if not result.success:
    print(result.error_info)
    exit()
print('Point cloud files uploaded.')Create Indexed Point Cloud
This example triggers the processing of a raw point cloud. This creates a new Indexed Point Cloud.
# Create a processed point cloud
# The variable "pc_id" contains the ID of a raw point cloud
# The variable "crs" contains the CRS of the project

result = vf.create_entity_processed(
    project=project,
    type=vf.entity_type.IndexedPointCloud,
    name="My Indexed Point Cloud",
    fields={
        'source': pc_id,
    },
    crs=crs)
if not result.success:
    print(result.error_info)
    exit()
idxpc_id = result.id
print('Indexed point cloud created ' + idxpc_id)
Create Voxel Terrain from Point Cloud
This example triggers the processing of a raw point cloud into a Voxel Terrain model
# Create a voxel terrain model
# The variable "pc_id" contains the ID of a raw point cloud
# The variable "crs" contains the CRS of the project

result = vf.create_entity_processed(
    project=project,
    type=vf.entity_type.VoxelTerrain,
    name="My Terrain",
    fields={
        'source': pc_id,
        'source_type': vf.entity_type.RawPointCloud,
    },
    crs=crs)
if not result.success:
    print(result.error_info)
    exit()
terrain_id = result.id
Upload Mesh Set
This example uploads a set of meshes. To see how "column_meta" property is composed, and what other metadata should be provided along with the meshes, please check the Extended Voxelized Mesh Metadata topic.
# Create raw mesh entity
# The variable "crs" contains the CRS for the project

result = vf.create_entity_raw(
    project=project,
    type=vf.entity_type.RawMesh,
    name="My Meshes",
    fields={
        'column_meta': 'File UID ,Index VALUE 0,Conical VALUE 0,Cubic VALUE 0,Spherical VALUE 0'
    },
    crs=crs)
if not result.success:
    print(result.error_info)
    exit(3)
mesh_id = result.id
print('Raw Mesh Entity created ' + mesh_id)

# Upload files
files = {'file': open('./mockdata/meshset.zip', 'rb')}
result = vf.attach_files(
    project=project,
    id=mesh_id,
    files=files)
if not result.success:
    print(result.error_info)
    exit(4)
print('Mesh files uploaded.')
Process Mesh Set
This example processes a set of meshes into a voxelized mesh set.
# Create a voxel mesh
# The variable "mesh_id" contains the ID of a raw point cloud
# The variable "crs" contains the CRS of the project

result = vf.create_entity_processed(
    project=project,
    type=vf.entity_type.VoxelMesh,
    name="My Mesh Set",
    fields={
        'source': mesh_id
    },
    crs=crs)
if not result.success:
    print(result.error_info)
    exit(5)
voxmesh_id = result.id
Create Voxel Terrain from Mesh
This example processes a raw mesh into a Voxel Terrain entity.
# The "raw_surface" variable contains the ID of the raw mesh entity
# The "crs" variable contains the project's CRS

result = vf.create_entity_processed(
    project=project,
    type=vf.entity_type.VoxelTerrain,
    name='Terrain Model',
    fields={
        'source': raw_surface,
        'source_type': vf.entity_type.RawMesh
    },
    crs=crs)
if not result.success:
    print(result.error_info)
    exit(5)
surface_id = result.id
Upload Block Model
This example uploads a raw Block Model. To see what other metadata should be provided along with the block model files, please check the Extended Block Model Metadata topic.
# Create raw mesh entity
# The variable "crs" contains the CRS for the project

result = vf.create_entity_raw(
    project=project,
    type=vf.entity_type.RawBlockModel,
    name="Raw BlockModel",
    fields={},
    crs=crs)
if not result.success:
    print(result.error_info)
    exit(3)
rawbm_id = result.id

# upload metadata
files = {'file': open('./mockdata/process.meta', 'rb')}
result = vf.attach_files(
    project=project,
    id=rawbm_id,
    files=files)
if not result.success:
    print(result.error_info)
    exit(4)
Process Block Model
The following example processes a Block Model.
# Create a block model
# The variable "rawbm_id" contains the ID of a raw Block Model
# The variable "crs" contains the CRS of the project

result = vf.create_entity_processed(
    project=project,
    type=vf.entity_type.BlockModel,
    name="Block Model",
    fields={
        'source': rawbm_id,
    },
    crs=crs)
if not result.success:
    print(result.error_info)
    exit(5)
bm_id = result.id
Python - Report Lambdas
Report Lambda Cheatset
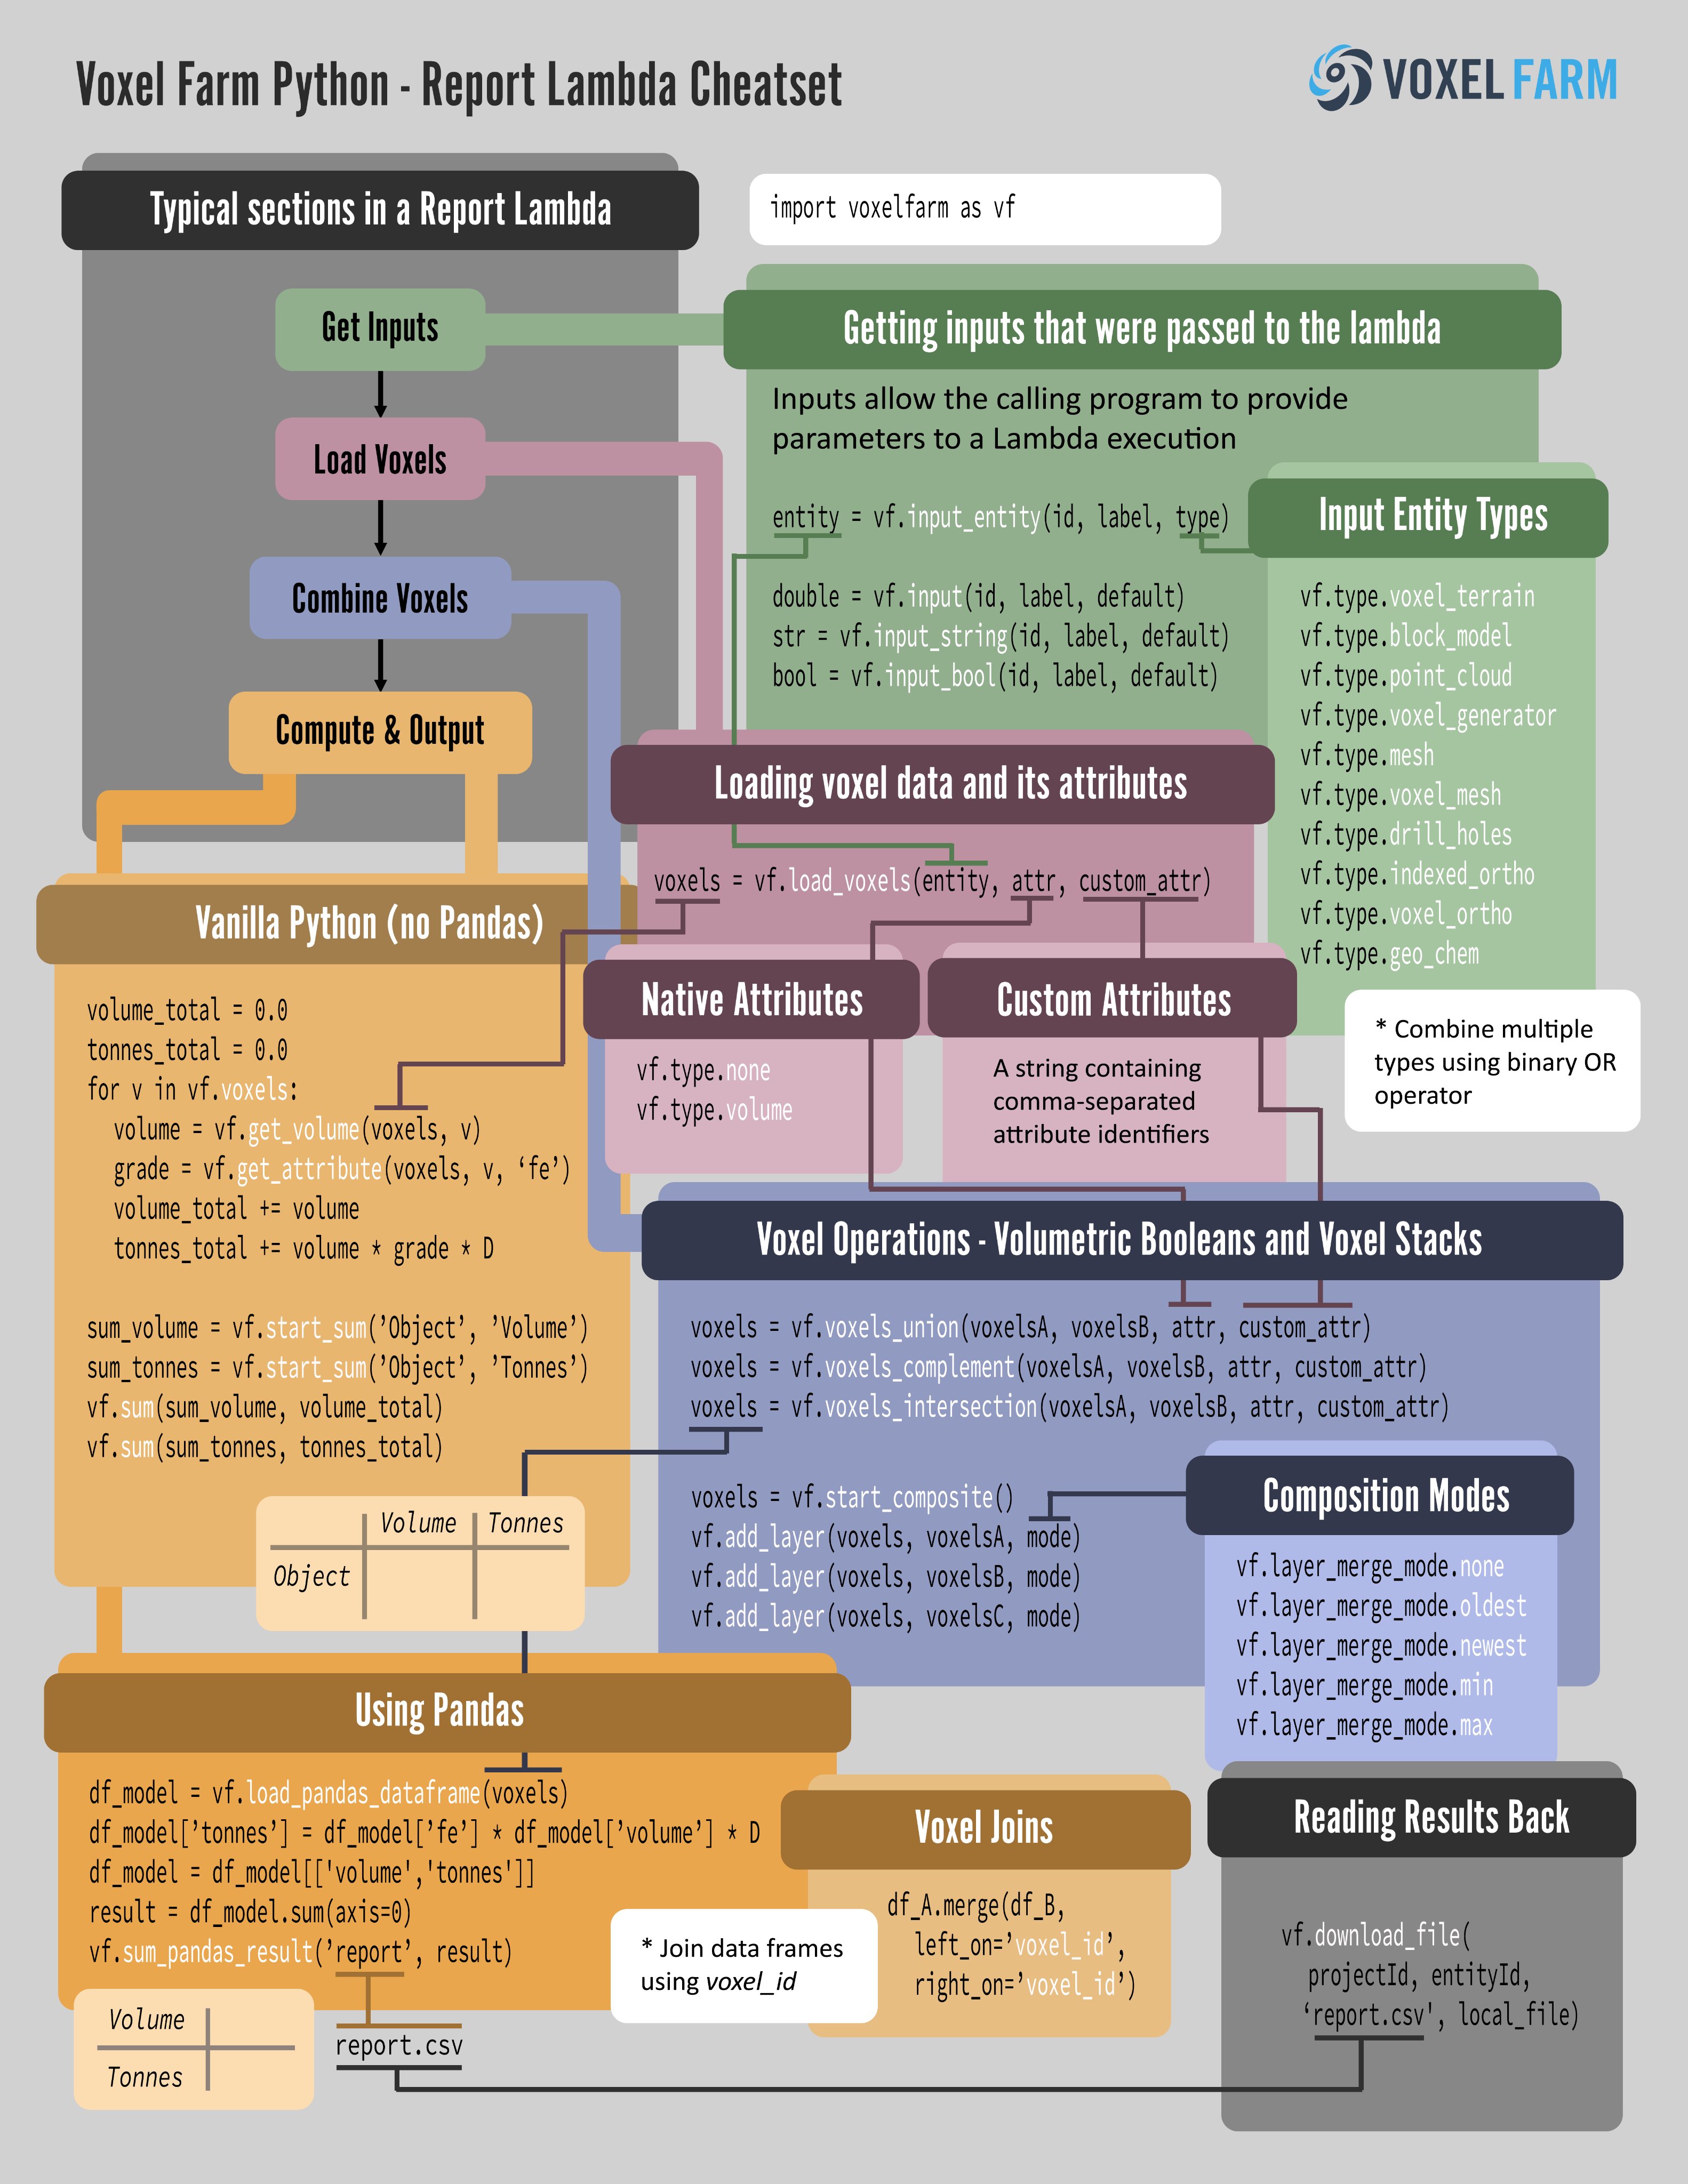
Define Report Program
This example creates a new report program.
result = vf.create_lambda_python(
    project=project,
    type=vf.lambda_type.Report,
    name="My Volume Report Lambda",
    fields={},
    code=open('./lambdas/ComputeVolumeLambda.py').read())
if not result.success:
    print(result.error_info)
    exit()
report_lambda_id = result.id
Run Report Program
The following example runs an existing Report Program with a given set of inputs.
# We will use a region that defines an 160 meter cube centered in the origin
region = '1,-80,80,-80,-80,80,-80,80,80,-80,80'
result = vf.create_report(
    project=project,
    program=report_lambda_id,
    region=region,
    lod=0,
    name='Volume of Cube',
    fields={},
    inputs={
        'entity' : voxmesh_id
    })
if not result.success:
    print(result.error_info)
    exit()
report_id = result.id
For more information on regions and how to trigger report programs, please check out the Triggering Reports topic.
Read Report Results
This example shows how to read the results of a Report Lambda execution.
# The "project" variable contains the Project ID
# The "report_id" variable contains the ID for the report entity
csvdata = vf.get_file(project, report_id, 'report.csv')
Initialize Report Lambda
This example shows how to initialize the Voxel Farm library in a report Lambda program.
import voxelfarm as vf
Read inputs of Report Lambda
The following example shows how to read inputs from a report lambda program.
mesh_entity = vf.input_entity("mesh_entity_id", "Entity", vf.type.voxel_mesh)
string_input = vf.input_string("string_input", "String Input", "")
numerical_input = vf.input("numerical_input", "Numerical Input", 0.0)
Volumetric Booleans in Report
This example shows how to create volumetric boolean operations between volumetric datasets.
# Get inputs, in this case the entities that will have they volumes computed
entityA = vf.input_entity("entityA", "Select Entity A", vf.type.voxel_generator | vf.type.voxel_terrain | vf.type.voxel_mesh)
entityB = vf.input_entity("entityB", "Select Entity B", vf.type.voxel_generator | vf.type.voxel_terrain | vf.type.voxel_mesh)

# Next, we will request to load voxel data for the entity
# We are only interested in volume, we will request no other attributes for voxels
voxelsA = vf.load_voxels(entityA, vf.attribute.volume, None)
voxelsB = vf.load_voxels(entityB, vf.attribute.volume, None)

voxels_union = vf.voxels_union(voxelsA, voxelsB, vf.attribute.volume, None)
voxels_intersection = vf.voxels_intersection(voxelsA, voxelsB, vf.attribute.volume, None)
voxels_complementAB = vf.voxels_complement(voxelsA, voxelsB, vf.attribute.volume, None)
voxels_complementBA = vf.voxels_complement(voxelsB, voxelsA, vf.attribute.volume, None)
Load and Write Pandas
This example shows how to create a Pandas dataframe from voxels inside a Report Lambda program and output a different dataframe as a result.
import pandas
import voxelfarm as vf

entity = vf.input_entity("entity", "Select Entity", vf.type.block_model)
voxels = vf.load_voxels(entity, vf.attribute.volume, 'fe, density')

df_model = vf.load_pandas_dataframe(voxels)
df_model['tonnes'] = df_model['fe'] * df_model['volume'] * df_model['density']
df_model = df_model['volume', 'tonnes']
df_output = df_model.sum(axis=0)
vf.sum_pandas_result('report', df_output)
Python - Process Lambdas
Run Process Lambda
This example runs a lambda process in the platform:
 result = vf.create_process_entity(
            project=projectId,
            type=vf.entity_type.Process,
            name="Generate Tetra Model " + strand,
            fields={
                'file_folder' : folderId,
                'code': 'estimations-generate-tetra-model.py',
                'input_value_bm_entity': raw_block_model_id,
                'input_value_bm_file': block_model_name,
                'input_value_strand': strand
            },

            crs=request.crs,
            files=['./estimations/estimations-generate-tetra-model.py'],
            callback=my_callback_url)


        if not result.success:
            print(result.error_info)
            exit(1)
        process_id = result.id
Read Process Results
This example shows how to read the results of a Process Lambda execution.
# The "project" variable contains the Project ID
# The "process_id" variable contains the ID for the report entity
csvdata = vf.get_file(project, process_id, 'my_result_data.csv')Initialize Process Lambda
The following example shows how to obtain the lambda_host interface:
from voxelfarm import process_lambda

lambda_host = process_lambda.process_lambda_host()Read inputs of Process Lambda
The following example shows how to read inputs from a process lambda program:
from voxelfarm import process_lambda

lambda_host = process_lambda.process_lambda_host()
mesh_entity = lambda_host.input_entity("mesh_entity_id", "Entity", vf.type.voxel_mesh)
string_input = lambda_host.input_string("string_input", "String Input", "")
numerical_input = lambda_host.input("numerical_input", "Numerical Input", 0.0)Downloading files in Process Lambda
This example shows how to download all files attached to an entity:
from voxelfarm import process_lambda

lambda_host = process_lambda.process_lambda_host()
ml_files = lambda_host.download_entity_files(ml_entity)Getting temp folder in Process Lambda
This example shows how to get the path to the large capacity temp folder used for temporary storage:
from voxelfarm import process_lambda

lambda_host = process_lambda.process_lambda_host()
scrap_folder = lambda_host.get_scrap_folder()Attach file to Process Lambda
The following example shows how to attach a file from the temporary drive to the running process lambda entity:
from voxelfarm import process_lambda

lambda_host = process_lambda.process_lambda_host()
floor = os.path.join(scrap, 'tetra_mesh_floor.obj')
lambda_host.attach_file(floor)
Log from Process Lambda
The following example shows how to send a new line to the processing log:
from voxelfarm import process_lambda

lambda_host = process_lambda.process_lambda_host()
lambda_host.log('My log message here)
Set exit code for Process Lambda
The following example shows how to set the exit code for a Process Lambda:
from voxelfarm import process_lambda

lambda_host = process_lambda.process_lambda_host()
lambda_host.set_exit_code(0)
Python - Workflow Interface
Create Version from Blob Upload
This example shows how to create a new version for a product by uploading files to a designated workflow blob drop-in:
import os
from azure.storage.blob import BlobServiceClient
from io import BufferedReader
from io import BytesIO
import json

CONTAINER_NAME = '!!!YOUR CONTAINER NAME HERE!!!'
connectin_string = "!!!YOUR CONNECTION STRING HERE!!!"

def uploadFileToBlob(filename, buffer):
    blob_service_client = BlobServiceClient.from_connection_string(connection_string)
    blob_client = blob_service_client.get_blob_client(container=CONTAINER_NAME, blob=filename)
    blob_client.upload_blob(buffer, overwrite=True)

files = [
    {

        "name": "file01.obj",

        "path": "W:\\mydata\\"

    },
    {

        "name": "file02.ftr",

        "path": "W:\\mydata\\"

    }
]

filesUpload = []
for f in files:
    with open(f["path"]+f["name"], "rb") as data:
        uploadFileToBlob(f["name"], data)
    filesUpload.append(f["name"])

manifest = {
    "user":  "me@gmail.com",
    "product": "MY_WORKFLOW_PRODUCT_ID",
    "comment": "A test version",
    "files": filesUpload
}

bytes=bytes(json.dumps(manifest), 'utf-8')
buffer = BytesIO(bytes)
uploadFileToBlob("manifest.json", buffer)
Workflow Definition
# This code runs inside the Voxel Farm platform

# Import the workflow lambda api
from voxelfarm import workflow_lambda

# Also import the voxelfarm client
from voxelfarm import voxelfarmclient

# Define the workflow callback functions
def receive_data(
        vf : voxelfarmclient.rest,
        request : workflow_lambda.request,
        host : workflow_lambda.workflow_lambda_host):
    host.log('Function called, doing nothing...')
    return {'success': True, 'complete': False, 'error_info': 'None'}

def stage_done(
        vf : voxelfarmclient.rest,
        request : workflow_lambda.request,
        host : workflow_lambda.workflow_lambda_host):
    host.log('Function called, doing nothing...')
    return {'success': True, 'complete': False, 'error_info': 'None'}

# The workflow hierarchy is defined as JSON structure
workflow = {
    'name' : 'Ore Body Model',
    'icon' : 'root',
    'id' : 'OBDP',
    'tracks' : [
        {
            'name' : 'Block Models',
            'icon' : 'voxbm',
            'id' : 'GM',
            'on_receive_data' : receive_data,
            'on_stage_done' : stage_done
        },
        {
            'name' : 'Drill Holes',
            'icon' : 'voxdh',
            'id' : 'DH',
            'tracks' : [
                {
                    'name' : 'Blast Holes',
                    'icon' : 'voxdh',
                    'id' : 'DH_BLASTHOLES',
                    'on_receive_data' : receive_data,
                    'on_stage_done' : stage_done
                },
                {
                    'name' : 'Hardness',
                    'icon' : 'voxdh',
                    'id' : 'DH_HARDNESS',
                    'on_receive_data' : receive_data,
                    'on_stage_done' : stage_done
                },
                {
                    'name' : 'Ore Quality',
                    'icon' : 'voxdh',
                    'id' : 'DH_ORE_QUALITY',
                    'on_receive_data' : receive_data,
                    'on_stage_done' : stage_done
                },
                {
                    'name' : 'Sondajes',
                    'icon' : 'voxdh',
                    'id' : 'DH_SONDAJES',
                    'on_receive_data' : receive_data,
                    'on_stage_done' : stage_done
                }

            ]
        },
        {
            'name' : 'Surveys',
            'icon' : 'voxsurf',
            'id' : 'SURF',
            'on_receive_data' : receive_data,
            'on_stage_done' : stage_done
        }
    ]
}

# Obtain the workflow_api interface
workflow_api = workflow_lambda.workflow_lambda_host()

# Set the workflow definition
workflow_api.set_workflow_definition(workflow)
Read a Product property
The following example reads the value of a property for a given product:
# Import voxel farm client and workflow lambda
from voxelfarm import voxelfarmclient
from voxelfarm import workflow_lambda

# Obtain the workflow_api interface
workflow_api = workflow_lambda.workflow_lambda_host()

# Read a property from another workflow product
value = workflow_api.get_product_property('MY_PRODUCT', 'my_property')
Read parameters as DataFrame
The following example loads a DataFrame for a provided parameter product in the workflow:
# Import voxel farm client and workflow lambda
from voxelfarm import voxelfarmclient
from voxelfarm import workflow_lambda

# Obtain the workflow_api interface
workflow_api = workflow_lambda.workflow_lambda_host()

# Read the product as a dataframe
df_stats = workflow_api.get_parameter_dataframe('META_COMPOSITE_STATS')Search Time Series
The following code performs a search in the Time Series database:
data_frame = vf.search_time_series(
    spatial_id="Z602_404_812_408_ALH_5",
    object_id="CRUSHER3",
    property="DRY_TONNES",
    # An array of two ISO8601 dates
    timespan=["2017-01-17T10:00:11.68Z", "2022-04-03T13:45:11.68Z"],
    project_id="1B282E62D9574512AD6CDC88111EC31D",
)
Get Time Series Data
This example shows how to retrieve event data from Time Series for an array of time series identifier:
timeseries_ids = [
    {
        "spatialID": "B101_408_807_408_BAH_14",
        "objectID": "CRUSHER3",
        "property": "DRY_TONNES",
    },
    {
        "spatialID": "B101_408_805_408_BAH_8",
        "objectID": "CRUSHER3",
        "property": "WET_TONNES",
    },
]

data_frame = vf.get_time_series(
    timeseries_id=timeseries_ids,
    # An array of two ISO8601 dates.
    timespan=["2018-01-17T10:00:11.68Z", "2022-03-23T13:45:11.68Z"],
    project_id="1B282E62D9574512AD6CDC88111EC31D",
)
Create Report
The following example creates a report by running a lambda Report function:
result = voxelfarm_workflow.create_report(vf, request, 'pending_reports',
    'Survey Volume Difference', 'lambdas/surface-volume-difference.py', region, 4,
    {
        'previous_surface_id' :  f'{previous_terrain_id}',
        'current_surface_id' :  f'{voxel_terrain_id}',
        'non_mining_surface_id' : f'{active_hist_surf}',
        'nat_surface_id' : f'{active_nat_surf}',
    })
Create View
The following example shows how to create a view using the workflow interface:
voxelfarm_workflow.create_view(vf, request, 'Composite Difference', None, 'lambdas/view-terrain-composite-difference.py',
{
    'previous_surface_id' : f'{previous_terrain_id}',
    'current_surface_id' : f'{voxel_terrain_id}',
    'non_mining_surface_id' : f'{active_hist_surf}',
    'nat_surface_id' : f'{active_nat_surf}',
}, {})
Serverless Programs - Python
Voxel Generator Programs
A spatial entity will go through several stages in its lifetime. It is possible to provide custom logic for some of these stages. This version of the Voxel Farm platform allows running custom Python programs to produce volumetric spatial output. This type of program is known in the system as a Voxel Generator program.
Typically, a Voxel Generator program will go through the following stages:
- Ask the user for input values, in case the generated object is parametric, and the user can provide values to these parameters.
- Set the spatial entity bounds. This step is optional but should be always included because it allows the system to evaluate the spatial entity only within its known bounds, which is more efficient.
- For each voxel in the spatial entity, emit a field density o other voxel attribute.
Initialization
Before anything else, the Python program must include the Voxel Farm Python library:
import voxelfarmVoxel Generator programs must make sure to initialize the Voxel Farm Python library by calling “voxelfarm.init()”:
voxelfarm.init()The program can then ask the user information about the entity using the “voxelfarm.input()” function:
h = voxelfarm.input(“altitude”, “Altitude”)
At this point, if the program knows of the spatial bounds of the entity, the bounds can be set by calling “voxelfarm.set_entity_bounds_x”, “voxelfarm.set_entity_bounds_y” and “voxelfarm.set_entity_bounds_z”.
vf.set_entity_bounds_z(h - 1000, h + 1000)
The program can either output voxel data, or field data. Field data will be contoured on the fly by the system and it is best suited for smooth surfaces. If the program needs to produce sharp edges and points, it is better to output voxel data.
Field Data Output
To output field data, the Python program must iterate over each voxel in the field. The range of voxels in a field is found in the “voxelfarm.field” variable:
for v in voxelfarm.field

       # will execute for each voxel “v” in the field
To get the coordinates in project space of the voxel, use the “voxelfarm.get_field_origin” function:
for v in voxelfarm.field

       p = voxelfarm.get_field_origin(v) # returns tuple for xyz
Using these coordinates, the user program can make useful computations. The program will have access to any Python library that is included in the Content Server. These computations eventually will produce a value for the field in the voxel’s origin. Voxel Farm will produce a surface wherever the field becomes zero. Places where the field is positive, will be considered “outside” the surface. Places where field is negative, will be considered solid and inside the surface.
To set the field value for the voxel, call the “voxelfarm.set_field” function:
for v in voxelfarm.field

       p = voxelfarm.get_field_origin(v) # returns tuple for xyz

       field = MyFieldFunction(p) # a call to custom function that outputs the field

       voxelfarm.set_field(v, field)
The following program creates an infinite plane with bumps on top of it:
import voxelfarm as vf

import math

vf.init()

h = vf.input("h", "Altitude")

vf.set_entity_bounds_z(h - 1000, h + 1000)

for v in vf.field:

    p = vf.get_field_origin(v)

    dh = 300 * (math.sin(0.001 * p[0]) + math.sin(0.001 * p[1]) + math.sin(0.001 * p[2]))

    dh = dh + 100 * (math.sin(0.01 * p[0]) + math.sin(0.01 * p[1]) +  + math.sin(0.01 * p[2]))

    vf.set_field(v, p[2] - h - dh)
Voxel Data Output
Consider using Voxel Data output in cases where you need the resulting spatial entity to contain sharp features.
Voxel Farm’s voxel format allows for both sharp and smooth features. Once a spatial entity is built to output voxel data, its program must at least output a material definition for each voxel. Additional optional channels are a 3D surface vector and a color.
To output voxel data, the Python program must iterate over each voxel in the request. The range of voxels in a request is found in the “voxelfarm.voxels” variable:
for v in voxelfarm.voxels

       # will execute for each voxel “v” in the request
To get the coordinates in project space of the voxel, use the “voxelfarm.get_voxel_origin” function:
for v in voxelfarm.field

       p = voxelfarm.get_voxel_origin(v) # returns tuple for xyz
Using these coordinates, the user program can make useful computations. The program will have access to any Python library that is included in the Content Server. These computations eventually will produce a value that will determine if the voxel is set as solid material, and which values should be used for color and the surface position inside the voxel.
To set the material for a voxel, call the “voxelfarm.set_material” function:
for v in voxelfarm.field

       p = voxelfarm.get_field_origin(v) # returns tuple for xyz

       field = MyFieldFunction(p) # a call to custom function that outputs a field

       if (field < 0.0)

               voxelfarm.set_material(v, 1)
The following program creates an infinite plane with bumps on top of it:
import voxelfarm as vf

import math

vf.init()

h = vf.input("h", "Altitude")

vf.set_entity_bounds_z(h - 1000, h + 1000)

for v in vf.voxels:

    p = vf.get_voxel_origin(v)

    dh = 300 * (math.sin(0.001 * p[0]) + math.sin(0.001 * p[1]) + math.sin(0.001 * p[2]))

    dh = dh + 100 * (math.sin(0.01 * p[0]) + math.sin(0.01 * p[1]) +  + math.sin(0.01 * p[2]))

    field = p[2] - h - dh

    if (field < 0.0):

vf.set_material(v, 1)Report Programs
Reports are special entities that contain tabular results, like a CSV table. These results are obtained by running a custom program over the spatial datasets available in the project. It is up to the report program to select which datasets should be used, and how the data they contained should be mixed and interpreted. Once the program completes execution, its results are stored in the report entity.
A report program will typically go over the following stages:
- Request user input. Report programs usually ask the user which datasets and attributes should be used and any other information required for the program to run.
- Load the data. Once input is gathered, the program decides which data to load, and how it should be combined. The data can be a mashup of different datasets.
- Look at the data. The report program can iterate over the data. If it decides it has found a relevant fact it can emit it as an RDF triplet.
The same report program is executed by the system in many threads at the same time, but over a different region of space in each case. The system will add the results of each individual run, integrating over all emitted RDF triplets. The triplets are then used to compose a table, which is stored in the report entity as a CSV file attachment.
Report Example
The following report program computes the volume of an object:
import voxelfarm as vf

entity = vf.input_entity("entity", "Entity", vf.type.voxel_terrain | vf.type.voxel_generator)

voxels = vf.load_voxels(entity, vf.attribute.volume, None)

volume = 0.0

for v in vf.voxels:

    volume += vf.get_volume(voxels, v)


sum = vf.start_sum("Item", "Object Volume")

vf.sum(sum, volume)
The program first asks the user for an entity by calling “input_entity()”. The program will compute the volume of this entity. The program requires this entity to be a Voxel Terrain or a Voxel Generator.
Next, the program calls “load_voxels”. This tells the system the program intends to use the voxel data associated with the input entity. The last two parameters to the function specify which attributes should appear in the voxel data. The first parameter is to select attributes from the default attribute set, like volume in this case. The second parameter is the set of custom attributes that will be loaded.
Then, for each voxel, the program calls the “get_volume()” function. This returns the volume for the voxel, a value between zero and the voxel size at the third power. The program proceeds to add up this value.
At the end, the program declares a new RDF triplet by calling “start_sum()”, the two parameters to this function contain the resource and property used for the triplet. The property value is incremented by the call to the “sum()” function. This is how every voxel’s volume is accounted for.
After running, this program generates a CSV file for the report that looks like this:
Item,Object Volume
Item,523605.137331239
Loading voxel attributes
The “load_voxels()” function instructs the system which voxel data must be loaded for the entity.
voxel_data = voxelfarm.load_voxels(entity, default_attributes, custom_attributes)
The last two parameters to the function specify which attributes we want to load from the voxel data.
The first parameter is to select attribute from the default attribute set, like volume in this case. This parameter is composed by performing a bitwise OR using the constants designated for each default attribute. The following table lists the possible values:
|
voxelfarm.attribute.none |
Constant used for requesting no attributes |
|
voxelfarm.attribute.volume |
Requests the volume for each voxel |
The second parameter is the set of custom attributes that will be loaded.
Volumetric accuracy
The report system in Voxel Farm is voxel-based. Voxels imply a discretization of space. A voxel may contain one or more samples of some object.
Voxel size must be equal or less than half the smallest distance from any two features in the object in order to be able to fully reconstruct the original object. Any pair of features less than the voxel size apart could erode, introducing an error comparable to the voxel size. This problem is generally referred to as aliasing.
Voxel Farm will use a precise sub-voxel geometric model to compute the volume value for the voxel. For instance, consider a sphere (in blue) that marginally intersects one voxel (in red):
The volume computed for this voxel will account only for the portion of the sphere that is really inside the voxel.
For volume computations, any surface inside the voxel is approximated to four quads. This is a close approximation, but it does introduce some error. This error is negative for convex surfaces and positive for concave ones.
At voxel size 0.5m, the earlier report program computes the volume of a 50m sphere to be: 523,605.137331239 cubic meters. The analytical result for the volume of a 50m sphere is: 523,598.7755983 cubic meters. The error introduced by the discretization of the sphere is 0.0012%
View Programs
A View entity defines a way to visualize several datasets together. In order to decide which datasets should be used, which information should be filtered, and how the results should be visualized, the user can supply a View Program, which will run a custom logic to construct a view layer.
A View program will typically go over the following stages:
- Ask user input. Here the program prompts the user information to select which datasets and attributes should be used, visual options for rendering, and any other piece of information the view program requires in order to run.
- Based on user input, create and configure a mashup of datasets from the available datasets in the project.
- Set up rendering of the elements produced by the dataset mashup.
The following program creates a simple view layer to visualize a terrain mesh:
import voxelfarm as vf

terrain = vf.input_entity("terrain", "Terrain", vf.type.voxel_terrain)

mesh = vf.load_mesh(terrain, 0, None)

material = vf.new_material()

material.gradient = "dirt"

vf.render(mesh, material)
The program calls “input_entity()” to prompt the user for a terrain model. Next it asks the system to load the mesh data for the terrain using “load_mesh()”.
The following two lines set up a material that will be used to render the terrain mesh. The material is created by calling the “new_material()” function. The “gradient” property of the material is set to “dirt”, instructing the rendering system to ready this gradient texture and pass it as the gradient to be used by the GPU shader.
The last line calls the “render()” function, which instructs the mesh must be rendered with the material that was created in the previous lines.
Working with materials
A view program is expected to make at least one call to the “render()” function. This function takes two arguments, the last argument is the material that will be used to render the element. If no material is provided (“None” passed as material), the system will use the default material.
In this version, materials contain only two properties:
|
color |
Defines an RGBA value as a four-member tuple. The RGB values will be used to tint the visual output for the component, while the alpha value will be used to make the surface transparent. |
|
gradient |
Can be one of the three available gradient modes:
|
Python Program Reference
The following table lists the functions and properties available in the Python programmable interface:
|
input(id, label) |
Requests a numeric input from the user. The value of the “id” parameter uniquely identifies the input, the programmer must make sure this value is only used for this input. The “label” parameter specifies the text that will appear in the UI to prompt the user for this value. |
|
input_date(id, label) |
Requests a date input from the user. The value of the “id” parameter uniquely identifies the input, the programmer must make sure this value is only used for this input. The “label” parameter specifies the text that will appear in the UI to prompt the user for this date. |
|
input_string(id, label) |
Requests a string input from the user. The value of the “id” parameter uniquely identifies the input, the programmer must make sure this value is only used for this input. The “label” parameter specifies the text that will appear in the UI to prompt the user for this string. |
|
input_query(id, label, entity) |
Requests a query input from the user. Queries are special strings that may involve conditional expressions that use the attributes in a dataset. The value of the “id” parameter uniquely identifies the input, the programmer must make sure this value is only used for this input. The “label” parameter specifies the text that will appear in the UI to prompt the user for this query. The “entity” parameter specifies which entity will be queried, this helps the system present the user a list of available attributes to query, which can be extracted from the entity’s metadata. |
|
input_attributes(id, label, type, entity) |
Requests the user to select a set of attributes. The value of the “id” parameter uniquely identifies the input, the programmer must make sure this value is only used for this input. The “label” parameter specifies the text that will appear in the UI to prompt the user for the attribute list. The “type” parameter indicates the type of input that will be used. Two values are allowed currently:
|
|
input_entity(id, label, type) |
Requests the user to pick an existing entity from the project. The value of the “id” parameter uniquely identifies the input, the programmer must make sure this value is only used for this input. The “label” parameter specifies the text that will appear in the UI to prompt the user for the entity selection. The “type” parameter contains a bit-field that signals which entity types are eligible for the input. The value for this parameter can be composed by performing a bitwise OR with the constants defined for each entity type:
|
|
set_entity_bounds_x(min, max) |
Specifies the entity is contained between “min” and “max” coordinates along the X axis. This function is called only by Voxel Generator programs. |
|
set_entity_bounds_y(min, max) |
Specifies the entity is contained between “min” and “max” coordinates along the Y axis. This function is called only by Voxel Generator programs. |
|
set_entity_bounds_z(min, max) |
Specifies the entity is contained between “min” and “max” coordinates along the Z axis. This function is called only by Voxel Generator programs. |
|
voxels |
A range containing the voxels for the program to read or produce. |
|
field |
A range containing the field entries that should be produced. This is used only by Voxel Generator programs. |
|
get_voxel_origin(voxel) |
Returns a tuple that contains the (X,Y,Z) coordinates of the voxel’s origin in Project space. |
|
get_field_origin(field_voxel) |
Returns a tuple that contains the (X,Y,Z) coordinates of the field origin in Project space. |
|
set_material(voxel, id) |
Applies sub-material id to the voxel. This is used only by Voxel Generator programs. Only sub-material 1 is allowed in the current version. |
|
set_vector(x, y, z) |
Sets surface vector for the voxel. This is used only by Voxel Generator programs. |
|
set_field(field_voxel, field_value) |
Sets field value for the field voxel. This is used only by Voxel Generator programs. |
|
set_query(entity, query) |
Sets a query value to the specified entity. |
|
set_attribute_gradient(entity, attribute, min_value, max_value) |
Sets cutoff values for an attribute in the specified entity. |
|
start_composite() |
Creates a new virtual entity that will be the result of stacking multiple voxel entities as layers. |
|
add_layer(composite, entity) |
Adds the specified entity to an existing voxel composite (returned by start_composite). |
|
get_entity_type(entity) |
Returns the type of the specified entity. Possible return values are:
|
|
get_entity_name(entity) |
Returns the readable name for the specified entity. |
|
get_entity_date(entity) |
Returns the capture date of the specified entity. |
|
folder_contains(folder, entity) |
Returns a Boolean indicating whether the entity is inside the specified folder. This function looks inside subfolders as well, so the entity could be nested multiple levels deep from the specified folder. |
|
get_attributes(attributes) |
Returns a range to iterate on the specified attribute set. |
|
get_attribute_name(attributes, index) |
Returns the attribute identifier for the attribute located at the specified index, from the specified attribute set. |
|
start_sum(item, property) |
Begins integration of an RDF triplet. The “item” and “property” parameters define the subject and property items of the triplet. See the “sum()” function to see how to provide a value to the triplet. Returns an integer value that identifies the new sum. |
|
sum(sumId, value) |
Adds the specified value to an existing sum. The “sumId” parameter is the identifier returned by the call to “start_sum()”. |
|
get_volume(voxeldata, voxel) |
Returns the volume of the specified voxel in the specified voxel data. The voxel data must be loaded with the “load_voxels()” function. The returned value will range from zero to the (voxel size)3 |
|
get_attribute_value(voxeldata, attribute, voxel) |
Returns the value of the specified attribute for the specified voxel. |
|
load_voxels(entity, attributes, custom_attributes) |
Instructs the system to load the voxel data for the specified entity. The “attributes” parameter contains a bit mask that defines which default attributes should be loaded. This can be computed as a bitwise OR of the constants for the desired default attributes. Currently the following default attributes are supported:
The “custom_attributes” parameter contains an array of strings where each entry corresponds to a custom attribute that may be found in the entity. If no custom attributes are required, it is possible to pass “None” in this parameter. |
|
load_mesh(entity, attributes, custom_attributes) |
Instructs the system to load the mesh data for the specified entity. In this version, the “attributes” parameter should be set to zero and the “custom_attributes” to None. |
|
load_points(entity, attributes, custom_attributes) |
Instructs the system to load the mesh data for the specified entity. In this version, the “attributes” parameter should be set to zero and the “custom_attributes” to None. |
|
new_material() |
Creates a new material instance. |
|
render(component, material) |
Instructs the system to render the specified component using the specified material. Only components of type mesh (returned by “load_mesh”) and of type points (returned by “load_points”) are supported by this version. |
Program Examples
Voxel Generator for a Torus object
This program generates a volumetric Torus object:
import voxelfarm as vf
import math


def length2d(p):
    return math.sqrt(p[0] * p[0] + p[1] * p[1])

def torus(p, r1, r2):
    d = length2d((p[0], p[2]))
    q = (d - r1, p[1])
    return length2d(q) - r2

vf.init() # necessary for Voxel Generator programs

xo = vf.input("x", "Torus Center X")
yo = vf.input("y", "Torus Center Y")
zo = vf.input("z", "Torus Center Z")
r1 = vf.input("r1", "Torus Radius")
r2 = vf.input("r2", "Torus Inner Radius")

vf.set_entity_bounds_x(xo - r1 - r2, xo + r1 + r2)
vf.set_entity_bounds_z(zo - r1 - r2, zo + r1 + r2)
vf.set_entity_bounds_y(yo - r2, yo + r2)

for v in vf.field:
    voxel_p = vf.get_field_origin(v)
    p = (voxel_p[0] - xo, voxel_p[1] - yo, voxel_p[2] - zo)
    f = torus(p, r1, r2)
    vf.set_field(v, f)
The program produces the following output:
Depletion Report
The following program computes a depletion report using two date ranges and a block model:
import voxelfarm as vf

block_model = vf.input_entity("bm", "Block Model", vf.type.block_model)
attributes = vf.input_attributes("attrs", "Attribute", vf.type.value, block_model)

terrainAD1 = vf.input_date("terrainA_date_start", "Terrain A Start Date")
terrainAD2 = vf.input_date("terrainA_date_end", "Terrain A End Date")
folderA = vf.input_entity("folderA", "Terrain A Parent Folder", vf.type.folder)
terrainBD1 = vf.input_date("terrainB_date_start", "Terrain B Start Date")
terrainBD2 = vf.input_date("terrainB_date_end", "Terrain B End Date")
folderB = vf.input_entity("folderB", "Terrain B Parent Folder", vf.type.folder)

surfaceA = vf.start_composite()
surfaceB = vf.start_composite()

for i in vf.entities:
    if vf.get_entity_type(i) & vf.type.voxel_terrain != 0:
        date = vf.get_entity_date(i)
        if date >= terrainAD1 and date <= terrainAD2 and vf.folder_contains(folderA, i):
            vf.add_layer(surfaceA, i)
        if date >= terrainBD1 and date <= terrainBD2 and vf.folder_contains(folderB, i):
            vf.add_layer(surfaceB, i)

terrain_voxelsA = vf.load_voxels(surfaceA, vf.attribute.volume, None)
terrain_voxelsB = vf.load_voxels(surfaceB, vf.attribute.volume, None)
voxel_data = vf.load_voxels(block_model, vf.attribute.volume, attributes)

attribute_list = vf.get_attributes(attributes)
for attr in attribute_list:
    vf.start_sum("Depleted", vf.get_attribute_name(attributes, attr))

for v in vf.voxels:
    volume = vf.get_volume(voxel_data, v)
    if volume > 0.0:
        for attr in attribute_list:

            # get block model attribute value
            value = vf.get_attribute_value(voxel_data, attr, v)

            # get terrain volume
            volumeTerrainA = vf.get_volume(terrain_voxelsA, v)
            volumeTerrainB = vf.get_volume(terrain_voxelsB, v)

            # clip affected volume to block model volume
            volumeA = min(volume, volumeTerrainA)
            volumeB = min(volume, volumeTerrainB)

            # sum attribute weight
            if volumeA > volumeB:

                # this was cut
                volume = min(volume, volumeA - volumeB)
                vf.sum(attr, volume * value)
The program will compute the tonnage for a user-supplied list of attributes.
The two date ranges are used to compute two surfaces. All terrain datasets within the first date range will be composited together in a single surface. The program does the same with the second date range, obtaining a second surface.
The program will assume the second composite is the most recent one.
Block Model with Terrain View
This program overlays a semi-transparent terrain over a block model:
import voxelfarm as vf

terrain = vf.input_entity("terrain", "Terrain", vf.type.voxel_terrain)
bm = vf.input_entity("bm", "Block Model", vf.type.block_model)

mesh1 = vf.load_mesh(terrain, vf.attribute.none, None)
mesh2 = vf.load_mesh(bm, vf.attribute.none, None)

mat1 = vf.new_material()
mat1.color = [1, 1, 1, 0.9]
mat1.gradient = "dirt"

mat2 = vf.new_material()
mat2.color = [1, 1, 1, 1]
mat2.gradient = "color"

vf.render(mesh1, mat1)
vf.render(mesh2, mat2)
Serverless .Net Lambdas
Submitting .Net Lambdas
The platform allows users to run Spatial Lambdas that are compiled as standard .Net assemblies.
Currently, .Net assemblies are supported only for REPORT programs. GENERATOR and VIEW programs must still be created using Python.
Spatial operations using .Net assemblies see a performance increase over 30 times compared to an equivalent workload running in Python.
Creating the assembly
In order to create a .Net assembly, the developer will follow these steps:
- Create a .Net Standard Class Library project
- Add the .Net VoxelFarmClientLibrary to the project
- Create a class in the Library that implements the desired Spatial Lambda interface (for instance IVoxelFarmReportLambda)
- Compile the assembly into a DLL, if necessary, package the DLL and dependencies into a ZIP file
Creating/updating the PROGRAM entity
Before running the Spatial Lambda, the user must create a PROGRAM entity that contains the .Net assembly for the Lambda code.
The user can choose between two options when it comes to creating the new entity:
1. Using the admin Web UI:
First, select Add > .Net Lambda from the Catalog section in the UI:
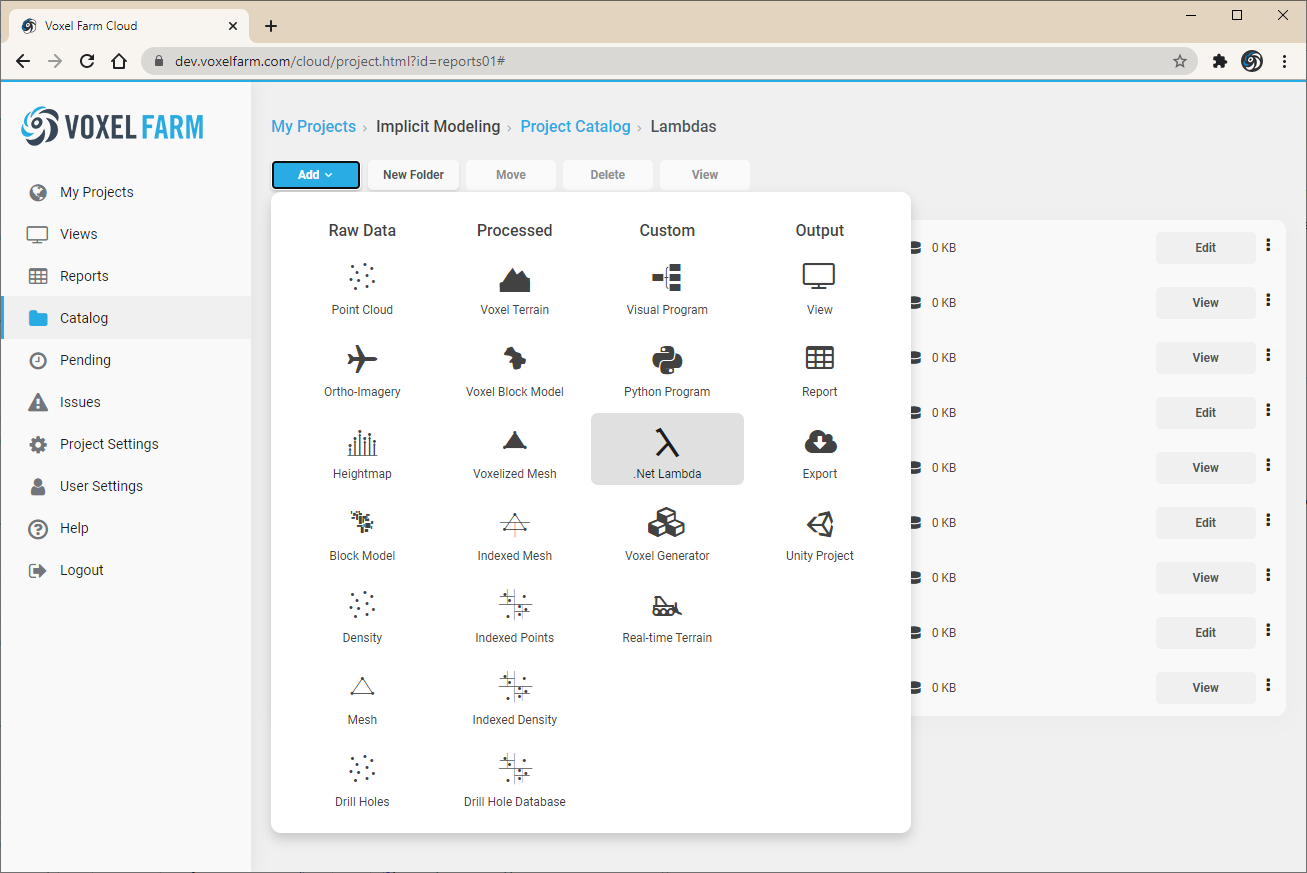
Provide a name for the program, and information about the Lambda class that will be used as entrypoint:
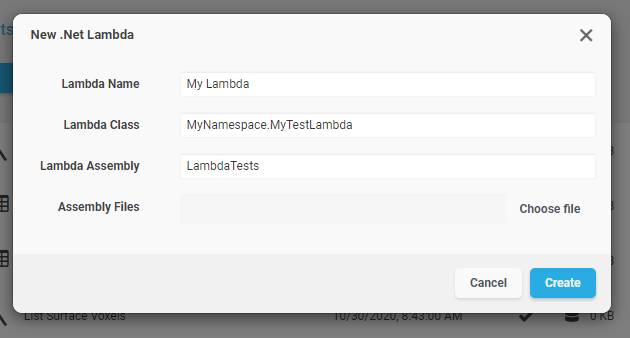
Click on "Choose file" to select one or multiple files that will be associated to the Spatial Lambda.
Once the use clicks on "Create", the platform validates the code and discovers which inputs the Lambda expects. From this point on, the Lambda is available for running as a spatial report.
2. Using the REST API:
The user can create and validate a new PROGRAM entity by making this sequence of REST calls:
- Create a PROGRAM entity, specifying "NETASM" in the code_origin property. See the Triggering Reports example to see how this is performed for a Python program.
- Upload the assembly files as an attachment to the entity. See the Uploading Entity Files section.
- Request the system to process the new program. This is so the platform can discover which inputs this program will require later, once it is ran by users. See the Triggering Reports topic for more information on how to trigger a processing job.
Writing Report Lambdas
Reports are processes that the platform runs over spatial datasets in a massively parallel fashion. The code for these processes can be supplied entirely by users, and can be provided as a Python program or a .Net assembly. This topic covers how to implement a Report process using a .Net assembly and C#.
In broad strokes, the user is required to:
- Create a class in C# that implements the report interface (IVoxelFarmReportLambda)
- Include that class in a library, and upload the .Net assembly for the library to the spatial project that contains the data to be used in the report
- Create a report entity that applies the uploaded .Net assembly program to a given region of space
This topic focuses on how a user would create an implementation of the IVoxelFarmReportLambda interface. See the Creating Spatial Lambdas in C# topic to learn more about how to import the lambda code into the platform. The Triggering Reports topic discuses how to start a report over a given spatial region.
Stages of a Spatial Report's execution
Before looking at how an implementation of the report lambda class would be made, it helps to understand the different stages a spatial report will go through:

Stage 1: Gather Inputs. During this stage, the report asks questions to the user or caller. For instance if the report is computing the interaction between two or more datasets, the report code could require these inputs to be provided.
Stage 2: Create Data Mashups. Based on the inputs that were provided in the earlier stage, and following the intent of the report, the report code will combine the datasets in particular ways that are useful to the report. Volumetric datasets can be easily combined by stacking them together, or by performing volumetric boolean operations like Union, Intersection and Complements.
Stage 3: Iterate and analyze data. In this stage, the report iterates over the results of the data mashups and gets to inspect the results. This could lead to the discovery of new facts about the information which the report can accumulate using special devices like Sums and Lists. See the following section for a better understanding of Sums and Lists.
Stage 4: Summarize results. The platform runs earlier stages in a massively parallel fashion. This fact is transparent to the programmer who writes the report, as the report code can be written as if it was running in a fully serial manner. There is, however, one last stage that does not in parallel, and runs once all the parallel processing is complete. During this stage, it is possible to look at the results gathered by the massively parallel stages and produce new facts and data for the report.
Sums and Lists
Report Lambda classes must be stateless. The platform runs the code in a large number of nodes at the same time, for this reason the implementation of the report interface must be purely functional.
Since they are stateless, report lambdas can use two concepts provided by the platform to remember the facts they are discovering: Sums and Lists.
A Sum is a global counter. A report can start as many Sums as it needs. The platform integrates all the partial values for each Sum as they are produced by parallel executions of the spatial lambda that target disjoint regions of space. A simple example of a sum would be how a lambda computes the volume of a very large object. The code would declare a singe sum for the final volume, and then add the volume of each voxel to the sum.
A List allows to collect a series of facts as the lambda executes over space. For instance, assume a report needs to add an entry to an error log wherever certain condition is met by the inspected data. By using a List, the programmer could emit one entry for the list every time an error is detected. Once the report completes, the last stage would be able to access every entry in the list and perform additional actions.
The IVoxelFarmReportLambda interface
A spatial report lambda is required to implement the IVoxelFarmReportLambda interface. This interface is included in the VoxelFarmCloudLibrary assembly.
Implementing the interface requires implementing only two methods, which cover all the execution stages:
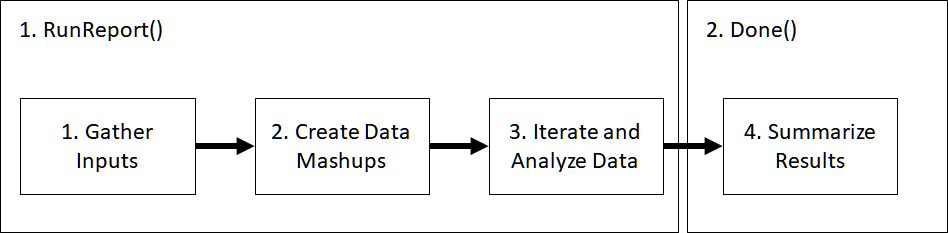
- RunReport: This method takes one parameter of type IVoxelFarmReportLambdaHost, called the lambda's "host". The host provides the functionality required to interact with the platform, including asking for inputs, loading data and creating mashups. In this function, the lambda can gather inputs, create mashups and iterate over the data. This is also where Sums and Lists are created and populated by the lambda code.
- Done: This method takes one parameter of type IVoxelFarmReportDoneLambdaHost, called "host". The host provides functionality required at this stage, like iterating over list results, sums, and uploading results as files or new entities to the platform.
IVoxelFarmReportLambda
The IVoxelFarmReportLambda interface provides a way to supply custom execution code for a report process in the platform.
The interface is declared as follows:
namespace VoxelFarm.SpatialLambda
{
    public interface IVoxelFarmReportLambda
    {
        SpatialLambdaResult RunReport(IVoxelFarmReportLambdaHost host);
        SpatialLambdaResult Done(IVoxelFarmReportDoneLambdaHost host);
    }
}
Methods:
|
RunReport(IVoxelFarmReportLambdaHost host) |
Runs the report's logic. See the topic for more information. This method takes one parameter of type IVoxelFarmReportLambdaHost |
|
Done(IVoxelFarmReportDoneLambdaHost host) |
Runs the final stage of the report, allowing to consolidate any data produced during the massively parallel stages. See the for more information. This method takes one parameter of type IVoxelFarmReportDoneLambdaHost |
IVoxelFarmReportLambdaHost
The IVoxelFarmReportLambdaHost interface provides access to platform features.
Methods:
|
double Input(string id, string label, double defaultValue) |
Inputs a floating point value. The parameter provided as id should be unique for the set of inputs in this report lambda. |
|
string InputAttributes(string id, string label, int entity, int type) |
Inputs one attribute. The parameter provided as id should be unique for the set of inputs in this report lambda. The parameter entity determines which entity will provide the list of possible attributes. |
|
bool InputBool(string id, string label, bool defaultValue); |
Inputs a boolean point value. The parameter provided as id should be unique for the set of inputs in this report lambda. |
|
ulong InputDate(string id, string label, ulong defaultValue); |
Inputs a date-time. The parameter provided as id should be unique for the set of inputs in this report lambda. |
|
int InputEntity(string id, string label, int type); |
Inputs a entity reference. The parameter provided as id should be unique for the set of inputs in this report lambda. |
|
string InputQuery(string id, string label, int entity); |
Inputs a query for the entity specified as parameter. The parameter provided as id should be unique for the set of inputs in this report lambda. |
|
string InputRegion(string id, string label); |
Inputs a region. The parameter provided as id should be unique for the set of inputs in this report lambda. |
|
string InputString(string id, string label, string defaultValue); |
Inputs a string. The parameter provided as id should be unique for the set of inputs in this report lambda. |
|
int LoadVoxels(int entity, int attributes, string customAttributes); |
Requests the platform to load voxels for the provided entity. The attributes parameter contains a bitmask that determines which standard attributes will be loaded for the voxels. Currently only VoxelFarm.SpatialLambda.Attribute.Volume is supported. Custom attributes may contain a comma-separated list of attributes that should be loaded. |
|
void SetAttributes(int entity, string attrib); |
Sets which attributes should be loaded for the specified entity. |
|
void SetQuery(int entity, string query); |
Sets which query should be applied to the specified entity. |
|
int StartComposite(); |
Starts a new voxel composite. This method is used in combination with AddLayer(), which inserts a new voxel layer into the voxel composite. |
|
int VoxelsComplement(int componentA, int componentB, int attributes, string customAttributes); |
Creates a volumetric boolean complement between two specified voxel layers. The attributes parameter contains a bitmask that determines which standard attributes will be loaded for the voxels. Currently only VoxelFarm.SpatialLambda.Attribute.Volume is supported. Custom attributes may contain a comma-separated list of attributes that should be loaded. |
|
int VoxelsIntersection(int componentA, int componentB, int attributes, string customAttributes); |
Creates a volumetric boolean intersection between two specified voxel layers. The attributes parameter contains a bitmask that determines which standard attributes will be loaded for the voxels. Currently only VoxelFarm.SpatialLambda.Attribute.Volume is supported. Custom attributes may contain a comma-separated list of attributes that should be loaded. |
|
int VoxelsUnion(int componentA, int componentB, int attributes, string customAttributes); |
Creates a volumetric boolean union between two specified voxel layers. The attributes parameter contains a bitmask that determines which standard attributes will be loaded for the voxels. Currently only VoxelFarm.SpatialLambda.Attribute.Volume is supported. Custom attributes may contain a comma-separated list of attributes that should be loaded. |
|
void AddLayer(int layer, int entity); |
Adds a layer to a voxel composite. See the StartComposite() method, which is used in tandem with this function. |
|
float[] GetAttributeBuffer(int component, int attribute, int channel); |
Returns a buffer that contains attribute values for the specified voxel component. This function will return null if there is no attribute data for that region of space. The attribute parameter provides the index of the desired attribute. This index is based on the attribute's position in the LoadVoxels() call, or in any of the volumetric boolean calls that also take an attribute list. The channel attribute allows to handle cases where a single voxel contains multiple channels of data for increased precision. See the GetChannelCount() function, which should be called prior to GetAttributeBuffer() to ensure all channels in the voxel are read. |
|
int GetAttributeCount(string attributeList); |
Returns the number of individual attributes in the provided attribute list string. |
|
string GetAttributeName(string attributeList, int index); |
Returns the attribute name given an attribute index and an attribute list string. |
|
ushort GetChannelCount(int component); |
Returns the number of overlapping channels in the voxel data. |
|
float[] GetVolumeBuffer(int component, int channel); |
Returns a buffer that contains voxel volumes for the specified voxel component. This function will return null if there is no volume data for that region of space. Volume values range from 0 to 1. In order to compute actual volume in world units, multiply this value by the value returned by GetVoxelVolume(). The channel attribute allows to handle cases where a single voxel contains multiple channels of data for increased precision. See the GetChannelCount() function, which should be called prior to GetAttributeBuffer() to ensure all channels in the voxel are read. |
|
double[] GetVoxelCentroids(); |
Returns an array of 3D points, where each point corresponds to the centroid of a voxel. This array has three times the number of entries as the arrays returned by GetVolumeBuffer or GetAttributeBuffer, as it takes three entries to represent the coordinates of a single voxel. |
|
double GetVoxelSize(); |
Returns the length of a voxel in the project. |
|
double GetVoxelVolume(); |
Returns the volume of a voxel in the project. |
|
int StartList(string name) |
Starts a list with the provided name. The function returns an integer handle to the list, which is later used in calls to the List() function. |
|
void List(int listId, string value) |
Adds an entry to a list. The listId parameter represents the list. The value parameter holds the contents of the item that will be added to the list. |
|
int StartSum(string entity, string property) |
Starts a sum for the provided object and property. This function returns an integer handle for the sum. This handle is later used in calls to Sum(). |
|
void Sum(int sumId, double value) |
Increments the specified sum by the specified value. |
IVoxelFarmReportDoneLambdaHost
The IVoxelFarmReportLambdaHost interface provides access to platform features during the final stage of a report's execution.
Methods:
|
string CreateTempFolder(string name) |
Creates a temporary folder and returns the path to it. |
|
bool AttachFile(string targetName, string filePath) |
Attaches a file to the report entity. |
|
ServerEndPoint GetServerEndpoint() |
Returns the necessary data to connect to the spatial platform. This can be used to interact with the REST or streaming APIs. |
|
double GetSumValue(string entity, string property) |
Returns the value for the specified sum. |
|
bool ScanList(string name, Func<string, bool> scanFunction) |
Allows to iterate over the specified list. The provided lambda function will be called once per element on the list. The callback must return false so the next element in the list is retrieved. The scan operation stops if the callback returns true. To have a list processed in its entirety, make sure the callback always returns false. |
Report Lambda Examples
using System;
using System.IO;
using System.IO.Compression;
using VoxelFarm.SpatialLambda;

namespace TestLambdas
{
    // This Report Lambda uses a Sum to compute the volume of an object

    public class EntityVolume : VoxelFarm.SpatialLambda.IVoxelFarmReportLambda
    {
        public SpatialLambdaResult Done(IVoxelFarmReportDoneLambdaHost host)
        {
            var result = new SpatialLambdaResult(0);
            return result;
        }

        public SpatialLambdaResult RunReport(IVoxelFarmReportLambdaHost host)
        {
            // get inputs
            int entity = host.InputEntity("0", "Volume Source",
                VoxelFarm.SpatialLambda.EntityType.VoxelTerrain |
                VoxelFarm.SpatialLambda.EntityType.BlockModel |
                VoxelFarm.SpatialLambda.EntityType.MaterialTracking |
                VoxelFarm.SpatialLambda.EntityType.VoxelGenerator);

            // ask the platform to load voxels for the entity including volume for each voxel
            int voxels = host.LoadVoxels(entity, VoxelFarm.SpatialLambda.Attribute.Volume, "");

            double sum = 0.0;

            int channelCount = host.GetChannelCount(voxels);
            for (int channel = 0; channel < channelCount; channel++)
            {
                // get array with volume values, one per voxel
                float[] volumes = host.GetVolumeBuffer(voxels, channel);

                // the array can be null if all volume values are zero
                if (volumes != null)
                {
                    // add volumes together
                    double voxelSize = host.GetVoxelVolume();
                    foreach (float v in volumes)
                    {
                        sum += v * voxelSize;
                    }
                }
            }

            // report sum results
            int sumId = host.StartSum("Object", "Volume");
            host.Sum(sumId, sum);

            var result = new SpatialLambdaResult(0);
            return result;
        }
    }

    // This Report Lambda uses a List to create a block model file in CSV format out
    // of another volumetric object

    public class CreateBlockModel : VoxelFarm.SpatialLambda.IVoxelFarmReportLambda
    {
        public SpatialLambdaResult RunReport(IVoxelFarmReportLambdaHost host)
        {
            // get inputs
            int entity = host.InputEntity("0", "Source",
                VoxelFarm.SpatialLambda.EntityType.VoxelTerrain |
                VoxelFarm.SpatialLambda.EntityType.BlockModel |
                VoxelFarm.SpatialLambda.EntityType.MaterialTracking |
                VoxelFarm.SpatialLambda.EntityType.VoxelGenerator);

            // get buffer with volumes
            int voxels = host.LoadVoxels(entity, VoxelFarm.SpatialLambda.Attribute.Volume, "");

            float[] volumes = host.GetVolumeBuffer(voxels, 0);

            // list voxels with any volume in them
            if (volumes != null)
            {
                double voxelSize = host.GetVoxelSize();
                double[] centroids = host.GetVoxelCentroids();

                var list = host.StartList("blocks");
                int index = 0;
                foreach (float v in volumes)
                {
                    if (v > 0.0)
                    {
                        double x = centroids[index];
                        double y = centroids[index + 1];
                        double z = centroids[index + 2];
                        string item = x + "," + y + "," + z + "," + voxelSize + "," + voxelSize + "," + voxelSize + "," + v;
                        host.List(list, item);
                    }
                    index += 3;
                }
            }

            return new SpatialLambdaResult(0);
        }


        public SpatialLambdaResult Done(IVoxelFarmReportDoneLambdaHost host)
        {
            string compressionFolder = host.CreateTempFolder("compress");
            string uploadsFolder = host.CreateTempFolder("uploads");
            string blockModelFileName = compressionFolder + "block_model.csv";
            string headersFileName = uploadsFolder + "headers.csv";
            StreamWriter file = new StreamWriter(blockModelFileName);
            StreamWriter headers = new StreamWriter(headersFileName);
            file.WriteLine("XC,YC,ZC,XS,YS,ZS,DENSITY");
            headers.WriteLine("XC,YC,ZC,XS,YS,ZS,DENSITY");
            headers.Close();
            host.ScanList("blocks", (item) =>
            {
                file.WriteLine(item);
                return false;
            });
            file.Close();
            ZipFile.CreateFromDirectory(compressionFolder, uploadsFolder + "block_model.zip");
            host.AttachFile("block_model.zip", uploadsFolder + "block_model.zip");
            host.AttachFile("headers.csv", headersFileName);
            return new SpatialLambdaResult(0);
        }
    }
}
Embed Viewer
Introduction
The Embed Viewer is a React component that encapsulates a viewer to show 3D spatial data.
The Embed Viewer developer manual includes the following sections
Definition of the Embed Viewer React Component' Props (Properties) and each prop values and description.
Definition of the Embed Viewer React Component' functions that can be called from 4DV Application.
Properties
|
Name |
JS Data Type |
Description |
|
projectId |
string |
The ID of the project |
|
streamingUrl |
string |
The URL of the streaming server |
|
restUrl |
string |
The URL of rest server |
|
viewId |
string |
The ID of the view |
|
viewJSON |
JSON Object |
A JSON Object containing description of layers |
|
project |
JSON Object |
The project entities associated to this view |
|
zoomToExtent |
Boolean |
Show/Hide zoom to extent button |
|
fullscreen |
Boolean |
Show/Hide full screen button |
|
home |
Boolean |
Show/Hide Home button |
|
options |
Boolean |
Show/Hide options button |
|
showControlsInView |
Boolean |
Show the controls inside/outside of the view |
|
onRegionChange |
function |
Event Notification is triggered when a change in a region occurs. The event includes the following properties: - voxelfarmPoints: the position of the region in Voxel Farm coordinates. - voxelfarmMinY: min Y in Voxel Farm coordinates. - voxelfarmMaxY: max Y in Voxel Farm coordinates. - worldPoints: the position of the region in World coordinates. - worldMinZ: min Z in world coordinates. - worldMaxZ: max Z in world coordinates. |
|
onLayerClick |
function |
Event Notification is triggered when clicking on a layer. The event includes the following properties: - eventType: mousedown/mouseup - canvasPosition: the position of the canvas. - layerId: the layer Id where the click occurred. - Position: the position of the click in the screen. - voxelfarmPosition: the position of the layer in Voxel Farm coordinates. - windowPosition: the position of the window. - worldPosition: the position of the layer in world coordinates. |
|
onCameraChange |
function |
Event Notification is triggered when the camera of the viewer change. |
|
onCameraRotate |
function |
Event Notification is triggered when the camera of the viewer rotates. |
|
onCrossSectionChange |
function |
Event Notification is triggered when the cross section of the viewer change. |
|
onBusy |
function |
Event Notification is triggered when the viewer is busy. |
|
onNewScene |
function |
Event Notification is triggered when the new scene is loaded. |
|
onError |
function |
Event Notification is triggered when the viewer is throwing an error. |
|
requestAuthToken |
function |
Optional Function if authentication is required, it returns the authorization token |
Functions
|
Name |
Parameters |
Description |
|
fetchProgramInputs |
- programId: string - callback: function => callback returning the inputs |
Return the current PYTHON programs inputs |
|
refreshView |
- selectedViewContainerMeta: ViewMetaData Object |
Update the current view with new MetaData |
|
loadRegion |
- regionId: string |
Load specific region in the viewer |
|
loadRegionData |
- regionData: interface => { mode: number (0: None, 1: default type), points: [], pointsWorld: [], minY: number (Float), maxY: number (Float), minWorldZ: number (Float), maxWorldZ: number (Float) } |
Load specific region data in the viewer |
|
hideRegion |
None |
Hide the current loaded region |
|
raycastViewPrimitives |
- clientX: number - clientY: number |
Ray-cast across all layers primitives in the view |
|
requestFeatureInfo |
- featureInfoQueryId: number - cellId: number - layerId: number - worldPoint: [3] - attributes: [] - customAttributes: [] - onComplete: function => callback on complete |
Requests feature info to the content server for a given a voxel layer |
|
zoomToExtents |
None |
Zooms the scene to the camera's extents |
|
zoomToRegion |
- regionData: interface => { mode: number (0: None, 1: default type), points: [], pointsWorld: [], minY: number (Float), maxY: number (Float), minWorldZ: number (Float), maxWorldZ: number (Float) } |
Zooms the region to the camera's extents |
|
zoomIn |
None |
Zoom in the focus of the camera |
|
zoomOut |
None |
Zoom out the focus of the camera |
|
captureFrame |
None |
Capture a frame |
|
frameWorldBounds |
- worldBounds: [3] |
Zoom a given bounds to the camera's extents |
|
getCameraWorldPosition |
None |
Return the camera position in world coordinates |
|
getWorldSceneBounds |
None |
Return the scene bounds in world coordinates |
|
getOrthographicScale |
None |
Return the orthographic scale of the viewer |
|
getDefaultGradientImage |
- gradientId: string |
Return the default gradient image used in the view |
|
getCameraViewerPosition |
None |
Return the current position of the camera |
|
getCameraWorldPosition |
None |
Return the current world position of the camera |
|
getCameraAzimuthPlunge |
None |
Return the current camera azimuth plunge |
|
getFocusViewerPosition |
None |
Return the current focus position of the viewer |
|
getViewerProjection |
None |
Return the current viewer projection as a string |
|
setOrthographicProjection |
- enable: Boolean |
Enable/disable orthographic projection |
|
setUserSettings |
- UserSettings: interface => { fontSize: number } |
Sets user settings for the viewer, such as font size for all labels |
|
setLabelVisibility |
- showLabels: Boolean |
Set visibility for all labels |
|
setVisibility |
- layerId: string - enable: Boolean |
Enable or disable visibility for a given meta component |
|
setTransparency |
- layerId: string - opacity: number (Float) |
Set opacity for a given meta component |
|
setDiffuseTransparency |
- layerId: string - diffuseOpacity: number (Float) |
Set diffuse map opacity for a given meta component |
|
setDiffuseBlendMode |
- layerId: string - diffuseBlendMode: number (Float) |
Set diffuse blend mode for a given meta component |
|
setDrillholeSettings |
- layerId: string - drillholesSettings: interface => { showRoots: Boolean, showRootLabels: Boolean, } |
Set drill hole settings for a given meta vector component, such as collar visibility, collar label id visibility, holes rendered as lines or tubes, holes attribute label filter |
|
setGeoChemSettings |
- layerId: string - geoCheomSettings: interface => { showPolygon: Boolean, vfPoints: number[3], wPoints: number[3] }, top: { attribute: string, color: [3], index: number }, bottom: { attribute: string, color: [3], index: number } left: { attribute: string, color: [3], index: number } right: { attribute: string, color: [3], index: number } }, } |
Set Geo chem settings for a given meta vector component, such as attribute label visibility, attribute label color, size and shape |
|
setAttributeQuery |
- layerId: string - attributeQuery: interface => { type: number, } |
Sets attribute query for a given meta component |
|
setLabelQuery |
- layerId: string - labelQuery: interface => { type: number, vfPoints: number[3], wPoints: number[3] } } |
Sets label query for a given meta component |
|
setBlockModelLimits |
- layerId: string - BlockModelLimits: interface => { indexFilter: number, min: { x: number (Float), y: number (Float), z: number (Float), }, max: { x: number (Float), y: number (Float), z: number (Float), } }, }, } |
Sets block model limits for a given meta block tree component |
|
setColorLegend |
- layerId: string - colorLegend: interface => { type: number (1: Static Color, 2: Data Driven), gradientId: string, dataDrivenColorDistribution: [] } |
Sets color legend for a given meta component |
|
setCollarLegend |
- layerId: string - collarLegend: interface => { type: number, (1: default type) } |
Sets collar legend for a given meta vector component |
|
setFatLineThickness |
- layerId: string - FlatlineThickness: number |
Sets fat line thickness for a given meta vector component |
|
setTubeDiameterLegend |
- layerId: string - tubeDiameterLegend: interface => { scaleMode: number, } |
Sets tube diameter legend for a given meta vector component |
|
setTraceSettings |
- layerId: string - traceSettings: interface => { traceThickness: number (Float) } |
Sets fat line thickness for a given meta vector component using trace settings |
|
setMeshPropertiesAt |
- layerId: string - meshIndex: number - meshVisible: Boolean - meshOpacity: number (Float) - meshUseParentColorLegend: Boolean - meshStaticColor: [3], |
Sets mesh properties at a specific mesh index for a given meta surface component |
|
setMeshProperties |
- layerId: string - meshProperties: interface => { parentLayer: string, } |
Sets mesh properties for all meshes for a given meta surface component |
|
setImageProperties |
- layerId: string - imageProperties: interface => { visible: Boolean, brightness: number (Float), gamma: number (Float), blendMode: number, blendMakeColorTransparent: Boolean, blendInvertSelection: Boolean, blendTransparentColor: [3], blendSelectionTolerance: number (Float), blendOutputTransparency: number (Float), blendOutputColor: [3], bands: [4] } |
Sets image properties for a given meta block tree/surface/vector component |
|
setImagePropertiesAt |
- layerId: string - imageId: string - imageVisible: Boolean - imageOpacity: number (Float) - imageContrast: number (Float) - imageBrightness: number (Float) - imageGamma: number (Float) - imageBlendMode: number - imageBlendMakeColorTransparent: Boolean - imageBlendTransparentColor: [3] - imageBlendSelectionTolerance: number (Float) - imageBlendOutputColor: [3], - imageBlendInvertSelection: Boolean - imageBands: [3] |
Sets the image properties at a specific image index for a given meta block tree/surface/vector component |
|
setNavigationMode |
- mode: number |
Set the navigation mode of the camera - mode = 0 => use rotation as primary mouse input mode = 1 => use pane as primary mouse input |
|
setViewMetaData |
- compositedMeta: ViewMetaData Object |
|
|
setExtendedMeta |
- index: number - extendedMeta: JSON Object - viewId: number (optional) |
Set extended meta to the current meta data Object |
|
applyZoomDelta |
- deltaDistance: number |
Apply a zoom given a delta value |
|
enableCrossSectionFading |
- enableFading: Boolean |
Enable or Disables Cross Section Fading |
|
alignCameraToDirection |
- direction: number |
Align the camera forward to the given direction |
|
startSegment |
- segmentType: number - keepSegmentAlive: Boolean - onCancelSegment: function => callback on canceling of the segment |
Start a segment procedure |
|
stopSegment |
- segmentId: number |
Stop a segment procedure |
|
startOrthoPoly |
- orthoPolyType: number - keepOrthoPolyAlive: Boolean - onCompleteOrthoPoly: function => callback on complete of the Ortho poly - onCancelOrthoPoly: function => callback on cancel of the Ortho poly |
Start an orthographic segment list procedure |
|
stopOrthoPoly |
- orthoPolyId: number |
Stop an orthographic segment list procedure |
|
createDot |
- dotId: number - worldPoint: [3] |
Create a dot in the scene |
|
destroyDot |
- dotId: number |
Destroy an existing dot |
|
createViewMetaData |
None |
Create ViewMetaData Object |
|
addViewer |
- projectId: string - viewId: string - layers: Array - findEntityFn: function => callback to find the entity from within the caller of the function - isBaseMap: Boolean - currentProject: JSON Object |
Add viewer to the multiCRS Viewer pool |
|
viewerExists |
- layer: JSON Object |
Check if a layer has a viewer associated with it. |
|
setViewerProjection |
- projectId: string - entityId: string |
Set the current projection of the view based on the selected entity passed to the function as the second parameter |
|
updateCrossSectionEnableHighlight |
- enableHighlight:Boolean |
Update the cross section to enable/disable highlight |
|
updateCrossSectionPresetType |
- presetType: number 0 : No Clipping; Hide +X +Y +Z +W 1 : Clip Outside; Show +X +Y +Z; Hide +W 2 : Clip Outside; Show +Z; Hide +X +Y +W 3 : Clip Outside; Show +X; Hide +Y +Z +W 4 : Clip Outside; Show +Y; Hide +X +Z +W 5 : Clip Normal; Show +Z; Hide +X +Y +W 6 : Clip Normal; Show -X; Hide +Y +Z +W 7 : Clip Normal; Show -Y; Hide +X +Z +W 8 : Clip Normal; Show -Z; Hide +X +Y +W 9 : Clip Normal; Show +X; Hide +Y +Z +W 10 : Clip Normal; Show +Y; Hide +X +Z +W 11 : Clip Normal; Show +W; Hide +X +Y +Z 12 : Clip Normal; Show -W; Hide +X +Y +Z 13 : Clip Outside; Show +W; Hide +X +Y +Z |
Control the Cross section of the view by presets |
C# Client Library
Introduction
The Voxel Farm solution includes a thin C# client library. This client allows applications running on .NET to connect and access data hosted by Voxel Farm servers.
The C# Client Library allows the application to create a “view” of content in the Voxel Farm platform. The library manages how the data in this view is streamed from the server to the client. This can be used to create a simple application that just requests data for exporting or further analysis, to complex rendering applications that must make efficient use of network and local resources as users move quickly in space, change queries and viewing parameters, etc.
The C# Client is the foundation of the Unity3D client. For a complete example of how to build a rendering application using this client, please refer to the included Unity3D example. This section also contains examples of how a simple data retrieval application can be built with this library.
In order to use the C# Client Library, it is necessary to add the VoxelFarmCloudLibrary.dll to the C# application as a reference.
Threading Model
The C# Client is designed to operate in high-frequency, real-time systems like VR rendering. It can only be used asynchronously.
The C# client uses worker threads to perform operations like downloading and decompressing data in the background. Before anything else, the application must initialize this pool of worker threads by calling:
| VoxelFarm.VoxelFarmWorkPool.Start(NumberOfThreads); |
Where “NumberOfThreads” is an integer specifying how many background threads should be used.
The “VoxelFarmWorkPool” object can be used to start new tasks either in background threads or in the main thread by calling the “RunInBackground()” or “RunInMainThread()” respectively. These functions take an action as a parameter, which will be queued and will be executed as soon as possible. Since the functions only insert the action into a queue, they return immediately.
The application is responsible for triggering the processing of pending actions in the main thread. To achieve this, the application must call the “RunNextMainThreadJob()” method in the “VoxelFarmWorkPool” object. Applications like client-side report programs will likely do so in loops that wait until the work is done.
It is up to the application coder to enforce thread safety for the behavior inside these actions. In general is it possible to achieve thread safety without using expensive critical sections by making background threads produce its own copy of the result data, and then passing the copy to an action in the main thread that will collate the copy with the final result. Since it is only the main thread accessing the results, all operations remain lock-free.
This code shows an example of this approach:
VoxelFarmWorkPool.Start(10);
string finalResult = "";
const int Iterations = 100;
int completedIterations = 0;
for (int i = 0; i<Iterations; i++)
{
    VoxelFarmWorkPool.RunInBackground(() =>
    {
        string partialResult = Guid.NewGuid().ToString();
        VoxelFarmWorkPool.RunInMainThread(() =>
        {
            finalResult += partialResult;
            completedIterations++;
        });
    });
}
while (completedIterations<Iterations)
{
    VoxelFarmWorkPool.RunNextMainThreadJob();
}
This example will initialize the work pool with 10 threads. Next, it will compute 100 random strings (using GUIDs) in parallel. Whenever a thread has computed the new string, a new task is scheduled to run in the main thread so the string can be added to a single final string which will eventually contain the 100 random strings
Coordinate Systems
When working with Voxel Farm projects, it is possible to encounter up to three different coordinate systems. These systems are:
- Project’s native coordinate system. These are the real-world coordinates, typically involving an Earth ellipsoid model (WSG84, etc.) a projection system (UTM, Mercator, etc.) and other additional parameters. In most cases, these are right-hand systems with Z coordinate going up.
- Voxel Farm’s internal coordinate system. This is a coordinate system that is used by all Voxel Farm components. It is equivalent to OpenGL’s system (right-handed, Y-up) but it does not contain negative coordinates.
- Rendering engines impose their own coordinate system, for instance, Unity is left-handed, Y-up.
Whenever necessary, it is possible to convert from project coordinates to Voxel Farm coordinates, and vice versa, by using the VoxelFarmAffineTransform class.
The class must be initialized with the project’s coordinate system and the voxel size. Once initialized, the “VF_TO_WC()” and “WC_TO_VF()” functions provide coordinate conversions from one system to another.
Spatial Indexing
A grid is assumed to divide the world into equally-sized 3D cells. Each cell measures VoxelFarmConstant.CELL_SIZE units along each direction.
From a given 3D point in Voxel Farm coordinates, it is possible to determine the coordinates of the cell containing the point. This is simply done by dividing each coordinate by VoxelFarmConstant.CELL_SIZE and keeping the integer part. Each cell can be uniquely described by its integer coordinates in this grid. This grid is known as VoxelFarmConstant.LOD_0 because these are the smallest cells possible.
The engine then assumes the existence of an array of additional grids, each one having cells with dimensions twice the size of the previous grid. These are known as the LOD 1..N cells.
Since the grids are aligned, it can be assumed that one cell at LOD(N) will contain eight cells at LOD(N-1).
Any cell, no matter on which LOD grid, can be uniquely described by four coordinates:
- LOD of the cell
- X index of the cell in the LOD grid
- Y index of the cell in the LOD grid
- Z index of the cell in the LOD grid
To uniquely represent the cell in the index system, these four coordinates are packed into a single 64bit identifier. These identifiers are typically referred to in the API as “cell Ids”.
Voxel-based objects will use an additional grid, which divides each cell into voxels. The number of voxels in a cell is defined in VoxelFarmConstant.BLOCK_DIMENSION.
Creating a View
In order to access spatial information from the Voxel Farm, the application will have to create at least one instance of the “VoxelFarmView” class.
| MyView = new VoxelFarm.VoxelFarmView(); |
The view object will connect to the server to request data based on user input and camera location. The application must provide the server information by calling the “SetServer” method:
| MyView.SetServer(“http://localhost:3983”, “localhost”, 3333, false); |
The first parameter is the URL for the server. If no port is included in the URL, port 80 will be assumed. HTTPS URLs are supported. The second and third parameter are the address and port for the Content Server. The last parameter indicates whether SSL should be used for the Content Server connection.
A single Voxel Farm deployment will host many different projects. The application must also define which project should be used by providing the project’s ID:
| MyView.SetProjectId(“mytestprject001”); |
At this point, we can ask the view to load the project’s information from the server. This is accomplished by calling the “LoadProject” method. This method takes an action function as a parameter, this action will be called when the project load operation completes:
| MyView.LoadProject((HttpStatusCode code) => { // code contains a System.Net.HttpStatusCode for the result of the request }); |
The “code” result parameter passed to the callback is the HTTP code returned by the server. If the server requires authentication and the default user credentials are rejected, this code will return HttpStatusCode.Unauthorized. In this case, the application can prompt the user for new credentials. To set the credentials, call the “SetCredentials” method:
| MyView.SetCredentials(NewUserCredentials); |
Note that it is necessary to call the “LoadProject” again, so the new credentials are used.
View Configuration
Once the project loads, the application must determine how to configure the client view. A single project may contain multiple datasets. Configuring the view in the client involves selecting which datasets should be used and how will they be combined and presented in the client.
There are two main ways to set up the client view:
- Use a predefined View Entity in the project.
- Create a new view definition on the client by instantiating view metadata.
It is possible to mix these two approaches, that is, load the metadata for a predefined view, further modify it on the client, and the using the modified metadata for the view.
Using predefined views
The project may already contain a file entity of type “VIEW” that holds the desired configuration. The client allows to load any predefined view by calling:
| MyView.SetViewId(“539CE7EFAA1F4F0BA6CF037F936BF035”); |
Where the parameter is the ID for the view in the project’s entity model.
If this ID is unknown, it is possible to get a list of all available pre-defined views in a project. To do this the application may call the “GetEntities” function to the client view object:
| var views = MyView.GetEntities(VoxelFarm.VoxelFarmEntityType.View); |
The parameter is the type of entity to return. Only entities of that type will be returned by the function.
This function returns a list of dictionaries, where each dictionary represents a different entity in the project.
The application can use the “ID” key to obtain the unique identifier for the entity, in this case the view. This is the identifier that would be provided to the “SetViewId” function.
Creating view metadata
The C# Client uses view metadata objects to describe how different datasets in a project can be combined.
The view metadata is always an instance of the “VoxelFarmViewMeta” class.
An instance of VoxelViewMeta will contain a list of inner components. Each component represents a different type of spatial data that should appear in the view. For instance, view that shows a terrain surface with ortho-imagery laid on top of it, would contain two different components: the terrain surface geometry and the ortho imagery set.
All components inherit from the “VoxelFarmMetaComponent” class. The available components in this version are:
- VoxelFarmMetaPointCloud. Used for point clouds.
- VoxelFarmMetaSurface. Used for volumetric entities (terrain, block models, etc.) and indexed meshes.
- VoxelFarmMetaOrthoImagery. Used to apply imagery to surfaces.
The VoxelFarmMetaSurface class not only represents volumetric components, but also components that are the result of volumetric operations between components. To combine different surfaces into a single operation, use the “VoxelFarmMetaSurfaceOperation” class.
For volumetric surfaces that are not the result of surface operations, use the “VoxelFarmMetaLayerStack” class. An instance of this class represents a surface that is the result of multiple volumetric layers added together. The layers can be of any of the following types:
- VoxelFarmMetaLayerHM. Represents voxel terrain.
- VoxelFarmMetaLayerBM. Represents a voxelized block model.
- VoxelFarmMetaLayerPython. Represents a Python voxel generator.
The following example creates view metadata for a terrain with ortho imagery applied to it and loads it into a client view object:
| var components = new List<VoxelFarmMetaComponent>(); var componentMasks = new List<ushort>(); var images = new VoxelFarmMetaOrthoImagery {Id = item["ID"], Diffuse = hasOrtho, Normal = hasNormals, Config = item["runtime"] }; components.Add(images); componentMasks.Add(0x01); var hmLayer = new VoxelFarmMetaLayerHM { Id = item["ID"], Config = item["runtime"] }; List<VoxelFarmMetaLayer> layerStack = new List<VoxelFarmMetaLayer>(); layerStack.Add(hmLayer); var layers = new VoxelFarmMetaLayerStack(layerStack); var surface = new VoxelFarmMetaSurfaceOperation { OpId = VoxelFarmMetaID.META_OP_NONE, OpA = layers, OpB = null, Images = images }; components.Add(surface); componentMasks.Add(0x02); var viewMeta = new VoxelFarmViewMeta { Components = components, ComponentMasks = componentMasks }; MyView.SetViewMetaData(viewMeta); |
Getting metadata for a predefined view
If required to modify a predefined view, without saving any changes to it on the server, the application may obtain a local copy of the view definition by calling the “GetViewMetaData” function:
| var viewMetaData = MyView.GetViewMetaData(); |
The view metadata can then be set back into the client view by calling the “SetViewMetaData” function:
| MyView.SetViewMetaData(viewMetaData); |
Using Views for Rendering
The C# Client Library allows to integrate the Voxel Farm platform into existing rendering environments.
The VoxelFarmView object in the library has the concept of a “focus” scope. Typically, a 3D application will have a camera, and the camera is expected to move often unpredictably and expose different regions of the 3D content. The “focus” point for a Voxel Farm View is defined as a region of space the application wants to see in higher detail. The VoxelFarmView object will load higher resolution data in the focus region, and it will lower the resolution of the data as it becomes more distant from the focus scope.
The VoxelFarmView also natively exploits the spatial and temporal coherence of the spatial models. The data used for a particular focus setting could be mostly reusable from the next focus point. The library makes sure only the portions that changed or were not in focus before will be requested from the server and loaded. The library also keeps an internal ephemeral cache that will remember some regions of space for a while, since very often users return to a previous vintage point.
To best exploit these advantages, the application must provide a special interface to the view. This interface will be called by the view to notify new content is ready for use. This is the “IVoxelFarmRenderer” interface. The application must supply its own implementation of the interface by calling the “SetRenderer” method:
| MyView.SetRenderer(myRenderer); |
Implementing IVoxelFarmRenderer
The “IVoxelFarmRenderer” is used by the application to receive notifications from the C# Client. This section describes the methods of this interface. For an example of a working IVoxelFarmRenderer implementation, look at the VoxelFarmUnityView class in the Unity example.
| void SetVoxelFarmOrigin(double x, double y, double z); |
The client notifies the application the origin of the project in Voxel Farm coordinates.
| IVoxelFarmCellResource BakeCellMesh(ushort clusterId, ulong cellId, byte layer, byte submesh, uint[] faces, float[] vertices, float[] normals, byte[] colors); |
The client requests the application to create a mesh resource for a given section of the scene. The clusterId, cellId, layer and submesh arguments identify the mesh section. The faces, vertices, normal and colors arrays contain the actual mesh information.
| IVoxelFarmCellResource BakeCellTexture(ushort clusterId, ulong cellId, byte layer, byte textureType, ushort textureSize, byte[] textureData, byte textureFormat); |
The client requests the application to create a texture resource for a given section of the scene. The clusterId, cellId, layer and textureType arguments identify the texture section. The textureSize argument specifies the dimensions of the texture in pixels. The textureData array contains the actual RGB information. The textureFormat argument specifies in which format the texture is stored.
| IVoxelFarmCellResource BakeCellPoints(ushort clusterId, ulong cellId, byte layer, float[] vertices, byte[] colors, double[,] aabb); |
The client requests the application to create a points resource for a given section of the scene. The clusterId, cellId and layer identify the point cloud section. The vertices and colors array contain the actual point information. The aabb argument represents a bounding box for the points section.
| void NotifyCellDestroyed(ulong cellId); |
The client notifies the application a given scene cell is no longer used and can be disposed from memory.
| void NewScene(Dictionary<ulong, bool[]> nextSceneData); |
The application is notified a new scene configuration has started.
| void SwapScene(Dictionary<ulong, bool[]> nextSceneData, VoxelFarmCellCache cellCache); |
The application is notified the new scene is complete and has replaced the previous scene configuration.
| void Clear(); |
The client asks the application to clear all resources.
| void Begin(); |
The application is notified new viewing conditions have started (usually as a result of setting new View Metadata)
Setting view focus
Once the view is configured for rendering, the client may start calling the “SetFocus” function. This would happen every time the user moves the viewing position. The “SetFocus()” function instructs the view object to produce a new representation of the data, where the provided coordinates appear in an adequate level of detail:
| MyView.SetFocus(x, y, z, 0.0, 0, 3); |
The first three parameters are the (x, y, z) coordinates of the focal point for the view. The fourth argument is the distance from the observer to this point, in this case the “0.0” makes the system assume the observer is right at the focal position.
All spatial units in this call are in Voxel Farm coordinates, to set the focus region using project coordinates, the caller must transform the coordinates first into Voxel Farm space by using the affine transform object that is already initialized in the view object. This transform is held in the “AffineTransform” property.
The fifth argument can be either zero or one, where a value of one increases the view resolution by a factor of 2. The last argument is the radius of the first level of detail.
Per-frame work
At each frame the, the application may call the “Update()” function to the view:
| MyView.Update(); |
By calling Update, the application asks the view to discover if a new scene configuration is necessary and whether new portions of the data need to be requested.
In most application frameworks, like Unity3D, Unreal Engine 4 and OpenGL, certain operation involving hardware resources must all execute in the same thread. This is usually the main application thread or a rendering thread.
For this reason, an application using the C# client will also be responsible for making calls to “VoxelFarmPool.RunNextMainThreadJob()” from a thread the application considers to be the one in charge of managing resources:
| VoxelFarmPool.RunNextMainThreadJob(); |
In a system that performs visualization, this function would typically be called every frame. The Voxel Farm client will attempt to minimize the time spent in these calls but since callbacks to the IVoxelFarmRenderer interface will be happen in this thread, it is up to the application to provide the best performance possible.
Example of IVoxelFarmRenderer
The following code listing shows a complete console application that uses the C# Client and defines the IVoxelFarmRenderer interface for callbacks:
using System;
using System.Collections.Generic;
using VoxelFarm;
namespace ConsoleApp1
{
    class MyDummyResource : VoxelFarm.IVoxelFarmCellResource
    {
        private string Name;
        private ulong CellId;
        public MyDummyResource(string name, ulong cellId)
        {
            Name = name;
            CellId = cellId;
        }
        public void Release()
        {
            Console.WriteLine("Released " + Name + " for " + CellId);
        }
    }
    class MyRenderer : VoxelFarm.IVoxelFarmRenderer
    {
        public IVoxelFarmCellResource BakeCellMesh(ushort clusterId, ulong cellId, byte layer, byte submesh, uint[] faces, float[] vertices, float[] normals, byte[] colors)
        {
            Console.WriteLine("Received mesh " + submesh + " for " + cellId);
            return new MyDummyResource("Mesh", cellId);
        }
        public IVoxelFarmCellResource BakeCellPoints(ushort clusterId, ulong cellId, byte layer, float[] vertices, byte[] colors, double[,] aabb)
        {
            Console.WriteLine("Received points for " + cellId);
            return new MyDummyResource("Points", cellId);
        }
        public IVoxelFarmCellResource BakeCellTexture(ushort clusterId, ulong cellId, byte layer, byte textureType, ushort textureSize, byte[] textureData, byte textureFormat)
        {
            Console.WriteLine("Received texture for " + cellId);
            return new MyDummyResource("Texture", cellId);
        }
        public void Begin()
        {
            Console.WriteLine("New view");
            if (OnNewView != null)
                OnNewView();
        }
        public void Clear()
        {
            Console.WriteLine("Scene cleared");
        }
        public void NewScene(Dictionary<ulong, bool[]> nextSceneData)
        {
            Console.WriteLine("New Scene " + nextSceneData.Count + " cells");
        }
        public void NotifyCellDestroyed(ulong cellId)
        {
            Console.WriteLine("Cell " + cellId + " deleted");
        }
        public void SetVoxelFarmOrigin(double x, double y, double z)
        {
            Console.WriteLine("Origin set to: " + x + ", " + y + ", " + z);
            OriginX = x;
            OriginY = y;
            OriginZ = z;
        }
        public void SwapScene(Dictionary<ulong, bool[]> nextSceneData, VoxelFarmCellCache cellCache)
        {
            Console.WriteLine("Scene completed");
            if (OnSceneCompleted != null)
                OnSceneCompleted();
        }
        public Action OnNewView = null;
        public Action OnSceneCompleted = null;
        public double OriginX = 0.0;
        public double OriginY = 0.0;
        public double OriginZ = 0.0;
    }
    class Program
    {
        static void Main(string[] args)
        {
            Random rnd = new Random();
            VoxelFarm.VoxelFarmWorkPool.Start(4);
            VoxelFarm.VoxelFarmView vf = new VoxelFarm.VoxelFarmView();
            MyRenderer myRenderer = new MyRenderer();
            myRenderer.OnNewView = () =>
            {
                // we will go to the origin
                vf.SetFocus(
                    myRenderer.OriginX,
                    myRenderer.OriginY,
                    myRenderer.OriginZ,
                    0.0, 0, 3);
            };
            myRenderer.OnSceneCompleted = () =>
            {
                // we will go to a new random location
                vf.SetFocus(
                    myRenderer.OriginX + 10000.0 * rnd.NextDouble(),
                    myRenderer.OriginY + 10000.0 * rnd.NextDouble(),
                    myRenderer.OriginZ + 10000.0 * rnd.NextDouble(),
                    0.0, 0, 3);
            };
            vf.SetRenderer(myRenderer);
            vf.SetServer("http://localhost", “localhost", 3333, false);
            vf.SetProjectId("sonomadb");
            vf.LoadProject((code) =>
            {
                if (code == System.Net.HttpStatusCode.OK)
                {
                    var views = vf.GetEntities(VoxelFarm.VoxelFarmEntityType.View);
                    if (views.Count > 0)
                    {
                        vf.SelectView(views[0]["ID"]);
                    }
                }
            });
            bool terminate = false;
            while (!terminate)
            {
                VoxelFarm.VoxelFarmWorkPool.RunNextMainThreadJob();
                vf.Update();
            }
        }
    }
}Using Views for Data Retrieval
The C# Client library allows a simpler interaction model for applications that just want to read spatial data from Voxel Farm servers. This is the case of a client-side report for instance, where multiple datasets can be requested and inspected by a client application, and then used to compute additional information.
Like it was the case with rendering a view, it is still necessary to set up the VoxelFarmView object with a server, a project, and the desired view configuration.
The VoxelFarmView instance provides callbacks that fire whenever information is received from the server. A client application that is interested in only receiving the data, can often do with just setting up some of these callbacks.
The data callback functions are:
|
OnViewStarted() |
Notifies that the view has started. This happens after the client establishes a successful connection to the server. |
|
OnReceiveVoxelData(VoxelData data) |
Notifies voxel data for a cell has arrived |
|
OnReceiveMeshData(MeshData data) |
Notifies mesh data for a cell has arrived |
|
OnReceiveTextureData(TextureData data) |
Notifies texture data for a cell has arrived |
|
OnReceivePointData(PointData data) |
Notifies point data for a cell has arrived |
|
OnCellComplete(ulong cell, VoxelFarmCellData data) |
Notifies all expected components for a cell have arrived |
VoxelData
This object contains voxel data for a cell. It has the following properties:
|
ulong cellId |
Unsigned 64bit identifier for the cell. |
|
byte layer |
Identifies the metadata component that originated this data in the view metadata |
|
float[] values |
Contains the requested voxel attribute values. For each attribute that was requested in the metadata, a section of VoxelFarmConstant.BLOCK_DIMENSION^3 floats appear in this array. For instance, the values for third attribute that was requested would appear at index (2 * BLOCK_DIMENSION * BLOCK_DIMENSION * BLOCK_DIMENSION) |
MeshData
This object contains voxel data for a cell. It has the following properties:
|
ulong cellId |
Unsigned 64bit identifier for the cell. |
|
byte layer |
Identifies the metadata component that originated this data in the view metadata |
|
byte submesh |
Identifies the section of the cell that is associated to the mesh. A single cell may contain up to 7 different meshes. The first mesh is the contents of the cell, the other six (one for each side of the cell) is a seam mesh that allows the cell mesh to connect to lower LOD neighboring cells. |
|
float[] vertices |
Contains the coordinates for the vertices. These coordinates are local to the cell origin, where (0,0,0) corresponds to the origin of the cell and (1,1,1) to the farthest corner from the origin. |
|
float[] normals |
Contains the surface normal vectors for each face-vertex combination |
|
float[] colors |
Contains an RGB color triplet for each vertex |
|
uint[] faces |
Contains triangle definitions for the mesh, each entry is a reference to a vertex in the vertices array. |
TextureData
This object contains texture data for a cell. It has the following properties:
|
ulong cellId |
Unsigned 64bit identifier for the cell. |
|
byte layer |
Identifies the metadata component that originated this data in the view metadata |
|
byte textureType |
Identifies the texture type. The following types are currently supported: 0 – Diffuse texture 1 – Normal map texture |
|
byte textureFormat |
Defines the texture format: 0 – DXT1 1 – DXT5 2 – JPG 3 – PNG 4 - RGBA |
|
ushort textureSize |
Contains the dimensions in pixels of the texture. Textures for cells are square. |
|
byte[] textureData |
Contains an RGBA values (8bits per channel) for the texture |
PointData
This object contains point cloud data for a cell. It has the following properties:
|
ulong cellId |
Unsigned 64bit identifier for the cell. |
|
byte layer |
Identifies the metadata component that originated this data in the view metadata |
|
float[] vertices |
Contains the coordinates for the points. These coordinates are local to the cell origin, where (0,0,0) corresponds to the origin of the cell and (1,1,1) to the farthest corner from the origin. |
|
float[] colors |
Contains an RGB color triplet for each point |
VoxelFarmCellData
This object contains all resources associated with a cell. Since a view may require multiple components to load for a single cell, this data structure will contain data results for each component in the view metadata. Individual component results can be found in the “layers” property of the object:
|
List<VoxelFarmCellDataLayer> Layers |
Contains a list of “VoxelFarmCellDataLayer” objects, one object per component in the view metadata. Depending on the component type, the object uses a more specialized class that derives from “VoxelFarmCellDataLayer”. These are:
|
Example - Mesh Export
The following C# program connects to a Voxel Farm server and exports the terrain surface within a 3D region as a mesh:
using System;
using System.Collections.Generic;
using System.IO;
using System.Linq;
using System.Net;
using System.Text;
using System.Threading;
using System.Threading.Tasks;
using VoxelFarm;


namespace ExportMesh
{
    class Program
    {
        private static void Terrain2MeshOBJ(
            string webServer,
            string contentServerAddr,
            int contentServerPort,
            string projectId,
            string entityId,
            Region25D region,
            int lod,
            string outputFile)
        {
            // Create output file
            System.IO.StreamWriter fileOutput = new StreamWriter(outputFile);

            // Local variables to track OBJ output
            bool done = false;
            int totalFaces = 0;
            int vertexIndexOffset = 1;

            // Start work pool
            VoxelFarmWorkPool.Start(2 * Environment.ProcessorCount);

            // Create view
            VoxelFarmView view = new VoxelFarmView();

            // Print view debug log
            view.OnDebugLog = (message) =>
            {
                //Console.WriteLine(message);
            };

            // Also print any uncaught error
            VoxelFarmWorkPool.OnError = (Exception error) =>
            {
                Console.WriteLine(error.Message + " " + error.StackTrace);
                done = true;
            };

            // Set OnViewStarted event
            view.OnViewStarted = () =>
            {
                try
                {
                    // Use the supplied region to create a set of ranges of 10x10x10 cells
                    var ranges = region.breakdownRegion(lod, 10, view.AffineTransform);


                    // Iterate over each range of cells
                    int totalRanges = ranges.Count;
                    int completedRanges = 0;
                    foreach (var range in ranges)
                    {
                        // Output progress message
                        int progress = (100 * completedRanges++) / totalRanges;
                        string message = (totalFaces > 0) ? String.Format("{0:0,0} triangles exported...", totalFaces) : "Scanning for triangles...";
                        Console.WriteLine(progress + "% " + message);

                        // Ask the view to load the cell range
                        view.SetCellRange(range);

                        // Wait until the view completes processing the range
                        view.Join();

                        // Check that we still have a connection to the server
                        if (view.ConnectionLost() || !view.IsConnected())
                        {
                            Console.WriteLine("Lost connection to content server.");
                            done = true;
                        }
                    }
                    done = true;
                }
                catch (Exception error)
                {
                    Console.WriteLine(error.Message + " " + error.StackTrace);
                    done = true;
                }
            };


            // Define a callaback to handle mesh data
            view.OnReceiveMeshData = (data) =>
            {
                ManualResetEvent outputDone = new ManualResetEvent(false);
                VoxelFarmWorkPool.RunInMainThread(() => {

                    int level, xc, yc, zc;
                    VoxelFarmCell.Unpack(data.cellId, out level, out xc, out yc, out zc);
                    double scale = VoxelFarmConstant.CELL_SIZE * (1 << level);
                    double cellOffsetX = scale * xc;
                    double cellOffsetY = scale * yc;
                    double cellOffsetZ = scale * zc;

                    int vertCount = data.vertices.Length / 3;
                    int faceCount = data.faces.Length / 3;

                    for (int i = 0; i < vertCount; i++)
                    {
                        var wc = view.AffineTransform.VF_TO_WC(
                            new VoxelFarmAffineTransform.sAffineVector
                            {
                                X = data.vertices[3 * i + 0] * scale + cellOffsetX,
                                Y = data.vertices[3 * i + 1] * scale + cellOffsetY,
                                Z = data.vertices[3 * i + 2] * scale + cellOffsetZ
                            });

                        fileOutput.WriteLine("v " + (-wc.X) + " " + wc.Z + " " + wc.Y);
                    }

                    for (int i = 0; i < faceCount; i++)
                    {
                        fileOutput.WriteLine("f " +
                            (data.faces[3 * i + 0] + vertexIndexOffset) + " " +
                            (data.faces[3 * i + 1] + vertexIndexOffset) + " " +
                            (data.faces[3 * i + 2] + vertexIndexOffset));
                    }

                    vertexIndexOffset += vertCount;
                    totalFaces += faceCount;

                    outputDone.Set();
                });
                outputDone.WaitOne();
            };


            // Set server and project

            view.SetServer(webServer, contentServerAddr, contentServerPort, false);
            view.SetProjectId(projectId);

            // Load the project
            view.LoadProject((HttpStatusCode httpcode) =>
            {
                if (httpcode == HttpStatusCode.OK)
                {
                    // Find entity
                    var terrainEntity = view.GetEntity(entityId);
                    if (terrainEntity == null || terrainEntity["file_type"] != VoxelFarmEntityType.VoxelTerrain)
                    {
                        done = true;
                        return;
                    }

                    // Create view metadata
                    var components = new List<VoxelFarmMetaComponent>();
                    var componentMasks = new List<ushort>();
                    List<VoxelFarmMetaLayer> layerStack = new List<VoxelFarmMetaLayer>();
                    layerStack.Add(new VoxelFarmMetaLayerHM { Id = entityId, Config = terrainEntity["runtime"] });
                    var layers = new VoxelFarmMetaLayerStack(layerStack);
                    var surface = new VoxelFarmMetaSurfaceOperation { OpId = VoxelFarmMetaID.META_OP_NONE, OpA = layers };
                    components.Add(surface);
                    componentMasks.Add(0x02);
                    var componentMaterials = new List<ushort>();
                    componentMaterials.Add(0xFFFF);
                    var metadata = new VoxelFarmViewMeta(components, componentMasks, componentMaterials, null);

                    // Set view metadata, this will start the connection to the streaming server
                    view.SetViewMetaData(metadata);
                }
                else
                {
                    done = true;
                }
            });

            while (!done)
            {
                VoxelFarmWorkPool.RunNextMainThreadJob();
            }

            fileOutput.Close();
            VoxelFarmWorkPool.Stop();
            Console.WriteLine("Export complete.");
        }

        static void Main(string[] args)
        {
            if (args.Length != 8)
            {
                Console.WriteLine("Usage ExportMesh.exe <REST URL> <Streaming Server> <Streaming Port> <Project Id> <Entity Id> <Region> <LOD> <Output File>");
                return;
            }

            try
            {
                Region25D region = new Region25D();
                region.loadFromString(args[5]);
                Terrain2MeshOBJ(args[0], args[1], Convert.ToInt32(args[2]), args[3], args[4], region, Convert.ToInt32(args[6]), args[7]);
            }
            catch (Exception error)
            {
                Console.WriteLine(error.Message + " " + error.StackTrace);
            }
        }
    }
}
The following command line tests this program over the Sta. Barbara Island dataset, requesting a mesh export for the full island at LOD 5 resolution:
ExportMesh.exe http://18.236.158.139 18.236.158.139 3333 blank 390CC9D2B934446DAEE5EFE9F7D64C4F 1,1.0000000000002274,300,-13253468.999999998,3937303,-13248860.999999998,3937303,-13248860.999999998,3932695,-13253468.999999998,3932695 5 f:\scrap\m1.obj
Note that this program requires the “vfcompression.dll” to be in the same folder as the .EXE, or be in one of the folders specified in the system PATH variable.
The program produces the following output to the console window:
0% Scanning for triangles...
4% 20,378 triangles exported...
8% 59,296 triangles exported...
12% 120,883 triangles exported...
16% 174,325 triangles exported...
20% 198,326 triangles exported...
24% 231,524 triangles exported...
28% 304,836 triangles exported...
32% 367,609 triangles exported...
36% 410,992 triangles exported...
40% 423,511 triangles exported...
44% 448,613 triangles exported...
48% 522,385 triangles exported...
52% 548,733 triangles exported...
56% 592,684 triangles exported...
60% 597,296 triangles exported...
64% 631,860 triangles exported...
68% 694,986 triangles exported...
72% 759,434 triangles exported...
76% 780,406 triangles exported...
80% 781,337 triangles exported...
84% 806,390 triangles exported...
88% 848,185 triangles exported...
92% 869,169 triangles exported...
96% 875,037 triangles exported...
Export complete.
The exported OBJ mesh looks like this:
Unity3D Client
Introduction
The Voxel Farm SDK contains a packaged Unity3D plugin you may add to any existing or new Unity3D project.
The SDK also contains a working Unity3D example that uses this plugin.
Unity3D Example
The Unity3D example is located in the “<SDKRoot>\Client.Unity\Example” folder. Use that folder to load the project inside the Unity3D editor:
Once the project loads, make sure the scene “SampleScene” is the active scene in the editor.
The “New Voxel Farm View” object in the scene will attempt to automatically connect to the specified server.
Using the Unity3D Plugin
To add the Voxel Farm Unity3D plugin to a new project, select “Assets > Import Package > Import Custom Package…” from the Unity3D editor menu. In the file selection dialog that appears, browser to the “<SDKRoot>\Client.Unity\Plugin” folder and select the file “VoxelFarmClient.unitypackage”.
Make sure all items are checked in the import package dialog that appears next and select “Import”:
When the package import operation completes, you should see a folder named “Voxel Farm Cloud” in the project’s Assets folder:
Next, you must create a VoxelFarmRuntime object. This object configures how many background threads will be used in the project. To create this object, right-click somewhere inside your project’s Assets folder and select “Create > Voxel Farm Runtime” from the right click menu:
Select the newly created Voxel Farm Runtime object and set the desired number of background threads in the object’s property inspector.
Next, right click on the Hierarchy panel to create a new scene object. From the right click menu select “Voxel Farm > View”. This will add a node labelled “New Voxel Farm View” to the scene hierarchy. Select this object and make sure its properties are visible in the object Inspector interface.
Assign the new Voxel Farm Runtime object to the “Voxel Farm Runtime” property in the view object.
Before the view can work, its connection to the server must be configured. Enter the proper settings for the Server URL and streaming port. If the server uses encryption for streaming, make sure “Streaming SSL” is checked.
At this point you should also supply the ID of one of the projects in the server. Once these settings are entered, click on “Load Project” from the inspector‘s UI. This will load the available pre-defined views in the project. Select the view you want to start with from the “Selected View” dropdown:
Making the view selection will cause the client to connect to the server and to request a full scene for the view. Look into the “Stats” section for the view object to verify the server is actually sending information.
After the view loads, you can move the camera at will within the scene. The Voxel Farm content will adapt its resolution based on the position of the editor’s camera.
Also consider adjusting the main light and ambient light intensity if the scene appears over-exposed at the start.
If you click “Play” in this state, you will realize the contents of the view will not appear. This is because there is no camera or other point of view associated to the Voxel Farm view object.
The Voxel Farm Unity3D client includes a special camera controller that is designed for browsing large spans of detailed content. To add this component, select a standard Unity3D camera (like the default Main Camera in the scene) and click on “Add Component” in its inspector panel. Search for “Voxel Farm” among the available components and select “Voxel Farm Unity Camera Controller”:
Once the component is created, make sure its “Voxel Farm View” property links to the “New Voxel Farm View” object in the scene. If you press “Play” now in Unity3D, the contents of the Voxel Farm view will appear. Again, keep an eye on the Stats sections to make sure there is an actual communication with the servers:
Voxel Farm content showing in Play Mode
The last step is optional and is about setting up a basic UI for your scene while it is in play mode. The Voxel Farm plugin includes a basic UI overlay can be is very useful in the early stages of the application’s development. To add this UI, right click on the Scene Hierarchy panel and select “Voxel Farm > Basic View UI”.
This will add a new object to the scene named “New Voxel Farm UI”. Select the object and make sure its “View” property points to the “New Voxel Farm View” object in the scene. You also configure UI settings like logos, icons and fonts. If you do not configure any of these, you will see the default UI when you enter Play mode:
Material Tracking API
Introduction
The platform features a component for material tracking. This is a voxel layer that can be used to track the location of material in space across time.
It is possible to interact with the Material Tracking Layer in two main general ways:
- Submit new facts about material changes (write data)
- Query information about material changes (read data)
Where “material change” is defined as:
- A change in the attribute values of a tracked volume of material, or
- a change in the location of a tracked volume of material
Like with other types of spatial data, the system uses a different pathway for writing versus reading. Data is ingested by processor services. This process is controlled by the REST API. It involves sending a POST request with a CSV file that contains the tracking operations the system needs to ingest. The API provides a callback mechanism to get notifications when ingestion completes. The REST API also provides the means to notify the tracking system about the beginning and completion of simulations.
Reading data out of the system, on the other hand, is performed by streaming services. The data could be used for visualizations or reporting/analysis and can be accessed from the C# client API. The REST API also allows accessing material tracking data from 1D constructs such as crushers and trucks.
Writing Material Changes
This section describes the API used to submit material changes to the tracking layer.
In general, the API will use a POST REST call that involves:
- An event type, which can be UPDATE, SIM_START or SIM_END
- An entity Id to identify which material tracking layer will be used
- An HTTP callback address that will be used to notify all changes have been committed
- A CSV file that contains a list of material operations to be performed. This file is called a “Material Operation Table” for the remainder of this document.
These REST calls only trigger the processing of material changes, which occurs asynchronously. The REST calls return immediately, with an indication of whether the request was accepted or not. The REST call includes a callback that will be used to notify the caller after the changes were actually written into the material tracking layer.
The write REST API is used in two main scenarios:
- Committing a new list of material operations
- Synchronizing simulations and committing their results
The following sequence diagram shows scenario (1):
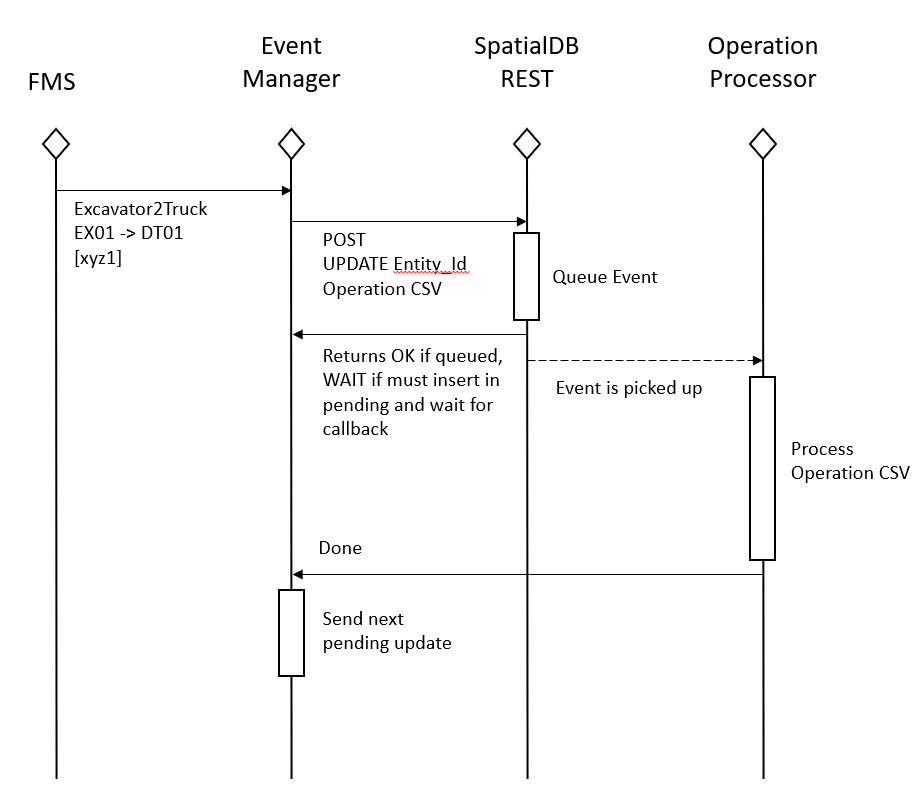
The agents at play here are:
- FMS – The source of raw fleet events, and similar raw event sources
- Event Manager – This entity transforms raw events into Material Tracking events, which translate directly to calls to the material tracking REST API (SpatialDB REST in the diagram)
- SpatialDB REST – This is the front-end to the write API
- Operation Processor – This is a service that asynchronously processes material changes
The scenario shows the outcome of a single fleet event, which describes an excavator loading a bucket of material into a truck. The Event Manager uses the location of the bucket to compile a list of material changes that were produced by this event into a CSV file, where each row describes one material change operation. The Event Manager then issues a POST request to the SpatialDB REST endpoint, using the UPDATE event, asking to update the material model following the changes described in the attached CSV operation table. If the tracking system is in a determined state, meaning there are no simulations pending, a message to process and commit the operation table is lodged in the SpatialDB internal processing queue. This event is eventually picked up by the material tracking processor, which executes the requested changes. When the changes are committed, the processor services issues a callback.
If there was a pending simulation (not shown in the diagram), the SpatialDB REST would have returned a special code that signals the Event Manager must put this request in a local queue. Then, upon receiving the callback, the Event Manager can get the next pending request from the local queue and issue the REST request again.
The second main usage scenario for the REST API is to perform simulations. Unlike updates to the material tracking, simulations are performed by agents foreign to the material tracking layer. The API includes a protocol to synchronize the external simulations with the material tracking processor.
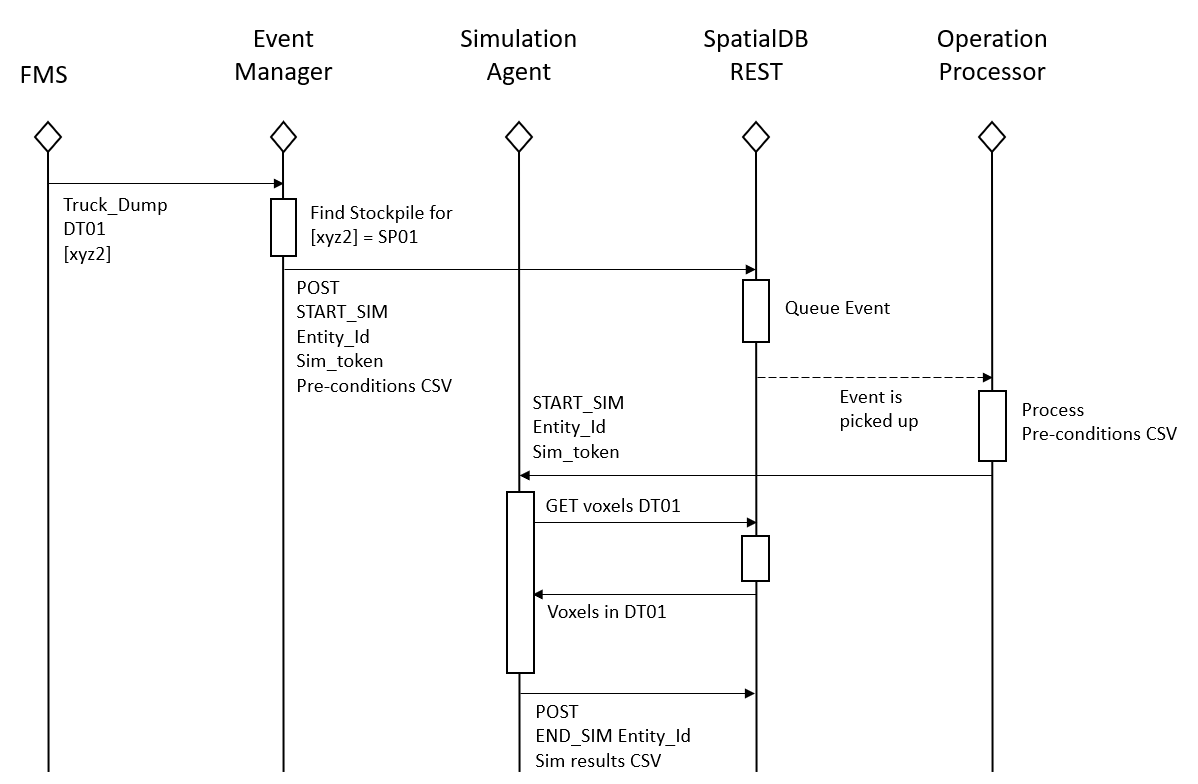
The agents involved in the simulation scenario are the same as in the previous sequence graph, with one addition:
- Simulation Agent – An external service that can compute material changes asynchronously and submit them to the system
The scenario starts when the Event Manager receives an event from Fleet Management about a truck dumping material. Using the location of the truck, and the registered stockpile polygons, the Event Manager finds a Stockpile simulation agent that is associated with the region.
The Event Manager then makes a POST to the SpatialDB REST interface containing the START_SIM event. The POST payload includes a CSV file that specifies a Material Operation Table. The operations in this table are considered pre-requisites for the simulation to start.
The START_SIM request is then handled by the SpatialDB REST interface. If the system is not performing any simulation for the provided Material Tracking Layer, the processing of the precondition operations is queued. When submitting the job, the Event Manager can specify a callback that will be received by the Simulation Agent. Once the system completes committing the precondition operations, the callback is triggered. At this point, the Simulation Agent knows the system meets the preconditions and can start the simulation process.
The callback contains a token that allows identifying the event that originated the simulation, which the Simulation Agent can use to retrieve additional information for the event. For instance, using a truck’s singularity ID to load the voxel contents of the truck.
When the simulation completes, the Simulation Agent sends another POST request to the SpatialDB. This time, it uses the END_SIM event, and the post contains a CSV file with a Material Operation Table for the results of the simulation.
If the END_SIM event is never received within an application-defined timeout, the system assumes the simulation produced no results.
Retrieving Material Changes
The REST interface allows to retrieve voxel sagas. The interface returns sagas in singularities and in space.
Method
GET
URL
<server>/entity.ashx
Parameters
To retrieve the contents of a singularity, use the following parameters:
|
project |
Must be set to the ID for the project that contains the material tracking layer |
|
org |
Must be set to “2343243456678890” |
|
layer |
Contains the ID for the Material Tracking Layer that will be queried |
|
singularity |
Contains the ID if the singularity that will be queried |
|
result_begin |
Contains the initial timestamp to be included in the query results |
|
result_end |
Contains the final timestamp to be included in the query results |
To retrieve the material tracking data for a region of space, use the following parameters:
|
project |
Must be set to the ID for the project that contains the material tracking layer |
|
org |
Must be set to “2343243456678890” |
|
layer |
Contains the ID for the Material Tracking Layer that will be queried |
|
aabb |
Contains an axis-aligned bounding box, in project coordinates, for the region of space that will be queried. The bounding box is comprised of six numbers, separated by commas. The first three numbers are the X,Y,Z coordinates of the lower corner of the bounding box. The next three numbers are the X,Y,Z coordinates of the upper corner. |
|
result_begin |
Contains the initial timestamp to be included in the query results |
|
result_end |
Contains the final timestamp to be included in the query results |
|
search_begin |
Contains the initial timestamp for the time search range |
|
search_end |
Contains the final timestamp for the time search range |
Returns
This call returns a JSON file. The file defines a dictionary where the entity’s properties appear as key-value pairs.
The REST call will return a JSON file that contains an array of operations. Each entry in this array is a JSON object with the following properties:
|
operation |
Will be one of the seven available operation types:
|
|
id |
Unique identifier for material volume |
|
from_t |
Origin time for the operation |
|
from_x |
Origin coordinate X for the operation |
|
from_y |
Origin coordinate Y for the operation |
|
from_z |
Origin coordinate Z for the operation |
|
from_id |
Origin singularity ID for the operation |
|
to_t |
Final time for the operation |
|
to_x |
Final coordinate X for the operation |
|
to_y |
Final coordinate Y for the operation |
|
to_z |
Final coordinate Z for the operation |
|
to_id |
Final singularity ID for the operation |
In addition to these fields, the JSON object will include the attribute values for the voxel.
Making sense of "search_begin/search_end" and "result_begin/result_end"
When retrieving voxel sagas from a singularities or regions of space, the API requires two time ranges as input. The result_begin and result_end parameters filter out events from the sagas that are outside this time window. This allows to reduce the amount of information returned by the API call.
The search_begin and search_end parameters are used to determine the region of time that will be searched. For instance, imagine there is a truck singularity in the system and we would like to know the last month of material history for the material the truck carried yesterday. In this case, the search region will be limited to yesterday but the results region would include the entire previous month.
Example
| http://localhost/entity.ashx?org=2343243456678890&project=A14B73E10AD04796A64490AA1056B16A&layer=BC2C849D0A4A44CE9D40714BED2E9143&singularity=86E634C260E74E888C542CC2C87BBE02&result_begin=200&result_end=300 |
Updating a resource model
The material tracking layer entity is initialized in the same fashion as other processed entities in the platform. These steps are described in this topic in a general way:
It is also possible to update an existing material tracking layer with a new version of a resource model. This requires the following additional steps:
- Set the "state" property of the Material Tracking entity to "PARTIAL"
- Set the "update_resource_models" property to a comma-separated list of IDs. Each ID in this list corresponds to a Block Model entity
- Set the "update_resource_model_timestamps" property to a comma-separated list of timestamp values. There must be one value for each resource model listed in the "update_resource_models" property. The update operations will be logged using the corresponding timestamps.
Material Tracking Queries
The Material Tracking information can be retrieved from the system using the C# client library.
The information stored by the Material Tracking Layer can be used equally to produce visualizations and to compute reports. In both cases, the functioning principle is the same: the Material Tracking Layer receives a query that selects individual voxels based on whether they meet the query criteria or not. The queries can be complex Boolean expressions that involve both attributes and genealogy operators.
The voxels that are selected can then be combined with other volumes, like terrain models, planning solids using further volumetric Boolean operations. These can be visualized, or have their volume and attributes used in reports.
A Material Tracking Query is a string that contains a symbolic expression. This expression produces a Boolean result, and it is evaluated for every voxel in a visualization or report region. If the expression returns TRUE the voxel is selected. Selected voxels will participate in visualizations, and will have non-zero volume when inspected by reports.
The query language supports the following operators:
|
val(attr) |
Represents the value of the provided attribute. For instance: “val(fe) > 50” Would return TRUE for voxels with attribute “fe” value greater than 50. |
|
from_region(R, t0, t1, t2, t3) |
Returns TRUE if the material present in the voxel at the t2..t3 timespan was contained within spatial region R during the t0..t1 timespan. The region R is a symbol that must be defined to the query evaluation before using this query. |
|
to_region(R, t0, t1, t2, t3) |
Returns TRUE if the material present in the voxel at the t2..t3 timespan was moved to spatial region R during the t0..t1 timespan. The region R is a symbol that must be defined to the query evaluation before using this query. |
|
from_singularity(S, t0, t1, t2, t3) |
Returns TRUE if the material present in the voxel at the t2..t3 timespan was contained by the singularity S during the t0..t1 timespan. For instance: “from_singularity(Truck01, 0, 200, 200, now)” Will return TRUE if the current contents of the voxel were transported by the truck with ID “Truck01” before timestamp 200. |
|
to_singularity(S, t0, t1, t2, t3) |
Returns TRUE if the material present in the voxel at the t2..t3 timespan was moved into the singularity S during the t0..t1 timespan. For instance: “from_singularity(Crusher01, 0, now, yesterday, yesterday)” Will return TRUE if the contents of the voxel went today into the crusher with ID “Crusher01”. |
|
contains(R) |
Returns TRUE if the voxel is contained within spatial region R. The region R is a symbol that must be defined to the query evaluatior before using this query. |
|
timespan(t0, t1) |
Returns TRUE if the voxel has information defined for the provided timespan t0..t1. For instance: “val(fe) > 50 & timespan(300, 500)” Returns TRUE if the value for iron is greater than 50 between timestamps 300 and 500. |
|
set(attr, value) |
Returns TRUE if the value of an attribute of type SET matches the value specified as second parameter. |
|
> |
Greater than |
|
>= |
Greater or equal than |
|
< |
Less than |
|
<= |
Less or equal than |
|
= |
Equal |
|
!= |
Not equal |
|
( ) |
The query language supports parenthesis for expression grouping. We recommend using parenthesis whenever the operation order would be subject to operator precedence rules. The operator precedence order is:
|
The C# client uses an interaction model where different data layers are stacked together in a single request to a content service. It is possible to include a Material Tracking Layer in this stack, which makes the system return information about the tracked materials.
For the Material Tracking Layer metadata in the layer stack, the caller can define:
- A query that determines which voxels will be selected
- A list of attributes that will be retrieved per voxel
The request metadata can be extended to include spatial intersections between multiple datasets. For instance, the voxels output by the Material Tracking Layer can be intersected with a custom volumetric solid that represents a bench, or a terrain model using several dates.
Material Operation Tables
A Material Operation Table is a CSV file, where each row contains a material tracking operation.
The first line of the file must contain comma-separated header identifiers. The system will look for the following reserved headers (case sensitive):
|
TIME |
Represents the timestamp for the operation. Contains a positive integer value that must fit in 64bits. |
|
OP |
It contains the operation type for the row. The possible operations are:
The operations will be discussed in more detail below. |
|
FROM_X |
Contains the X coordinate, in Project coordinates, of the source voxel |
|
FROM_Y |
Contains the Y coordinate, in Project coordinates, of the source voxel |
|
FROM_Z |
Contains the Z coordinate, in Project coordinates, of the source voxel |
|
FROM_TIME |
A timestamp used by some singularity operations (jump and reload) to unambiguously refer to a tracked portion of material in space-time. |
|
FROM_ID |
Contains the identifier of the singularity from which the material has reappeared |
|
TO_X |
X coordinate, in Project coordinates, of the destination voxel |
|
TO_Y |
Y coordinate, in Project coordinates, of the destination voxel |
|
TO_Z |
Z coordinate, in Project coordinates, of the destination voxel |
|
TO_ID |
Contains the identifier of the singularity where the material disappeared. |
The following table lists the available operations and their effects:
|
load |
The load operation starts tracking a volume of material at the specified location/time. The operation also assigns values to attributes within the volume. Parameters: TIME, TO_X, TO_Y, TO_Z [, attributes] |
|
unload |
The unload operation tells the system a volume of material has disappeared from the spatial domain and it has entered a singularity, for instance a truck or a crusher. The operation moves from a voxel address to an opaque singularity ID. Parameters: TIME, FROM_X, FROM_Y, FROM_Z, TO_ID |
|
reload |
The reload operation tells the system a volume of material has reappeared into the spatial domain from a singularity. For instance, material can temporarily disappear into a truck and emerge later from the truck at the dump location. Parameters: TIME, FROM_X, FROM_Y, FROM_Z, FROM_TIME, FROM_ID, TO_X, TO_Y, TO_Z |
|
update |
The update operation writes new values into attributes for the tracked material, but does not change the identity of the tracked material. This operation is used to model a situation where the contents of a tracked volume of material have changed. Parameters: TIME, FROM_X, FROM_Y, FROM_Z [, attributes] |
|
move |
The move operation removes a tracked volume of material from one location and places it into a different location. Parameters: TIME, FROM_X, FROM_Y, FROM_Z, TO_X, TO_Y, TO_Z |
|
expand |
The expand operation branches the current volume of tracked material into a new location of space, and starts a new genealogy branch there. The original material ID is preserved, however, allowing to track expanded material back to its origin. Parameters: TIME, FROM_X, FROM_Y, FROM_Z, TO_X, TO_Y, TO_Z |
|
jump |
Moves material from one singularity to another. Parameters: TIME, FROM_X, FROM_Y, FROM_Z, FROM_TIME, FROM_ID, TO_ID |
In addition to these special columns, the CSV may contain custom columns, one for each attribute that is tracked.
The system supports two types of columns: numerical and string. The type of a column will be inferred from the column's identifier. To specify a column that contains string values, the "$" character must appear at the beginning of the column's name.
The following image shows an example of a Material Operation Table:
|
TIME |
OP |
FROM_X |
FROM_Y |
FROM_Z |
TO_X |
TO_Y |
TO_Z |
TO_ID |
fe |
|
0 |
load |
|
|
|
0 |
0 |
0 |
|
10 |
|
0 |
load |
|
|
|
0 |
0 |
1 |
|
20 |
|
0 |
load |
|
|
|
0 |
0 |
2 |
|
5 |
|
0 |
load |
|
|
|
0 |
0 |
3 |
|
30 |
|
100 |
unload |
0 |
0 |
0 |
|
|
|
DT01 |
|
|
100 |
unload |
0 |
0 |
1 |
|
|
|
DT01 |
|
|
100 |
unload |
0 |
0 |
2 |
|
|
|
DT01 |
|
|
100 |
unload |
0 |
0 |
3 |
|
|
|
DT01 |
|
This table models an excavator-to-truck load event.
The first four entries perform load operations over four different voxels (vertically stacked along Z) and assign different iron grades to them. In this example, their timestamp is zero, reflecting the fact the model considers the resource model to be there from the beginning of time.
The next four entries are about the actual excavator operation, which occurred at timestamp 100. Here, the four stacked voxels are unloaded from the tracking system and sent to a singularity, a truck with unique ID “DT01”.
Singularities represent entities in the system where material can disappear, and from where material could later reappear. Unlike voxels in the material tracking layer, singularities do not have a spatial address, rather an application-assigned ID that is opaque to the material tracking system.
Since they could have zero volume, but may have received vast amounts of material (e.g. a crusher), singularities cannot be stored spatially. They require traditional sequential storage, for instance, a table in a relational database.
The spatial and relational aspects of the material tracking are deeply intertwined. The material tracking system must be equally aware of these non-spatial constructs, since queries will ultimately involve spatial and relational elements at the same time, allowing to reconcile spatial facts to relational facts.
Singularities also provide means for simulations to access information about their preconditions. For instance, when simulating a dump truck event, the simulation agent only needs to know the singularity ID for the truck and the timestamp at which the dump occurred. From this, it can obtain the voxel contents of the truck from the singularity.
The following Material Operation Table shows the results of simulating a dump event on a stockpile, based on the previous table:
|
TIME |
OP |
FROM_X |
FROM_Y |
FROM_Z |
FROM_ID |
TO_X |
TO_Y |
TO_Z |
fe |
|
200 |
reload |
0 |
0 |
0 |
DT01 |
10 |
10 |
0 |
|
|
200 |
reload |
0 |
0 |
1 |
DT01 |
10 |
10 |
1 |
|
|
200 |
reload |
0 |
0 |
2 |
DT01 |
10 |
10 |
2 |
|
|
200 |
reload |
0 |
0 |
3 |
DT01 |
10 |
10 |
3 |
|
|
200 |
update |
10 |
10 |
0 |
|
|
|
|
16.25 |
|
200 |
update |
10 |
10 |
1 |
|
|
|
|
16.25 |
|
200 |
update |
10 |
10 |
2 |
|
|
|
|
16.25 |
|
200 |
update |
10 |
10 |
3 |
|
|
|
|
16.25 |
The first four entries declare the material that went into truck DT01 is now back at the site, but at a different location.
The next four entries set new attribute values. This could be to model a change of grade in the tracked material due to transportation, mixing at the time it was dumped, and other simulated factors.
It is equally possible to model the same process described by the two tables above without using a singularity. The following Material Operation Table shows this approach:
|
TIME |
OP |
FROM_X |
FROM_Y |
FROM_Z |
TO_X |
TO_Y |
TO_Z |
fe |
|
0 |
load |
|
|
|
0 |
0 |
0 |
10 |
|
0 |
load |
|
|
|
0 |
0 |
1 |
20 |
|
0 |
load |
|
|
|
0 |
0 |
2 |
5 |
|
0 |
load |
|
|
|
0 |
0 |
3 |
30 |
|
200 |
move |
0 |
0 |
0 |
10 |
10 |
0 |
|
|
200 |
move |
0 |
0 |
1 |
10 |
10 |
1 |
|
|
200 |
move |
0 |
0 |
2 |
10 |
10 |
2 |
|
|
200 |
move |
0 |
0 |
3 |
10 |
10 |
3 |
|
|
200 |
update |
10 |
10 |
0 |
|
|
|
16.25 |
|
200 |
update |
10 |
10 |
1 |
|
|
|
16.25 |
|
200 |
update |
10 |
10 |
2 |
|
|
|
16.25 |
|
200 |
update |
10 |
10 |
3 |
|
|
|
16.25 |
While the outcome is the same, and voxel ledgers are much shorter, this approach does not allow to properly answer where the material was in the time span from 100 to 200, as it still thinks the material has not moved from the original location in the resource model until timestamp 200, where we learn the material has appeared at the bottom of a stockpile. Equally, the system will not be able to answer any queries that involve trucks, for instance, visualizing the origin of the material currently carried by a truck.
Updates and Simulations
The Material Tracking Layer builds entropy as it operates, following the direction of time. That is, the outcome of a particular event may depend on events that happened before. For this reason, out of order events are not permitted and any conflicting spatial-temporal information will be discarded by the layer. It is up to the sender to guarantee events in the past are not submitted after future events.
Assuming the updates are submitted in proper sequence, the caller can issue multiple requests without waiting for any callbacks. In some other cases, however, there may be temporal dependencies that are not resolved yet. In these cases, the caller will be instructed by the API to wait, as the input data for the next stage is still not completely known to the system yet.
This case is caused by simulations. A simulation agent is an external system that uses a particular subset of REST calls, which tell the system a simulation must start or has ended, and what was the outcome of the simulation in terms of material changes. The system must be aware of simulations because when the system is under simulation, any new material operations should be deferred until the simulation is over. The outcome of these operations may depend on the results produced by the simulation.
For instance, consider this scenario:
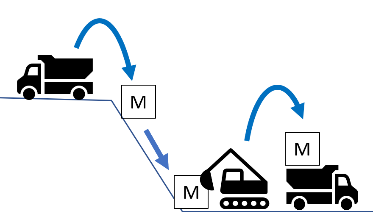
- A dump event containing material M occurs at simulation time sim_t = 0, system time sys_t = 0
- A simulation agent computes the new location of material M from system time sys_t = 0 to sys_t = 200
- An excavator load event occurs at simulation time sim_t = 100, system time sys_t = 100
The outcome of step (3) depends on the outcome of the preceding step, which is a simulation that is performed by a third-party agent. In this example, the simulation took longer to compute than the physical process to happen, so the excavator load event arrived at the system before there is knowledge of what the excavator could be picking up.
These dependencies are compounded when there are multiple simulation steps chained together. For this reason, the API uses an interaction model that guarantees simulation steps are performed only after their preconditions have been committed to the material tracking layer.
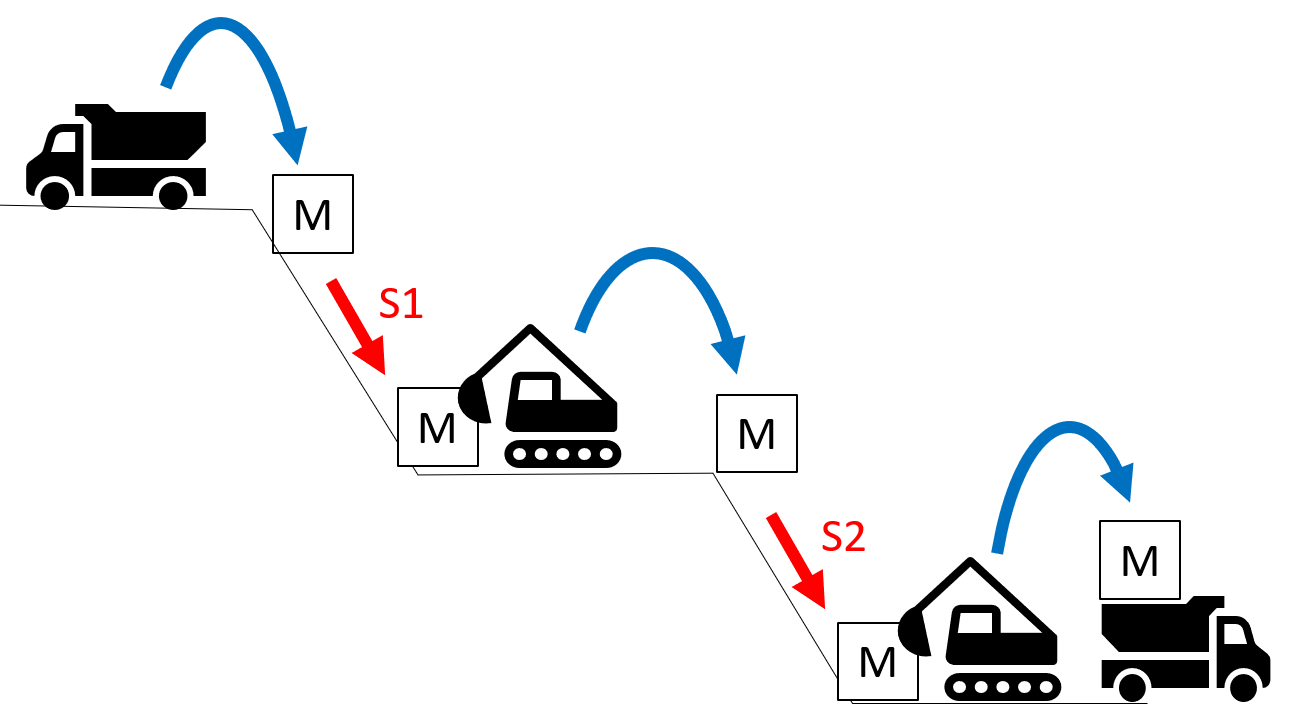
In some cases, when submitting a new batch of material tracking operations, the API may instruct the caller to wait for a callback to submit the batch.
The image at the left shows two simulation steps S1 and S2, where S2 depends on S1. If the event that triggers S2 is received before S1 completes, the system will return WAIT on any attempt to queue the S2 simulation and the caller will be notified when S1 is complete via a callback.